k8s学习之路 | Day20 k8s 工作负载 Deployment(下)

文章目录
3. HPA 动态扩缩容
3.1 HPA
Horizontal Pod Autoscaler 可以根据 CPU 利用率自动扩缩 ReplicationController、 Deployment、ReplicaSet 或 StatefulSet 中的 Pod 数量

HorizontalPodAutoscaler(简称 HPA ) 自动更新工作负载资源(例如 Deployment 或者 StatefulSet), 目的是自动扩缩工作负载以满足需求。
水平扩缩意味着对增加的负载的响应是部署更多的 Pod。 这与 “垂直(Vertical)” 扩缩不同,对于 Kubernetes, 垂直扩缩意味着将更多资源(例如:内存或 CPU)分配给已经为工作负载运行的 Pod。
如果负载减少,并且 Pod 的数量高于配置的最小值, HorizontalPodAutoscaler 会指示工作负载资源(Deployment、StatefulSet 或其他类似资源)缩减。
3.2 安装 metrics-server
有关 metrics-server 地址:https://github.com/kubernetes-sigs/metrics-server#readme
Metrics Server是 k8s 内置自动缩放管道的可扩展、高效的容器资源度量源。
Metrics Server 从 Kubelets 收集资源度量,并通过Metrics API在Kubernetes apiserver中公开这些度量,供Horizontal Pod Autoscaler和Vertical Pod Autocaler使用。kubectl top还可以访问Metrics API,从而更容易调试自动缩放管道。
准备 yaml 文件
## metrics-server.yaml
apiVersion: v1
kind: ServiceAccount
metadata:labels:k8s-app: metrics-servername: metrics-servernamespace: kube-system
---
apiVersion: rbac.authorization.k8s.io/v1
kind: ClusterRole
metadata:labels:k8s-app: metrics-serverrbac.authorization.k8s.io/aggregate-to-admin: "true"rbac.authorization.k8s.io/aggregate-to-edit: "true"rbac.authorization.k8s.io/aggregate-to-view: "true"name: system:aggregated-metrics-reader
rules:
- apiGroups:- metrics.k8s.ioresources:- pods- nodesverbs:- get- list- watch
---
apiVersion: rbac.authorization.k8s.io/v1
kind: ClusterRole
metadata:labels:k8s-app: metrics-servername: system:metrics-server
rules:
- apiGroups:- ""resources:- pods- nodes- nodes/stats- namespaces- configmapsverbs:- get- list- watch
---
apiVersion: rbac.authorization.k8s.io/v1
kind: RoleBinding
metadata:labels:k8s-app: metrics-servername: metrics-server-auth-readernamespace: kube-system
roleRef:apiGroup: rbac.authorization.k8s.iokind: Rolename: extension-apiserver-authentication-reader
subjects:
- kind: ServiceAccountname: metrics-servernamespace: kube-system
---
apiVersion: rbac.authorization.k8s.io/v1
kind: ClusterRoleBinding
metadata:labels:k8s-app: metrics-servername: metrics-server:system:auth-delegator
roleRef:apiGroup: rbac.authorization.k8s.iokind: ClusterRolename: system:auth-delegator
subjects:
- kind: ServiceAccountname: metrics-servernamespace: kube-system
---
apiVersion: rbac.authorization.k8s.io/v1
kind: ClusterRoleBinding
metadata:labels:k8s-app: metrics-servername: system:metrics-server
roleRef:apiGroup: rbac.authorization.k8s.iokind: ClusterRolename: system:metrics-server
subjects:
- kind: ServiceAccountname: metrics-servernamespace: kube-system
---
apiVersion: v1
kind: Service
metadata:labels:k8s-app: metrics-servername: metrics-servernamespace: kube-system
spec:ports:- name: httpsport: 443protocol: TCPtargetPort: httpsselector:k8s-app: metrics-server
---
apiVersion: apps/v1
kind: Deployment
metadata:labels:k8s-app: metrics-servername: metrics-servernamespace: kube-system
spec:selector:matchLabels:k8s-app: metrics-serverstrategy:rollingUpdate:maxUnavailable: 0template:metadata:labels:k8s-app: metrics-serverspec:containers:- args:- --cert-dir=/tmp- --kubelet-insecure-tls- --secure-port=4443- --kubelet-preferred-address-types=InternalIP,ExternalIP,Hostname- --kubelet-use-node-status-portimage: registry.cn-hangzhou.aliyuncs.com/lfy_k8s_images/metrics-server:v0.4.3imagePullPolicy: IfNotPresentlivenessProbe:failureThreshold: 3httpGet:path: /livezport: httpsscheme: HTTPSperiodSeconds: 10name: metrics-serverports:- containerPort: 4443name: httpsprotocol: TCPreadinessProbe:failureThreshold: 3httpGet:path: /readyzport: httpsscheme: HTTPSperiodSeconds: 10securityContext:readOnlyRootFilesystem: truerunAsNonRoot: truerunAsUser: 1000volumeMounts:- mountPath: /tmpname: tmp-dirnodeSelector:kubernetes.io/os: linuxpriorityClassName: system-cluster-criticalserviceAccountName: metrics-servervolumes:- emptyDir: {}name: tmp-dir
---
apiVersion: apiregistration.k8s.io/v1
kind: APIService
metadata:labels:k8s-app: metrics-servername: v1beta1.metrics.k8s.io
spec:group: metrics.k8s.iogroupPriorityMinimum: 100insecureSkipTLSVerify: trueservice:name: metrics-servernamespace: kube-systemversion: v1beta1versionPriority: 100
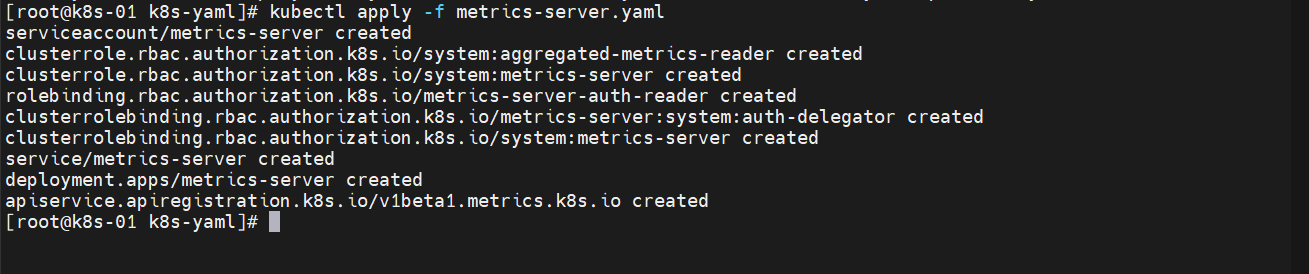
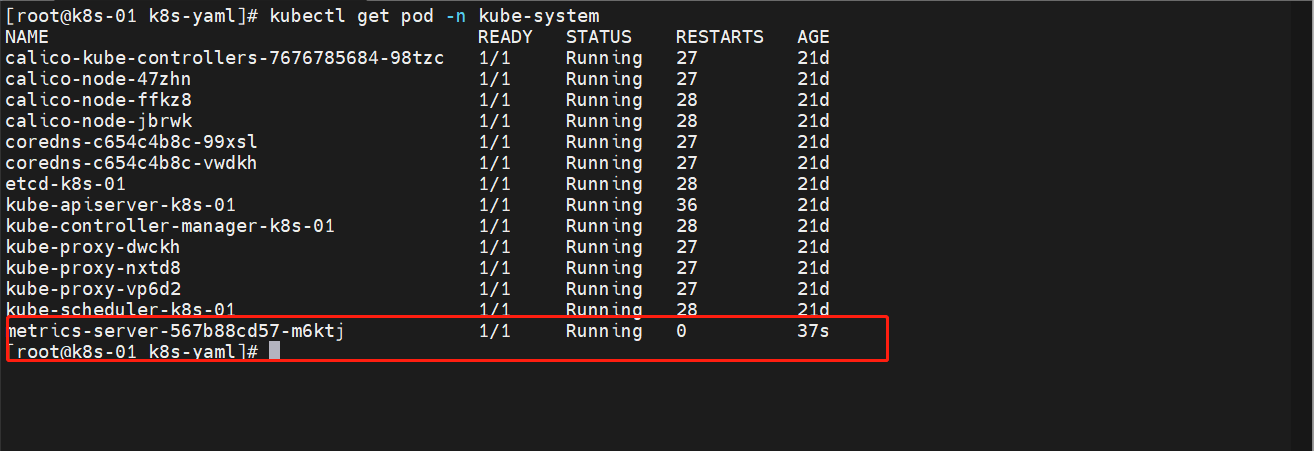
查看一下状态
kubectl get pod -n kube-system
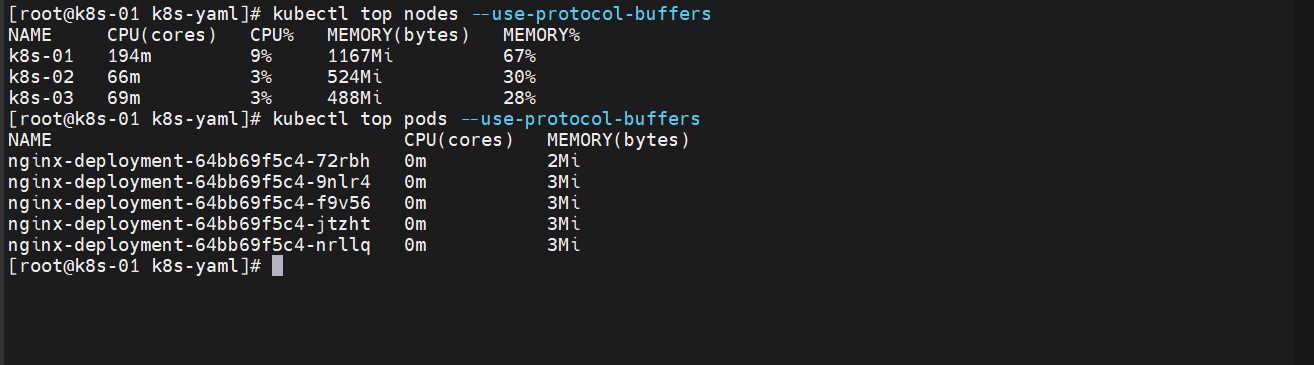
查看一下指标
##节点使用情况
kubectl top nodes --use-protocol-buffers##pod使用情况
kubectl top pods --use-protocol-buffers
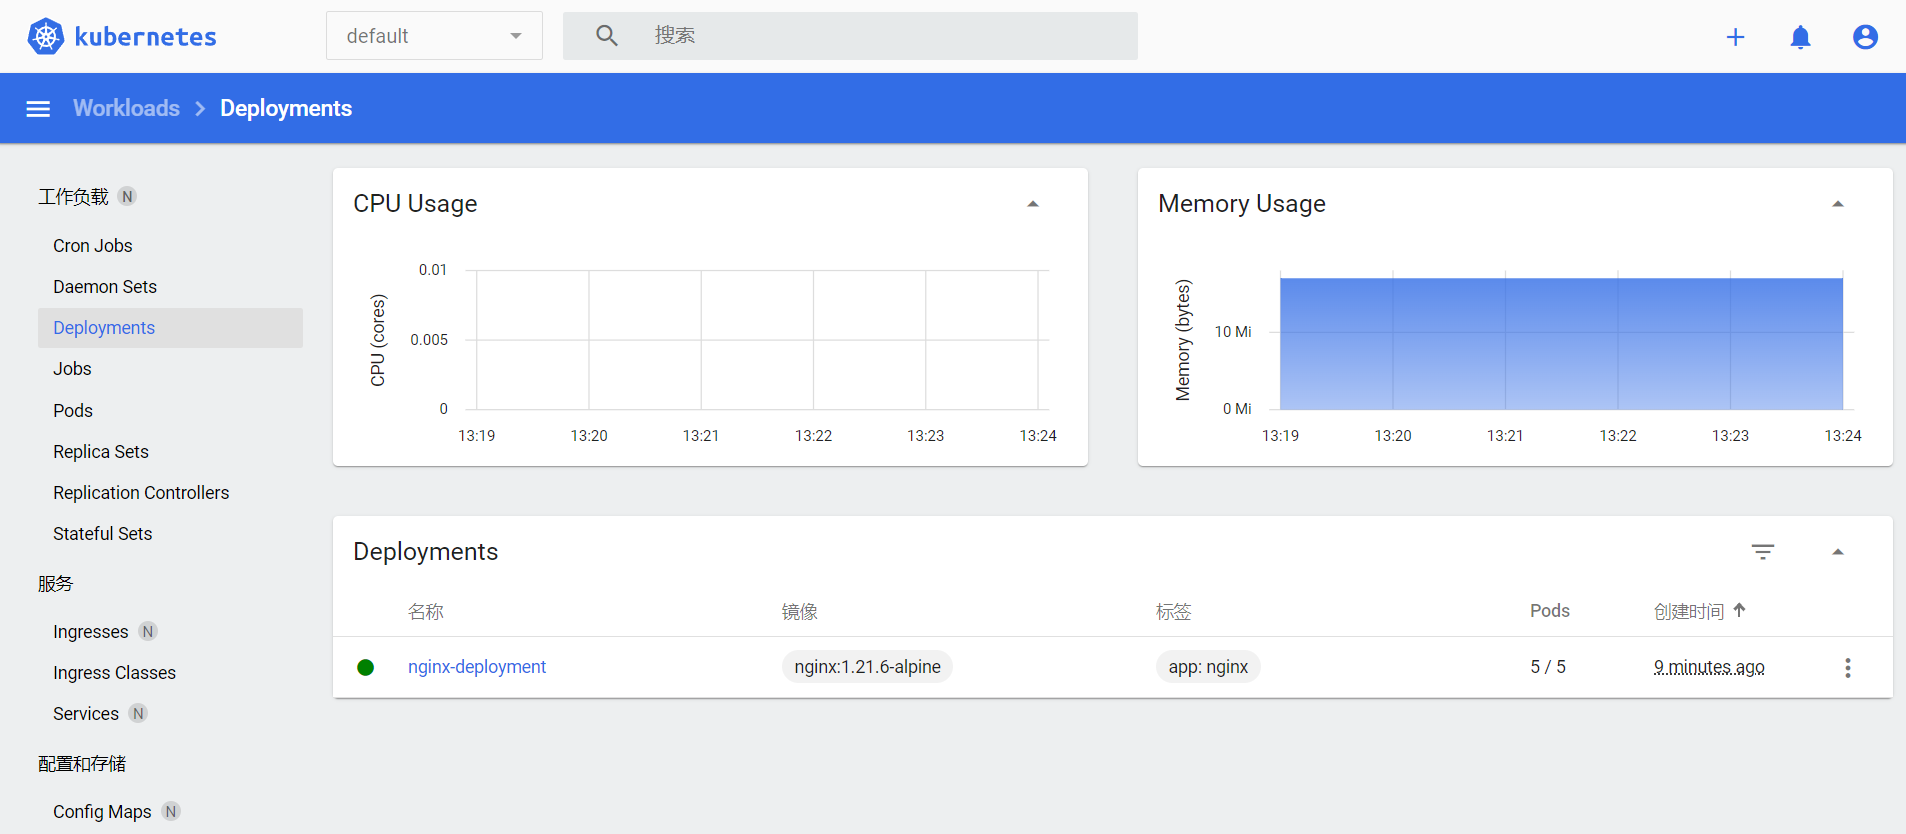
3.3 验证指标收集
我们可以登陆 Dashboard 上去查看信息收集
3.4 扩缩容的实现
HPA 也是 k8s 中的一种资源,就是写这个资源的 yaml 文件来实现的

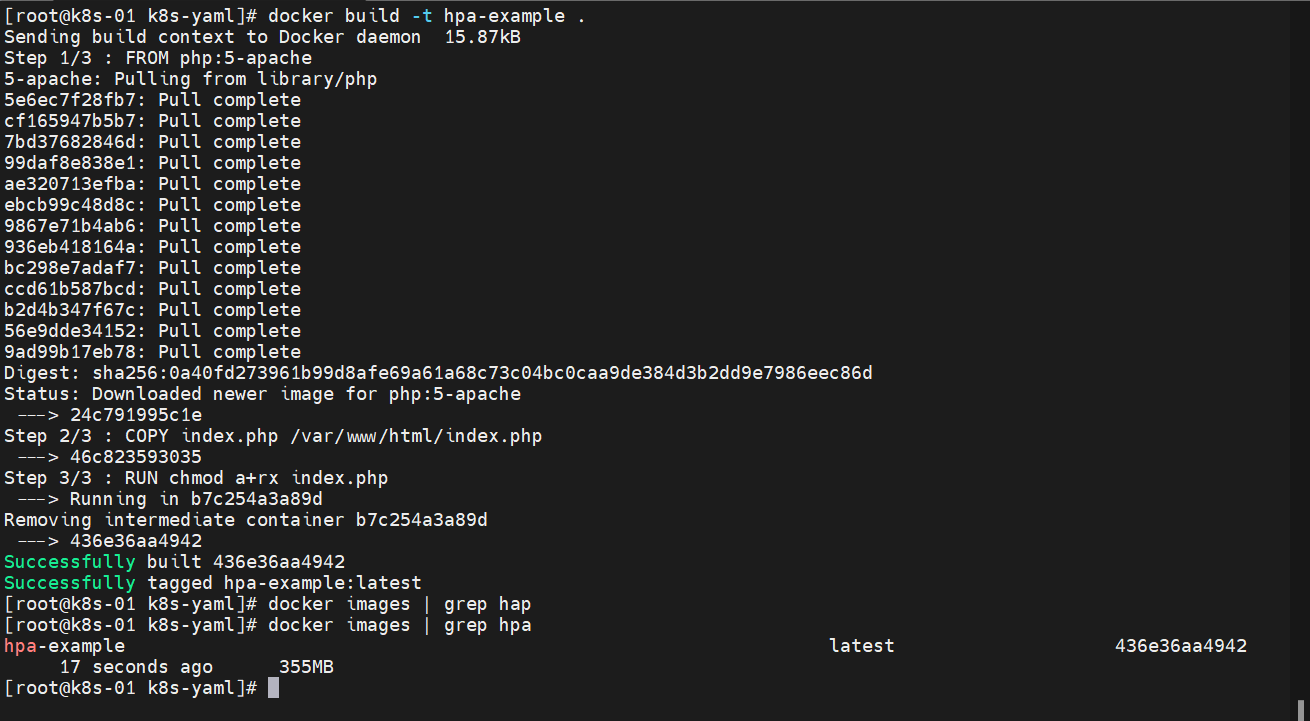
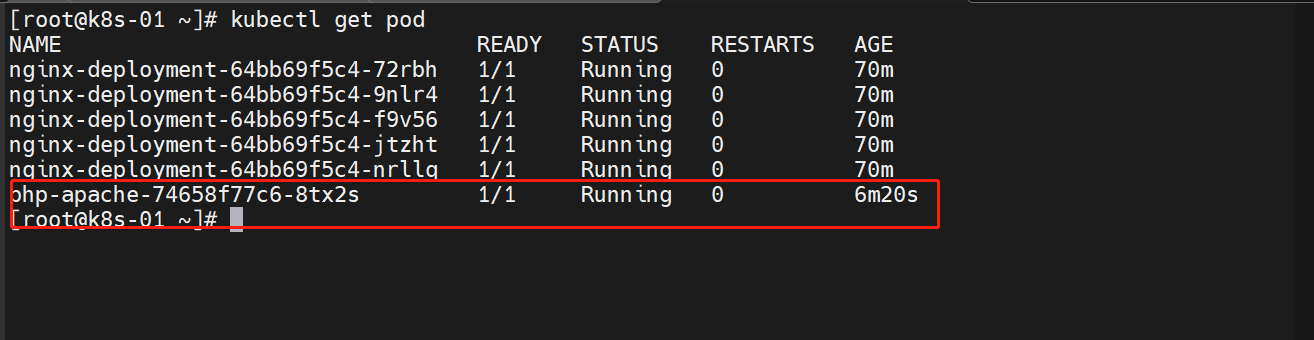
准备一个镜像
来自1.21版本的k8s 官方文档
FROM php:5-apache
COPY index.php /var/www/html/index.php
RUN chmod a+rx index.php
index.php 文件内容
<?php$x = 0.0001;for ($i = 0; $i <= 1000000; $i++) {$x += sqrt($x);}echo "OK!";
?>
构建一下这个镜像:docker build -t hpa-example .
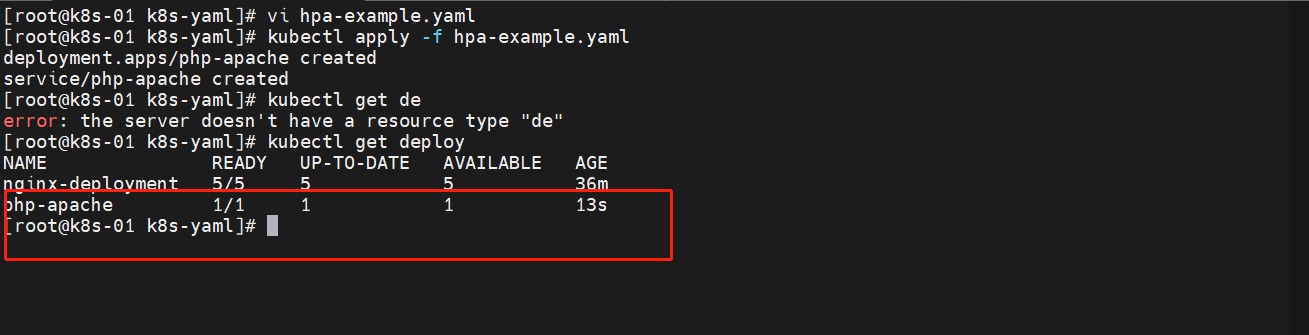
准备 Deployment
hpa-example.yaml
apiVersion: apps/v1
kind: Deployment
metadata:name: php-apache
spec:selector:matchLabels:run: php-apachereplicas: 1template:metadata:labels:run: php-apachespec:containers:- name: php-apacheimagePullPolicy: Neverimage: hpa-exampleports:- containerPort: 80resources:limits:cpu: 500mrequests:cpu: 200m
---
apiVersion: v1
kind: Service
metadata:name: php-apachelabels:run: php-apache
spec:ports:- port: 80selector:run: php-apache
启动一下
编写 HPA
怎么写这个东西呢?直接描述就行了 kubectl explain hpa
如果不是整合第三方的话,这个资源能写的信息很少
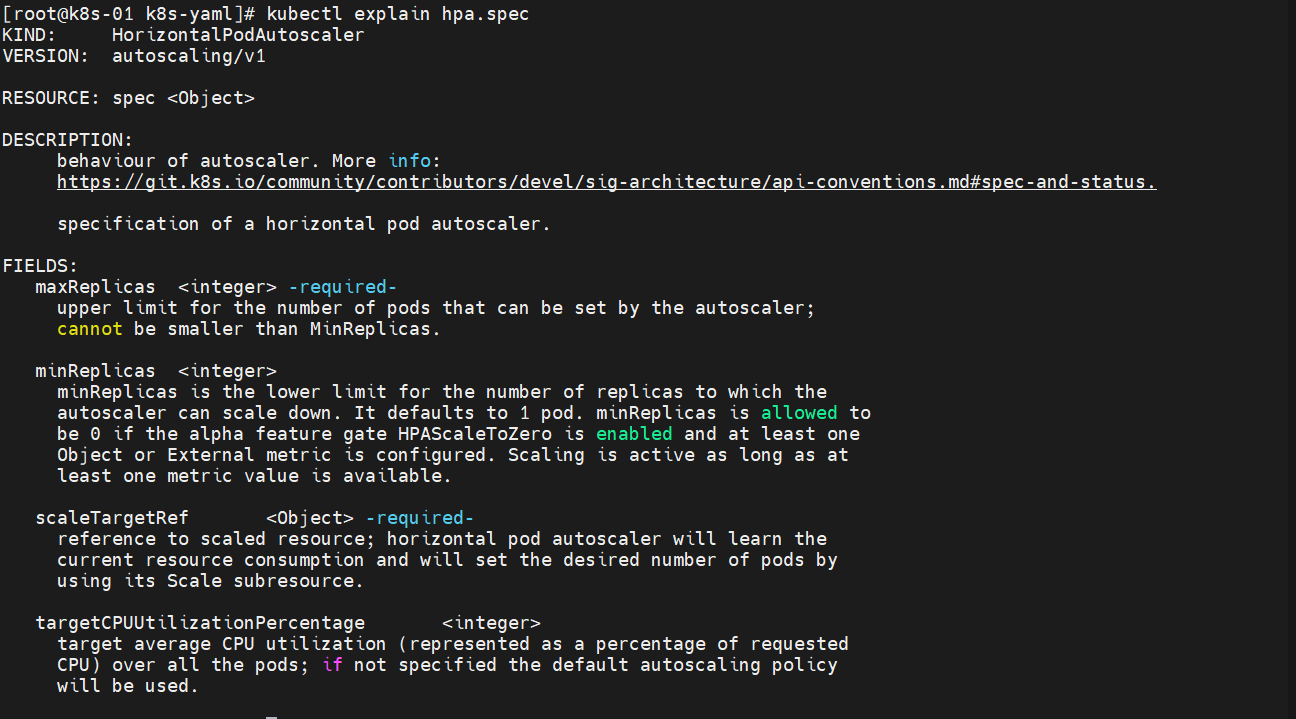
FIELDS:maxReplicas <integer> -required- ## 自动缩放器可设置的数量上限,不能小于Minupper limit for the number of pods that can be set by the autoscaler;cannot be smaller than MinReplicas.minReplicas <integer>minReplicas is the lower limit for the number of replicas to which theautoscaler can scale down. It defaults to 1 pod. minReplicas is allowed tobe 0 if the alpha feature gate HPAScaleToZero is enabled and at least oneObject or External metric is configured. Scaling is active as long as atleast one metric value is available.scaleTargetRef <Object> -required- ##缩放资源类型reference to scaled resource; horizontal pod autoscaler will learn thecurrent resource consumption and will set the desired number of pods byusing its Scale subresource.targetCPUUtilizationPercentage <integer> ##目标平均CPU利用率target average CPU utilization (represented as a percentage of requestedCPU) over all the pods; if not specified the default autoscaling policywill be used.apiVersion: autoscaling/v1
kind: HorizontalPodAutoscaler
metadata: ##元数据name: php-apache
spec:maxReplicas: 10 ##最大10个minReplicas: 1 ##最小1个scaleTargetRef:apiVersion: apps/v1kind: Deployment ##资源类型,将于动态扩缩容的目标引用name: php-apachetargetCPUUtilizationPercentage: 50 ## 目标CPU使用率就扩容,低于就缩容
创建一下 HPA
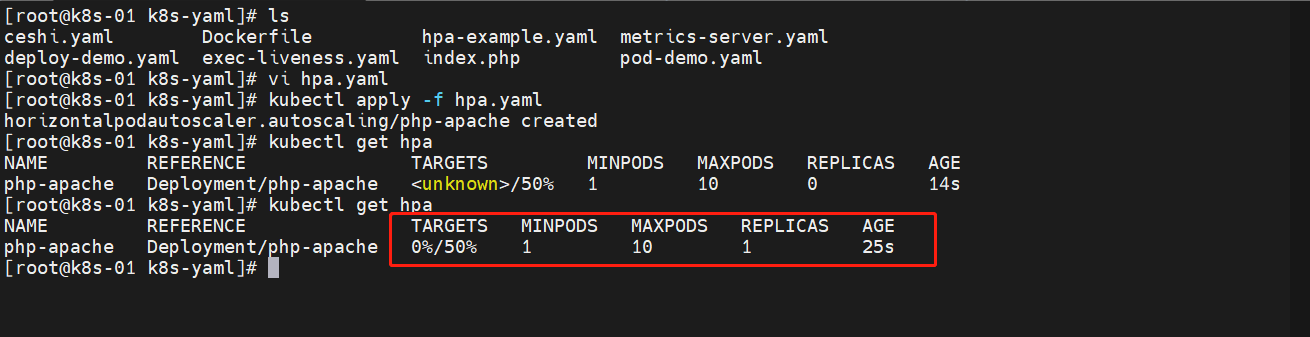
3.5 增加负载
动态监控一下
kubectl get hpa -w
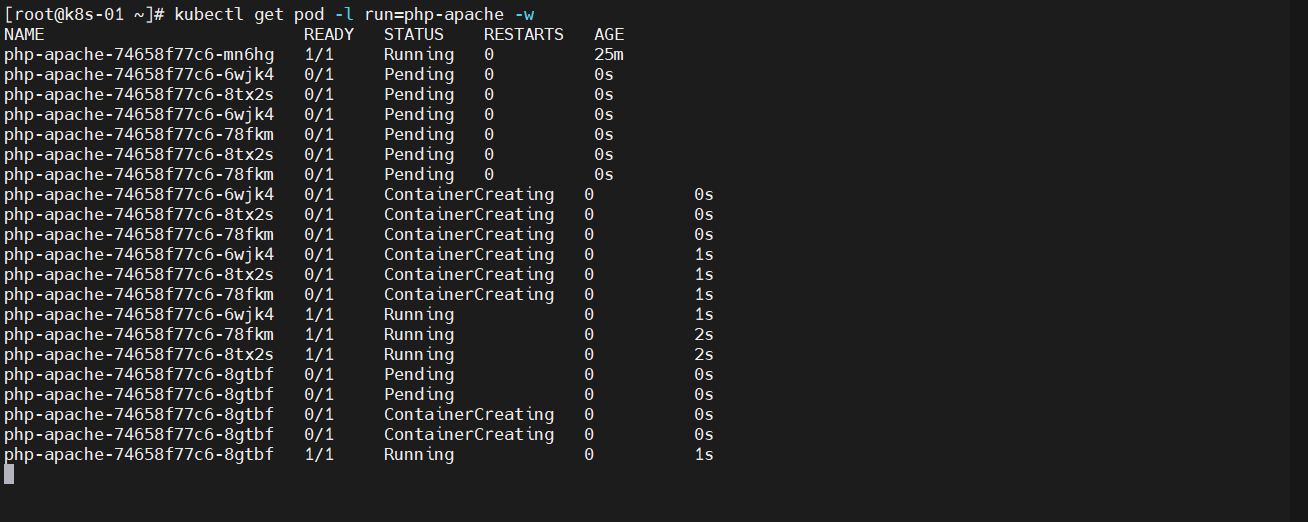
kubectl get pod -l run=php-apache -w
增加负载
##一直访问
while true;do curl 10.96.169.3;done
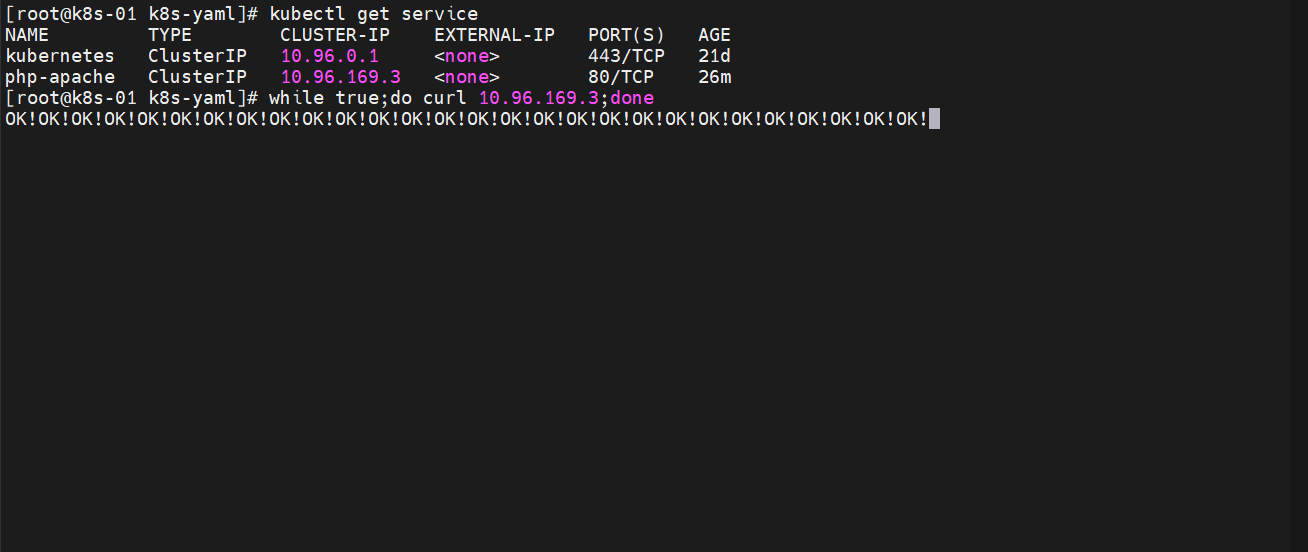
动态观察结果
运行一段发现负载升高,实现了自动扩容


3.6 降低负载
Ctrl + C 取消循环后,资源利用率会降下去,但是会有一个缓冲时间才会进行缩容
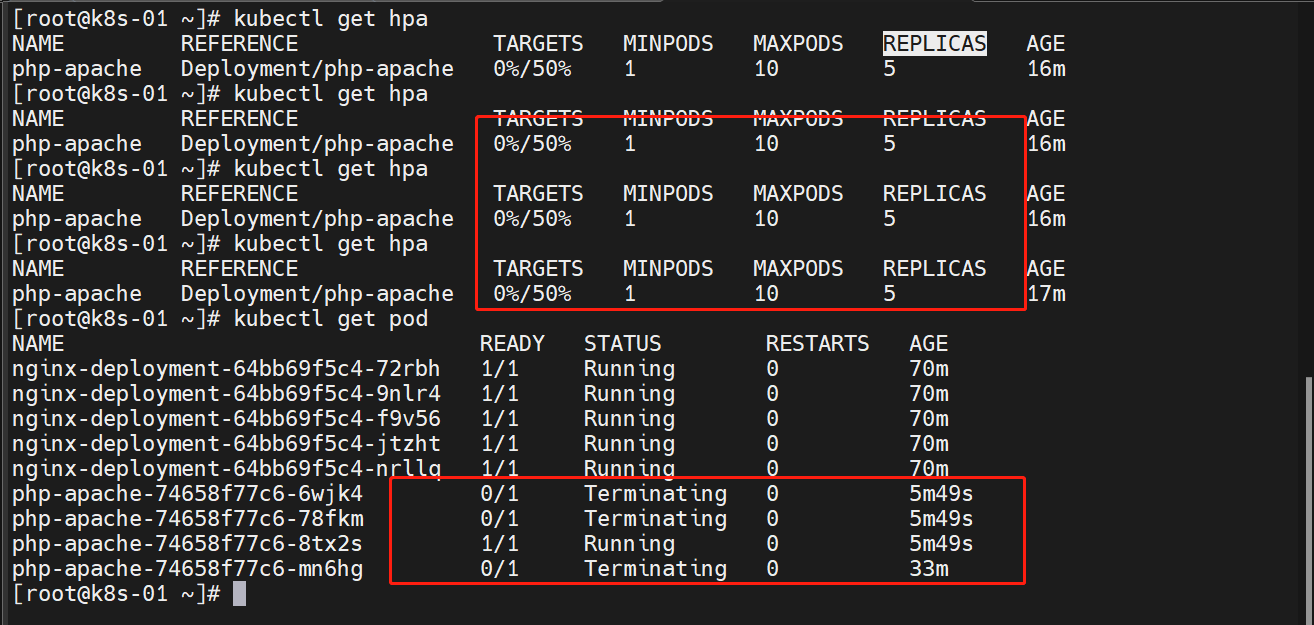
等一段时间后(好像是5分钟),最终会缩容到一个
3.7 更多的度量指标
有很多度量指标,参考最新版本的地址:https://kubernetes.io/zh-cn/docs/tasks/run-application/horizontal-pod-autoscale-walkthrough/#autoscaling-on-multiple-metrics-and-custom-metrics
基于多项度量指标和自定义度量指标自动扩缩
4. 金丝雀部署
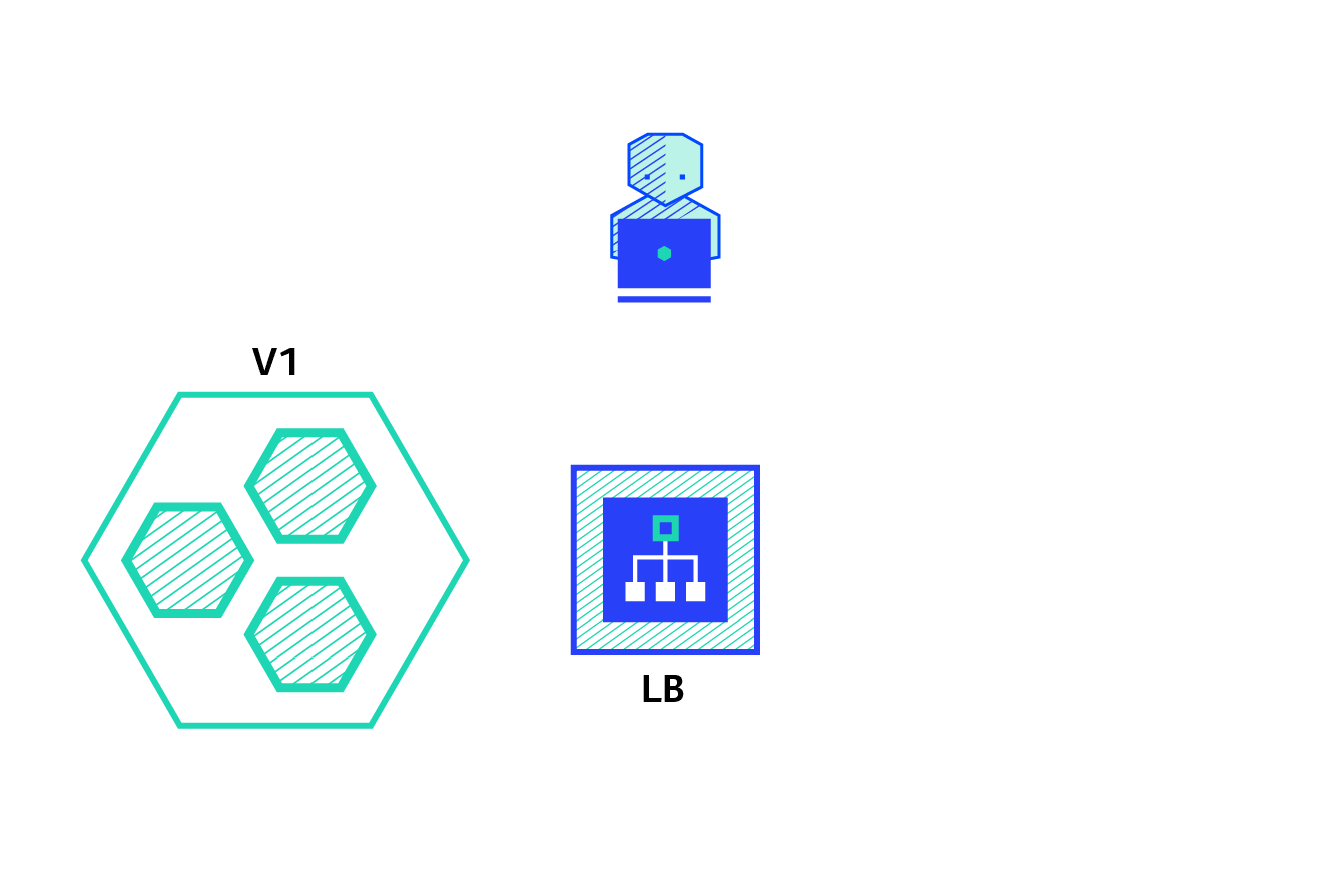
4.1 蓝绿部署
- 系统存在两个版本:V1 和 V2(绿和蓝)
- 将一些流量请求发往蓝色的版本的,如果发现是对的,就将系统切换到蓝版本
4.2 金丝雀部署
金丝雀部署来源于矿场的一个场景:矿工进矿洞之前会放入金丝雀,金丝雀对瓦斯气体很敏感,如果放进去了没有叽叽喳喳声音,矿工就不会进去了
- 现在有2个版本:V1 和 V2
- 先部署一个 V2 版本,请求流量会走向 V1和 V2
- 再逐渐增加 V2 数量,将全部流量走向 V2,销毁 V1
与滚动发布相比
滚动发布:
- 也都是同时存在2个版本,都能接受流量
- 滚动发布短时间就直接结束了,不能直接控制新老版本的存活时间
4.3 金丝雀部署的实现
首先准备一个 service
- 选择“app: canary-nginx”标签进行一个对外负载访问
##canary-test.yaml
apiVersion: v1
kind: Service
metadata:name: canary-testnamespace: default
spec:selector:app: canary-nginxtype: NodePort  ## 浏览器可以直接访问ports:- name: canary-testport: 80    targetPort: 80  ## Pod的访问端口protocol: TCPnodePort: 31666  ## 浏览器访问端口
准备三个版本镜像
##v1版本:nginx-demo1
FROM nginx
ENV version="v1"
RUN echo $version > /usr/share/nginx/html/index.html##v2版本:nginx-demo2
FROM nginx
ENV version="v2"
RUN echo $version > /usr/share/nginx/html/index.html##v3版本:nginx-demo3
FROM nginx
ENV version="v3"
RUN echo $version > /usr/share/nginx/html/index.html
构建镜像
docker build -t nginx:demo1 .
准备一个 v1 版本的 Deployment
canary-deploy-demo1.yaml
apiVersion: apps/v1
kind: Deployment
metadata:name: canary-dep-v1namespace: defaultlabels:app: canary-dep-v1
spec:selector:matchLabels:app: canary-nginxversion: v1replicas: 1template:metadata:labels:app: canary-nginxversion: v1spec:containers:- name: nginximage: nginx:demo1imagePullPolicy: Never
创建一次 Deployment
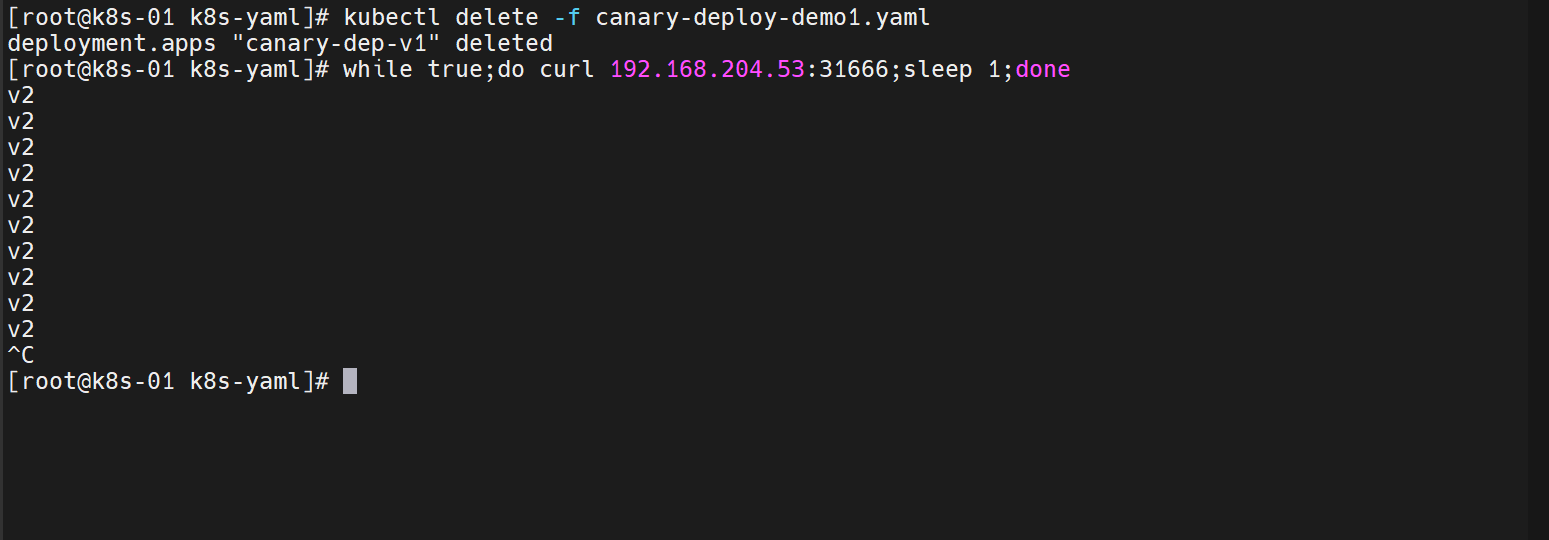
kubectl apply -f canary-deploy-demo1.yaml
访问检查

再启动一个v2版本
canary-deploy-demo2.yaml
apiVersion: apps/v1
kind: Deployment
metadata:name: canary-dep-v2namespace: defaultlabels:app: canary-dep-v2
spec:selector:matchLabels:app: canary-nginxversion: v2replicas: 1template:metadata:labels:app: canary-nginxversion: v2spec:containers:- name: nginximage: nginx:demo2imagePullPolicy: Never
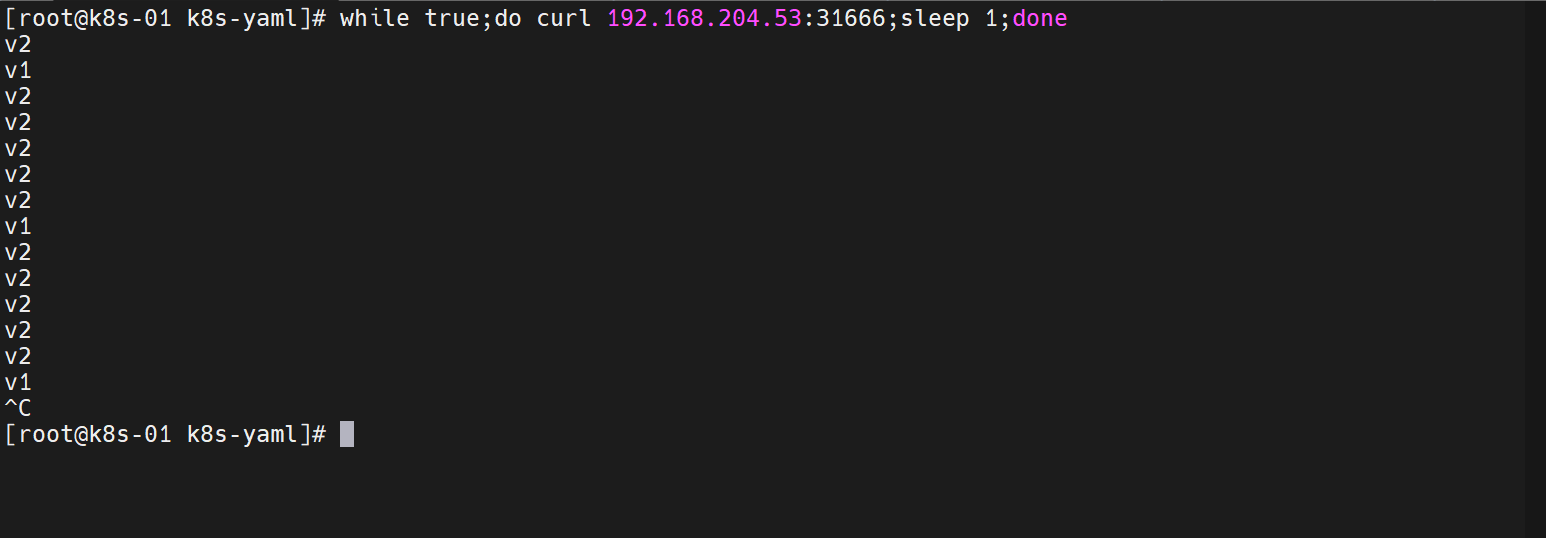
访问一下
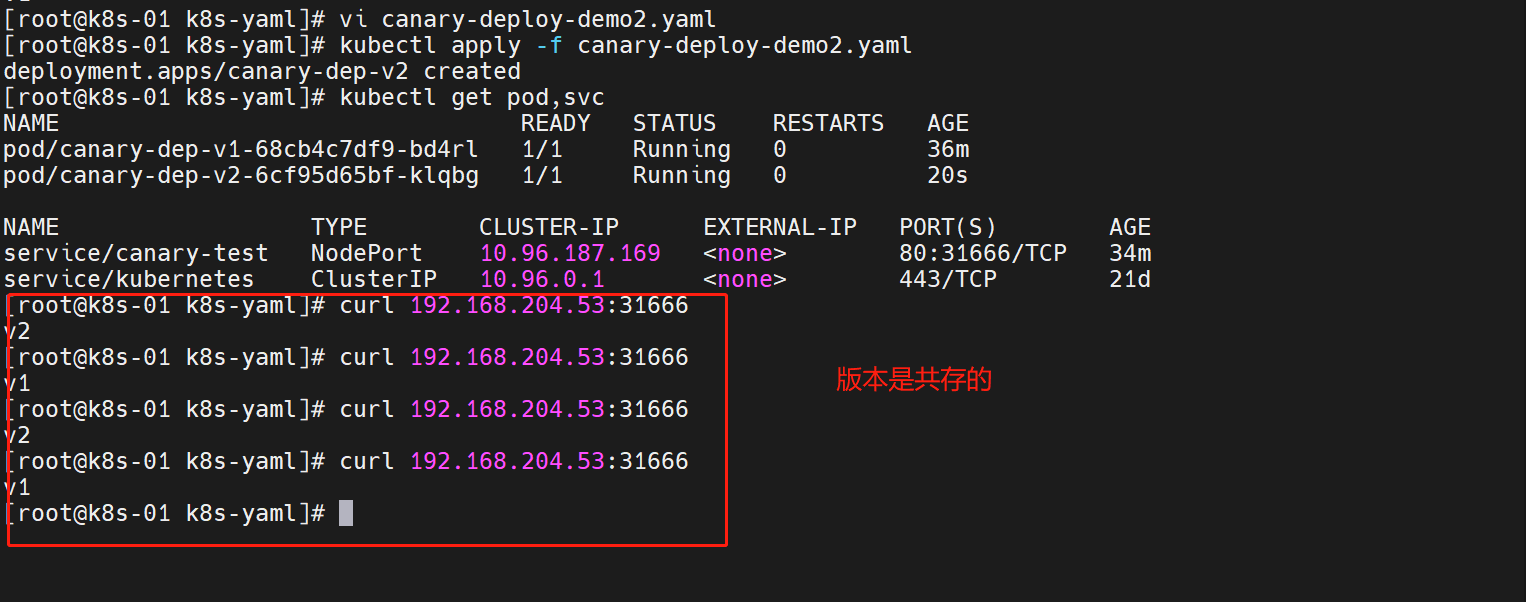
v2版本没问题,我们进行一个扩容操作
##更改canary-deploy-demo2.yaml的.spec.replicas字段信息replicas: 5

这个时候,通往 v2 版本的流量就增加了
我们的新版本就OK,就可以删除v1版本了
5. Deployment 状态与排查
5.1 进行中的 Deployment
执行下面的任务期间,Kubernetes 标记 Deployment 为进行中(Progressing)_:
- Deployment 创建新的 ReplicaSet
- Deployment 正在为其最新的 ReplicaSet 扩容
- Deployment 正在为其旧有的 ReplicaSet(s) 缩容
- 新的 Pod 已经就绪或者可用(就绪至少持续了 MinReadySeconds 秒)。
当上线过程进入“Progressing”状态时,Deployment 控制器会向 Deployment 的 .status.conditions 中添加包含下面属性的状况条目:
type: Progressingstatus: "True"reason: NewReplicaSetCreated|reason: FoundNewReplicaSet|reason: ReplicaSetUpdated
监视 Deployment 进度:kubectl rollout status deploy nginx-deployment
5.2 完成的 Deployment
当 Deployment 具有以下特征时,Kubernetes 将其标记为完成(Complete);
- 与 Deployment 关联的所有副本都已更新到指定的最新版本,这意味着之前请求的所有更新都已完成。
- 与 Deployment 关联的所有副本都可用。
- 未运行 Deployment 的旧副本。
当上线过程进入“Complete”状态时,Deployment 控制器会向 Deployment 的 .status.conditions 中添加包含下面属性的状况条目:
type: Progressingstatus: "True"reason: NewReplicaSetAvailable
5.3 失败的 Deployment
Deployment 可能会在尝试部署其最新的 ReplicaSet 受挫,一直处于未完成状态。 造成此情况一些可能因素如下:
- 配额(Quota)不足
- 就绪探测(Readiness Probe)失败
- 镜像拉取错误
- 权限不足
- 限制范围(Limit Ranges)问题
- 应用程序运行时的配置错误
描述性查看 Deployment 情况:kubectl describe deployment nginx-deployment
5.4 对失败 Deployment 的操作
可应用于已完成的 Deployment 的所有操作也适用于失败的 Deployment。 你可以对其执行扩缩容、回滚到以前的修订版本等操作,或者在需要对 Deployment 的 Pod 模板应用多项调整时,将 Deployment 暂停。
清理策略
可以在 Deployment 中设置 .spec.revisionHistoryLimit 字段以指定保留此 Deployment 的多少个旧有 ReplicaSet。其余的 ReplicaSet 将在后台被垃圾回收。 默认情况下,此值为 10。
将此字段设置为 0 将导致 Deployment 的所有历史记录被清空,造成 Deployment 将无法回滚
万能的排错方式:kubectl describe xxxxxx