主题切换实现(vue-less)

介绍
- 本文适合黑白切换或者主题样式偏少的(建议:2-10种);主题越多,样式会越多。理论上无限套。
- 本文适合已经写好了一套主题,然后需求增加第二套或者多套主题(最好小于10套,当然也可以更多,但是样式也会更多)
- 本文以 vue + vue-cli2.x + element-ui +vuex举例
实现
-
您需要实现全局样式文件
1)在/src/main.js引入全局样式文件;如果有使用插件实现全局样式引入的则,只需要确保你的全局样式文件可以覆盖掉 UI 组件的样式import Vue from 'vue' import App from './App' import ElementUI from 'element-ui' import 'element-ui/lib/theme-chalk/index.css';import "./styles/index.less";new Vue({render: h => h(App),data: {eventHub: new Vue()} }).$mount('#app');2)个人建议在
src文件夹下创建一个styles文件夹来管理全局样式。因为这块可以使用less的mixin来抽离成样式组件。
3)styles最终如下图集成模式为下图
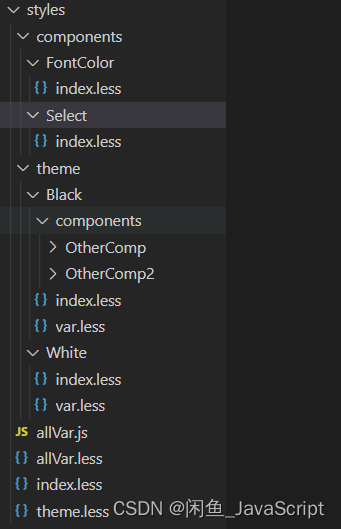
-
在 styles 文件夹中增加 index.less、theme.less、allVar.js、allVar.less 四个文件;theme、components两个文件夹。(如上图)
1)index.less;主入口@import './theme.less';2)
theme.less; 负责引入主题中的index.less文件@import './theme/White/index.less'; // 白色主题 @import './theme/Black/index.less'; // 黑色主题3)
allVar.js;你的所有主题都需要在这里引入,主要是负责js中使用less变量(颜色、字体大小等)而存在的import black from '@/styles/anHui-new/theme/Black/var.less'; import white from '@/styles/anHui-new/theme/White/var.less'; // 获取 less 变量颜色 export default {black,white }4)
allVar.less;集合所有主题中的变量文件,如果后续需要在页面内使用主题变量的话(非常不建议在页面内使用!因为会使后续增加主题提高难度!)@import './theme/Black/var.less'; @import './theme/White/var.less'; -
以黑白两种主题来介绍;
1)src/styles/theme中增加 Black 和 White 两个文件夹;并且同时增加 index.less 和 var.less文件;建议在文件夹中再次增加components文件夹;如下图
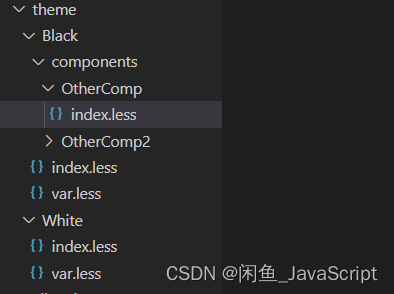
2)此时theme中每一个文件夹则是一种主题色的配置;我们以黑色 Black (style/theme/Black) 来举例子:
(1)Black/index.less;@import './var.less'; // 引入当前主题的变量 @import '../../components/FontColor/index.less'; // 全局引入修改字体颜色的less方法(mixin) @import '../../components/Select/index.less'; // 引入下拉框的less方法(mixin实现) .theme-black-731514100-random {.el-select-dropdown(@select-bg-color: @black-select-bg-color, @select-border-color: @black-select-border-color); }(2)
Black/var.less;命名规范建议以主题色为开头(比如@black-xxxxx;@white-xxxxx)// 基础色 @black-base-color: #0080FF; @black-base-bg-pop-color: rgba(0, 13, 26, .8);// 下拉框 @black-select-border-color: #00D5FF; @black-select-bg-color: @black-base-bg-pop-color;:export {base-color: @black-base-color;base-bg-pop-color: @black-base-bg-pop-color; }温馨提示1:上文中的
:export为less文件的导出变量;可以直接在 js 中使用颜色;(直接import xxx from 'styles/theme/Black/var.less’即可看到已经编译好的对象)
温馨提示2:目前没有发现可以直接导出当前less文件全部变量。只能自己手动导出变量;
温馨提示3:导出变量一定要与上面一样;因为在vuex可以直接切换主题名字进行切换主题,到时候选取的变量名要保持一致!3)此时你会发现我引入了 components 中的两个 less 组件内容;那么我们开始介绍这两个组件;
(1)切换到 components 目录(src/styles/components);增加两个文件夹:Select、FontColor;文件夹中都含有个index.less;如下图:
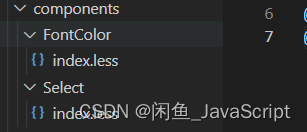
(2)FontColor和Select都是使用less的mixin抽成为方法了;如果不了解的话可以去 less 官网看看 mixin 如何使用
(3)FontColor/index.less;修改字体颜色的.changeFontColor(@color) {color: @color;a,span,div,label,i {color: @color;} } .changeFontColorImportant(@color) {color: @color !important;a,span,div,label,i {color: @color !important;} }(4)
Select/index.less;全局修改下拉框样式组件.el-select-activeClass(@select-border-color) {background: transparent !important;.changeFontColor(@select-border-color); // 这个是因为外部引入了 FontColor 组件的原因; }.el-select-dropdown(@select-bg-color, @select-border-color) {background: @select-bg-color;border: 1px solid @select-border-color;.popper__arrow::after {border-bottom-color: @select-border-color;}.selected {.el-select-activeClass(@select-border-color)}.hover {.el-select-activeClass(@select-border-color)} } -
挂载
(1)增加文件:src/mixin/theme.jsimport { mapGetters, mapMutations } from 'vuex';export default {computed: {...mapGetters('style', ['theme'])},watch: {theme() {this.setTheme();}},mounted() {this.setTheme()},methods: {...mapMutations('style', ['changeTheme']),setTheme() {document.getElementsByTagName('body')[0].className = `theme-${this.theme}-731514100-random`},} }(2)在你页面的主入口混入(mixins)
src/mixin/theme.js这个文件;比如说(app.vue中)<template><div id="app" style="height:100%"><router-view></router-view></div> </template><script> import themeMixin from "@/mixin/theme.js"; export default {name: 'App',mixins: [/ themeMixin: 主题挂载* @computed theme* @method setTheme* @watch theme*/themeMixin], } </script> -
vuex状态管理数据,实现切换主题功能,实现获取less变量值功能;
(1)使用vuex状态管理;创建文件:src/store/modules/style.js;此处使用到了命名空间,如果对命名空间不理解的话可以去vuex官网看看。(namespaced: true为开启命名空间)import style from '@/styles/anHui-new/allVar.js'; export default {namespaced: true,state: {themeList: [{type: 'white',style: style.white},{type: 'black',style: style.black}],theme: 'black'},mutations: {changeTheme(state, data) { // 改变主题调用此函数;唯一参数:传递改变为哪个主题、或者在第一个和第二个主题切换。state.theme = data || state.themeList.reduce((pre, next, i, arr) => {if (pre) return pre;if (next.type !== state.theme) pre = next.type;return pre}, void 0)}},getters: {theme: (state) => state.theme, // 获取当前主题是哪个globalColor: (state) => (style[state.theme]) // 会返回你定义的对象-返回当前主题的变量颜色} }温馨提示:上面这个文件需要挂载到vuex里面去;如果已经挂载过了则不需要走以下不走了;实现如下:
(2)挂载到vuex中(src/store/index.js)import Vue from 'vue'; import Vuex from 'vuex'; Vue.use(Vuex) let moduleInclude = {state: {},actions: {},mutations: {} }const modulesFiles = require.context('./modules', true, /\\.js$/) const modules = modulesFiles.keys().reduce((modules, modulePath) => {const name = modulePath.replace(/^\\.\\/(.*)\\.\\w+$/, '$1'),value = modulesFiles(modulePath);modules[name] = value.default;return modules; }, {})export default new Vuex.Store({modules: {moduleInclude,...modules} })(3)在 src/main.js 中挂到 vue 中
import Vue from 'vue' import App from './App' import ElementUI from 'element-ui' import 'element-ui/lib/theme-chalk/index.css'; import store from './store'; // 这个是挂载vuex的 import "./styles/index.less";new Vue({store,render: h => h(App),data: {eventHub: new Vue()} }).$mount('#app'); -
引用示例
<template><div><button @click="changeTheme()">changeTheme</button><!-- 这里写你的下拉框组件去测试吧 --></div> </template><script> import { mapGetters, mapMutations } from "vuex"; import themeMixin from "@/mixin/theme.js"; export default {data() {return {};},mixins: [/ themeMixin: 主题挂载* @computed theme* @method setTheme* @watch theme*/themeMixin,],computed: {...mapGetters("style", ["theme"]),},methods: {...mapMutations("style", ["changeTheme"])}, }; </script> -
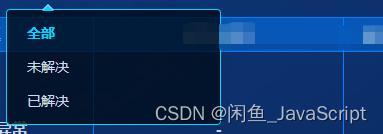
此时如果你完成了以上步骤,则可以看到你的下拉框可以被覆盖颜色了
总结
- 功能持续加强版:可集成一个项目模块,专门来配置项目主题色。最后生成样式配置文件。(src/styles/theme/xxxxxx: index.less 和 var.less);
- 切换主题这功能好像可以使用
css-vars-ponyfill这个插件更好的去实现样;有兴趣的小伙伴可以去研究一下(期待你的回信);css-vars-ponyfill官网地址 - 如果你有更好的实现方案,可以一起讨论~