[oeasy]python0135_python_语义分析_ast_抽象语法树_abstract_syntax_tree
![[oeasy]python0135_python_语义分析_ast_抽象语法树_abstract_syntax_tree](http://pic.ttrar.cn/nice/%5boeasy%5dpytho.jpg)
语义分析_抽象语法树_反汇编
回忆
- 上次回顾了一下历史
- python 是如何从无到有的
- 看到 Guido 长期的坚持和努力
- python究竟是如何理解
- print(“hello”)的?
- 这些ascii字母如何被组织起来执行?
纯文本
- 首先编写Guido的简历
print("1982------Guido in cwi")
print("1995------Guido in cnri")
print("2000------Guido in beopen")
print("2005------Guido in google")
print("2012------Guido in dropbox")
print("2020------Guido in microsoft")
- 并保存为Guido.py
生成token流
- 回到shell之后
- 从字符流生成token流
![[oeasy]python0135_python_语义分析_ast_抽象语法树_abstract_syntax_tree](https://img-blog.csdnimg.cn/img_convert/4e8806db7105067c5915aeeadb82808c.png)
- 这个过程叫做分词
分词
- 首先把一个个字符组成词
- 分析一下哪些字可以组成词
- 术语叫词法分析(lexical analysis)
![[oeasy]python0135_python_语义分析_ast_抽象语法树_abstract_syntax_tree](https://img-blog.csdnimg.cn/img_convert/2363682888c6e93669bdbc8f005b792e.png)
- 词分析出来之后呢?
组词
- 词分析出来就是怎么组词的问题
- 哪些词和哪些词先组合
- 哪些词和哪些词后组合
- 生成一棵抽象语法树
- AST(Abstract Syntax Tree)
![[oeasy]python0135_python_语义分析_ast_抽象语法树_abstract_syntax_tree](https://img-blog.csdnimg.cn/img_convert/39b914111023ad5c243120e8dbdbe704.png)
- 我能看看这棵ast树么?
引入ast模块
![[oeasy]python0135_python_语义分析_ast_抽象语法树_abstract_syntax_tree](https://img-blog.csdnimg.cn/img_convert/bc95576f88145ed74acb2e74a24116a7.png)
- 具体怎么做呢?
流程
- 先把这个ast模块导入(import)进来
- 第一句就是import ast
- 回车之后没有任何报错
- 那就是执行成功了
- 后面也一样
- 没有报错就是执行成功了
![[oeasy]python0135_python_语义分析_ast_抽象语法树_abstract_syntax_tree](https://img-blog.csdnimg.cn/img_convert/2118986a12abae1e2d25e8bb37ec92f6.png)
- 然后读取guido.py并送到s
- 然后对于s进行语法分析(parse)
![[oeasy]python0135_python_语义分析_ast_抽象语法树_abstract_syntax_tree](https://img-blog.csdnimg.cn/img_convert/1549ea53ad68504068671fc6e1032db2.png)
-
再把分析(parse)的结果进行转储(dump)
-
看起来有点乱
- 可以清晰一些么?
升级Python
- 目前lanqiao.cn上面的python是3.8
- 这个清晰缩进的格式需要在3.9以上完成
- 需要升级
sudo apt update
sudo apt install python3.9
- 升级之后就可以使用Python3.9了
![[oeasy]python0135_python_语义分析_ast_抽象语法树_abstract_syntax_tree](https://img-blog.csdnimg.cn/img_convert/4ba02f8d11898310446aa326f12da9a5.png)
缩进换行
- 只能在本地演示一下
![[oeasy]python0135_python_语义分析_ast_抽象语法树_abstract_syntax_tree](https://img-blog.csdnimg.cn/img_convert/ca2085e516d195e089543fcd902c72f3.png)
- 这个就是把词组成语法树的样子
- 如何理解这棵树呢?
- 我们看一个例子
表达式运算
- 如果给的表达式为 1 * 2 * 3
![[oeasy]python0135_python_语义分析_ast_抽象语法树_abstract_syntax_tree](https://img-blog.csdnimg.cn/img_convert/9fc2279e06713630e5604a381911a22e.png)
- 结合序为下图
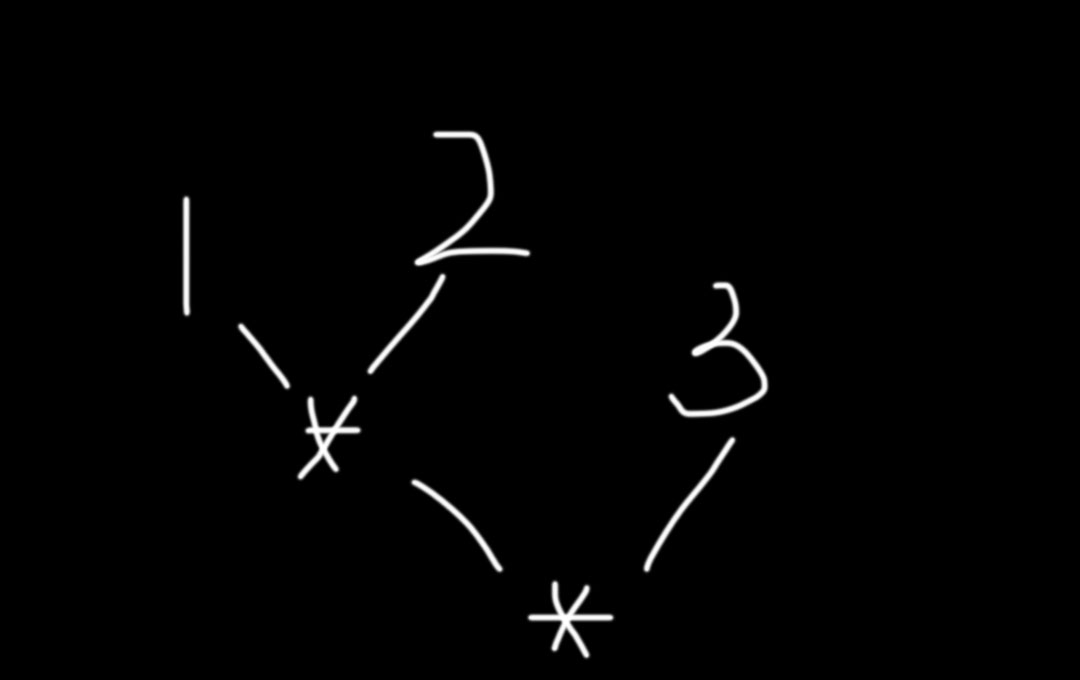
- 前两个先结合
- 得到的结果作为下一个运算的左操作数
- 然后和第3个结合
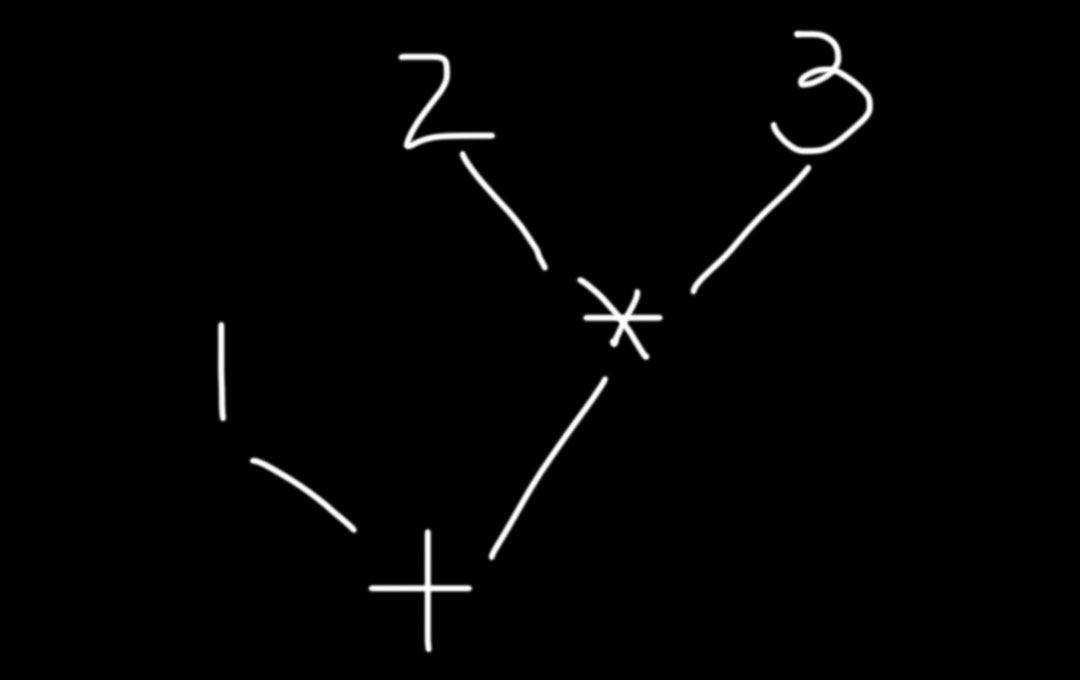
结合序
- 如果把 第一个* 改成 + 号
- 其他什么也没加
![[oeasy]python0135_python_语义分析_ast_抽象语法树_abstract_syntax_tree](https://img-blog.csdnimg.cn/img_convert/214da6e865670cbffa7cd042cd2f5422.png)
- 表达式是1 + 2 * 3
翻译成 字节码
- 要把源程序 翻译成字节码 才能执行
- 字节码 对应着cpu的指令
- 怎么把ast 转化为字节码(指令) 呢?
- 需要 编译(compile)
- 从一种语言 到 另一种语言
- 从py文件
- 到字节码(指令)
- 就是编译
- compile
![[oeasy]python0135_python_语义分析_ast_抽象语法树_abstract_syntax_tree](https://img-blog.csdnimg.cn/img_convert/0a36c9e4a89431eed7c04c4929d1f6d9.png)
compile
![[oeasy]python0135_python_语义分析_ast_抽象语法树_abstract_syntax_tree](https://img-blog.csdnimg.cn/img_convert/552ae01844d104c842ed4ab97a61f2d8.png)
- 我可以看看这个编译过程么?
指令
- instruction
- python3 -m dis Guido.py
- -m 代表使用模块
- dis 代表反编译(disassemble)
![[oeasy]python0135_python_语义分析_ast_抽象语法树_abstract_syntax_tree](https://img-blog.csdnimg.cn/img_convert/bd89ecbb1aadd3b24f77de4a3d75ea29.png)
- 我们可以看见
- 前面是行号
- 每行对应4条指令
- LOAD_NAME 装载(函数)名字
- LOAD_CONST 装载常量
- CALL_FUNCTION 调用函数
- POP_TOP 弹栈
编译结果
- 先看看这个pyc文件
- 注意他在
__pycache__文件夹下
- 注意他在
![[oeasy]python0135_python_语义分析_ast_抽象语法树_abstract_syntax_tree](https://img-blog.csdnimg.cn/img_convert/6eefc5785b7fb4da9043b7075ea71ad0.png)
- :%!xxd
- 把文件转化为字节形态
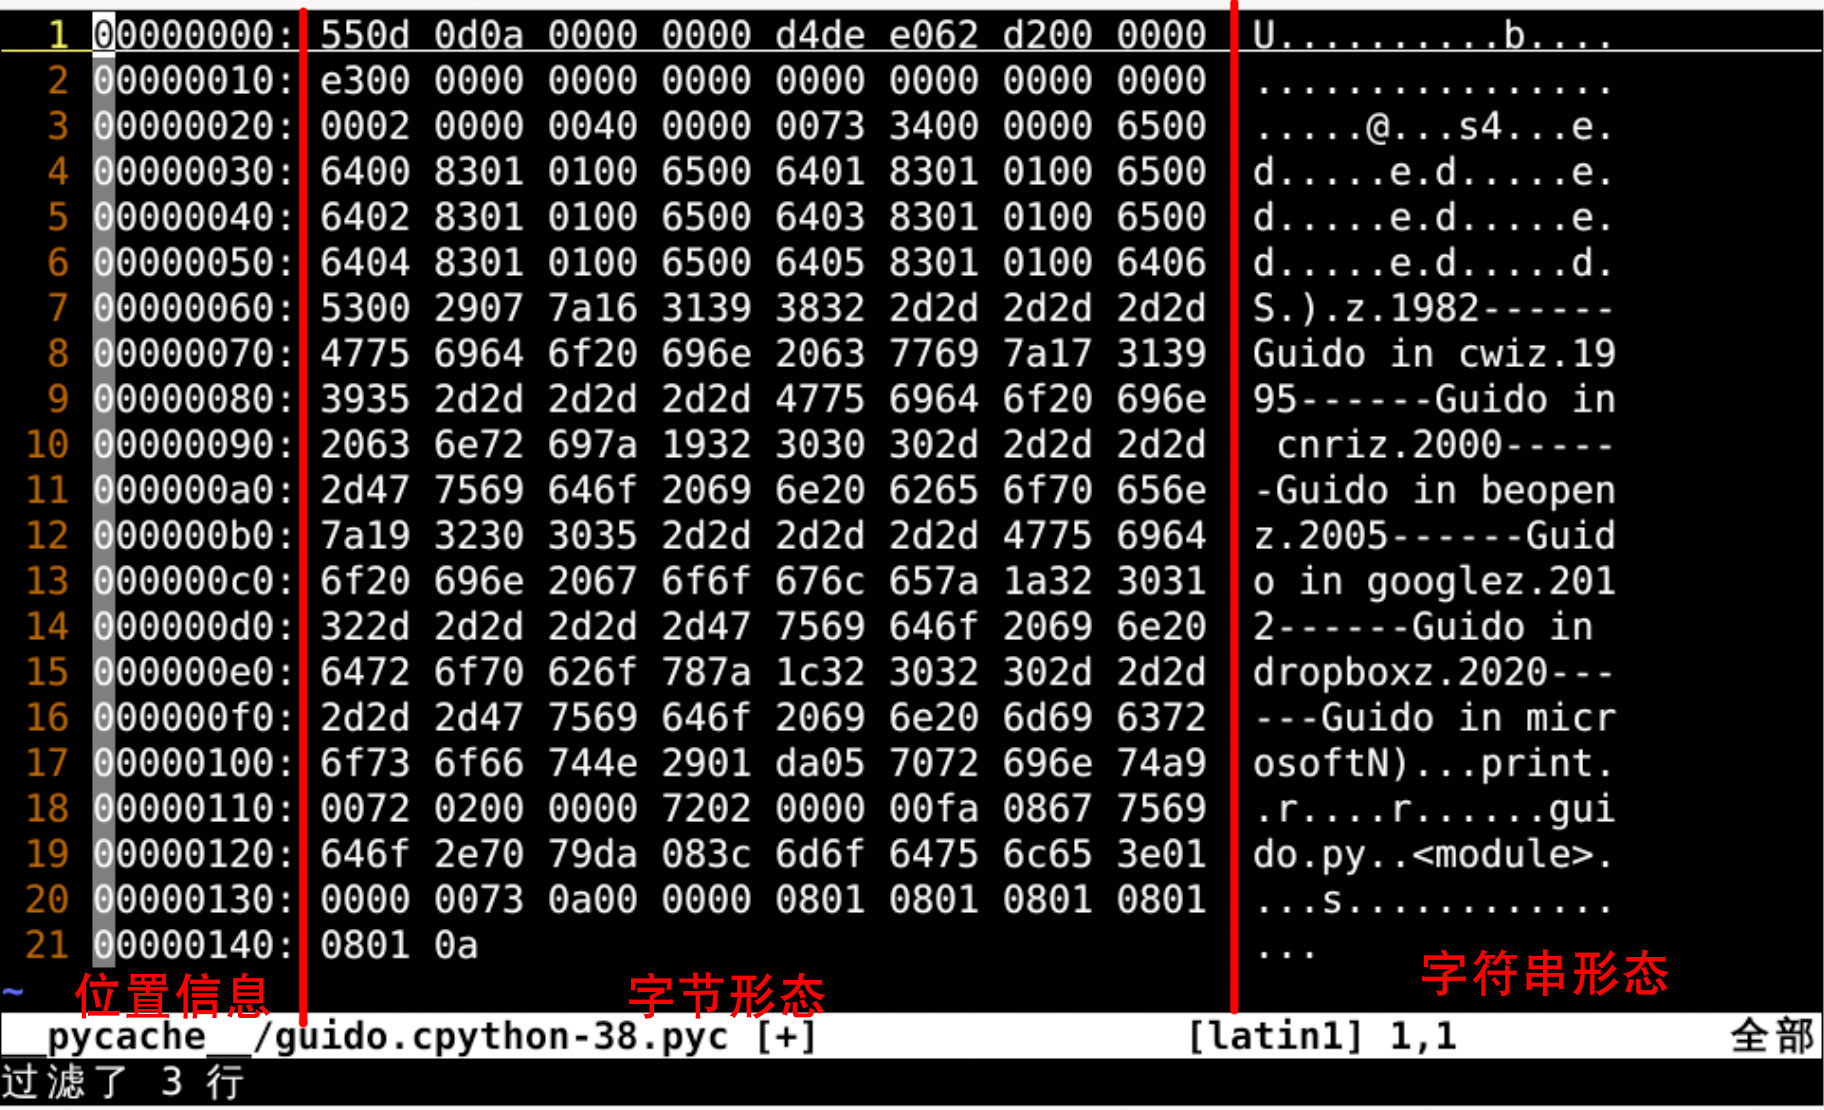
- 这纯纯的机器语言字节形态
- 实在是看不懂啊😭
- 这真的是指令么?
- 究竟什么是指令呢?
指令
- py文件每行print 对应4条指令
- LOAD_NAME 装载(函数)名字
- LOAD_CONST 装载常量
- CALL_FUNCTION 调用函数
- POP_TOP 弹栈
- https://github.com/python/cpython/blob/main/Lib/opcode.py
![[oeasy]python0135_python_语义分析_ast_抽象语法树_abstract_syntax_tree](https://img-blog.csdnimg.cn/img_convert/f9d55d525f9bc9a6db6bc13b27456e4d.png)
- 这样 我们 能否找到
- 4条指令 分别对应的 字节状态值
找到对应关系
| 指令助记符 | 指令含义 | 十进制状态 | 十六进制状态 |
|---|---|---|---|
| LOAD_NAME | 装载函数名称 | 101 | 0x65 |
| LOAD_CONST | 装载参数 | 100 | 0x64 |
| CALL_FUNCTION | 调用函数 | 142 | 0x8e |
| POP_TOP | 弹栈返回 | 1 | 0x01 |
- 可以找对应关系
![[oeasy]python0135_python_语义分析_ast_抽象语法树_abstract_syntax_tree](https://img-blog.csdnimg.cn/img_convert/75f213c9e043d2568e30868db8e533d3.png)
- 我们从头捋一下
python3 执行过程
- 不管是python3这个游乐场
- 还是Guido.py这个python程序
- 都在我们的硬盘上
![[oeasy]python0135_python_语义分析_ast_抽象语法树_abstract_syntax_tree](https://img-blog.csdnimg.cn/img_convert/9b2317f67ea89560ecabc2fe2824af8b.png)
- 先得把文件从硬盘读到内存
python3 执行的过程大致是这样
- 先把python3.8这个主解释器
- 加载到内存中
- 然后 在x86-64的cpu上 执行
- 模拟出 一台python虚拟机
![[oeasy]python0135_python_语义分析_ast_抽象语法树_abstract_syntax_tree](https://img-blog.csdnimg.cn/img_convert/a073da15bfdd6774bba5a491abdc9cb3.png)
- 准备开始 对py文件 解释执行
先编译
- 然后把参数
Guido.py这个需要执行的程序 加载到内存- 词法分析 得到 词流(token stream)
- 语法分析 得到 抽象语法树(Abstract Syntax Tree)
- 编译 得到 字节码 (byte_code)
![[oeasy]python0135_python_语义分析_ast_抽象语法树_abstract_syntax_tree](https://img-blog.csdnimg.cn/img_convert/3b72c2ba5902f8e48c95391e31f9f6c3.png)
- 也就是编译后 的pyc文件
解释执行
- 不过 这个pyc指令文件
- 是基于python虚拟机的 虚拟cpu的 指令集的
![[oeasy]python0135_python_语义分析_ast_抽象语法树_abstract_syntax_tree](https://img-blog.csdnimg.cn/img_convert/967b551fc6a0e91c2b03a54f61fcf23c.png)
- 需要放到 模拟好的 python虚拟机中
- 一条条指令 进行执行
换句话说
- 简化版的 hello.py 的执行过程是:
- 给了
python3一个参数Guido.py - 使用
python3这个解释器来解释执行Guido.py Guido.py中的语句一句句地依次解释执行
- 给了
- 全解释完成 后
- 退出python这个程序
- 把控制权交回到shell
![[oeasy]python0135_python_语义分析_ast_抽象语法树_abstract_syntax_tree](https://img-blog.csdnimg.cn/img_convert/cd1b4c8349c9dad01f2d4b511b36a600.png)
- 这些 都是基于 解释器python3的
- 所谓的 解释器python3
- 先编译成 python虚拟机的 虚拟指令字节码
- 然后用 python虚拟机 直接执行虚拟指令
- 所谓的 解释器python3
- 而解释器(python3) 是
- 在不同系统 不同架构的cpu语言上 运行的
![[oeasy]python0135_python_语义分析_ast_抽象语法树_abstract_syntax_tree](https://img-blog.csdnimg.cn/img_convert/dc74195bb59e933e8778a1eec371b03f.png)
- 那不同的系统、cpu架构
- python3 为什么 都能正确地解释?
总结
- 这次把py源文件
- 词法分析 得到 词流(token stream)
- 语法分析 得到 抽象语法树(Abstract Syntax Tree)
- 这里确立了优先级
- 编译 得到 字节码 (bytecode)
- 字节码我们看不懂
- 所以反编译 得到 指令文件(opcode)
- 指令文件是基于python虚拟机的虚拟cpu的指令集
- 所以反编译 得到 指令文件(opcode)
![[oeasy]python0135_python_语义分析_ast_抽象语法树_abstract_syntax_tree](https://img-blog.csdnimg.cn/img_convert/2860b1917917ede5e943c4b1de68e62e.png)
-
先从 python3最基础的
- 变量声明和赋值来看看
- python虚拟机是如何做的?🤔
- 变量声明和赋值来看看
-
我们下次再说👋
-
蓝桥->https://www.lanqiao.cn/courses/3584
-
github->https://github.com/overmind1980/oeasy-python-tutorial
-
gitee->https://gitee.com/overmind1980/oeasypython