Android 详解基本布局以及ListView和RecyclerView

前言
一个丰富的界面有很多个控件组成,那么就需要布局来实现控件有条不紊的摆放。
一 LinearLayout 线性布局
LinearLayout 又称作线性布局,是一种常用的布局。有横向和竖向两个方向。
通过下面的属性进行设置
android:orientation="vertical"
android:orientation="horizontal"1
1 layout_gravity
控制该组件在父组件的对齐方式
2 gravity
控制组件所包含的子元素的对齐方式
3 layout_weight
使用比例的方式来指定控件的大小。这个权重是分配的屏幕剩余空间
下面的三个方块,如若只有一个设置这个属性为的话,那么他会占满屏幕
如果两个都设置的话 那么两个均分剩下的空间
如若三个都设置为1的话,那么三个均分全部的空间
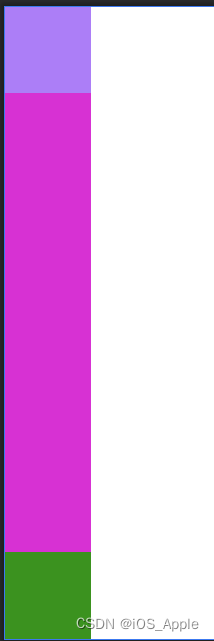

<LinearLayoutandroid:layout_width="100dp"android:layout_height="0dp"android:background="@color/purple_200"android:layout_weight="1"/><LinearLayoutandroid:layout_width="100dp"android:layout_height="0dp"android:background="#ee00dd"android:layout_weight="1"/><LinearLayoutandroid:layout_width="100dp"android:layout_height="0dp"android:background="#00a000"android:layout_weight="1"/>
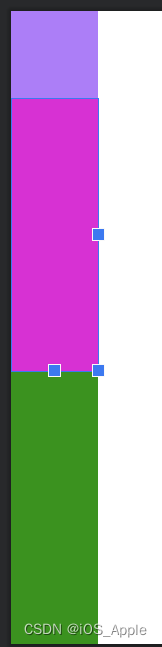
二 RelativeLayout 相对布局
主要通过定位的方式让控件出现在布局的任何位置。
1 相对于父容器而言
1> layout_alignParentLeft
左对齐
2> layout_alignParentRight
右对齐
3> layout_centerInParent
在父容器中间
2 相对于兄弟容器而言
1>layout_toLeftOf
放置于参考组件的左边
2> layout_above
放置于参考组件的上方,就是我的Bottom对着你的Top
3> layout_alignLeft
对齐参考组件的左边
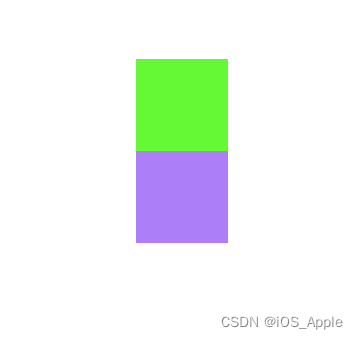
<RelativeLayoutandroid:id="@+id/btn"android:layout_width="100dp"android:layout_height="100dp"android:background="@color/purple_200"android:layout_centerInParent="true"/><RelativeLayoutandroid:layout_width="100dp"android:layout_height="100dp"android:background="#00ff00"android:layout_above="@+id/btn"android:paddingBottom="100dp"android:layout_alignLeft="@+id/btn"/>三 FrameLayout 帧布局
相比前两种比较少用,所有空间都会默认放置在布局的左上角。
有两个属性可以用
foreground  设置前景
foregroundGravity 前景的位置
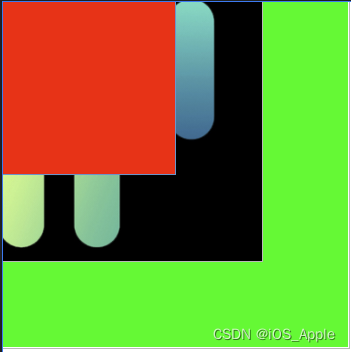
<FrameLayoutandroid:layout_width="400dp"android:layout_height="400dp"android:background="#00ff00"/><FrameLayoutandroid:layout_width="300dp"android:layout_height="300dp"android:foreground="@drawable/demo1"android:foregroundGravity="bottom|right"android:background="#ffff00"/><FrameLayoutandroid:layout_width="200dp"android:layout_height="200dp"android:background="#ff0000"/>四 TableLayout 表格布局
就像是一个表格,每个TableLayout 由多个TableRow 构成
1 常见属性
1> collapseColumns 需要隐藏的列号 从0 开始
2> stretchColumns 需要拉伸的列号
3> shrinkColumns 允许被收缩的列号
2 子控件常见的属性
1> android:layout_span 横向夸两列显示
2> layout_column 显示在第几列
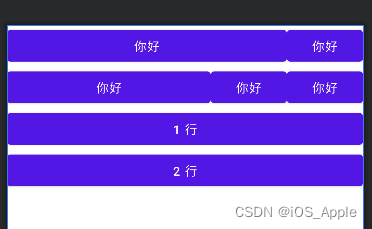
<TableLayoutxmlns:android="http://schemas.android.com/apk/res/android"android:layout_width="match_parent"android:layout_height="match_parent"android:collapseColumns="0"android:stretchColumns="1"><TableRow><Button android:text="你好"android:layout_span="2"android:layout_column="1"/><Button android:text="你好"/></TableRow><TableRow><Button android:text="你好"/><Button android:text="你好"/><Button android:text="你好"/><Button android:text="你好"/></TableRow><Button android:text="1 行"/><Button android:text="2 行"/></TableLayout>
五 网格布局 GridLayout
1 常见属性
1> orientation方向设置
2> columnCount 每一列的数量
3> rowCount 行的数量
2 子控件常见属性
1 > layout_column 显示在第几列
2> layout_columnSpan 横向跨几列
3> layout_columnWeight 横向剩余空间分配方式
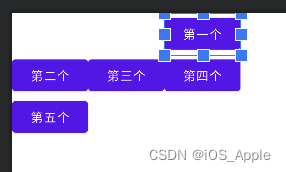
<GridLayoutxmlns:android="http://schemas.android.com/apk/res/android"android:layout_width="match_parent"android:layout_height="match_parent"android:orientation="horizontal"android:columnCount="3"><Button android:text="第一个"android:layout_column="2"/><Button android:text="第二个"android:layout_columnSpan="1"android:layout_columnWeight="0"/><Button android:text="第三个" /><Button android:text="第四个" /><Button android:text="第五个" /></GridLayout>六 ConstraintLayout 约束布局
可视化的方式来编写界面
七 ListView
非常常用的组件,以列表的形式显示具体内容
提升运行的效率,对加载好的布局进行缓存。
基本使用
xml
<ListViewandroid:id="@+id/lv"android:layout_width="match_parent"android:layout_height="match_parent"/>
Bean
package com.example.leonardoday1;public class Bean {String name;public Bean(String name) {this.name = name;}public void setName(String name) {this.name = name;}public String getName() {return name;}
}
adapter
package com.example.leonardoday1;import android.content.Context;
import android.view.LayoutInflater;
import android.view.View;
import android.view.ViewGroup;
import android.widget.BaseAdapter;
import android.widget.TextView;import java.util.List;public class MyAdapter extends BaseAdapter {private Context context;private List<Bean> datas;public MyAdapter(Context context, List<Bean> datas) {this.context = context;this.datas = datas;}@Overridepublic int getCount() {return datas.size();}@Overridepublic Object getItem(int i) {return null;}@Overridepublic long getItemId(int i) {return i;}@Overridepublic View getView(int i, View view, ViewGroup viewGroup) {ViewHolder viewHolder;// Tag从本质上来讲是就是相关联的view的额外的信息。它们经常用来存储一些view的数据,这样做非常方便而不用存入另外的单独结构。// 用View中的setTag(Onbect)给View添加1个格外的数据,再用getTag()获得到对应的View。if (view == null){view =  LayoutInflater.from(context).inflate(R.layout.list_item,viewGroup,false);viewHolder = new ViewHolder();viewHolder.textView =  view.findViewById(R.id.tv);view.setTag(viewHolder);}else{viewHolder = (ViewHolder) view.getTag();}
//        TextView tv = view.findViewById(R.id.tv);String name = datas.get(i).name;
//        tv.setText(name);viewHolder.textView.setText(name);return view;}private  final  class ViewHolder{TextView textView;}}
调用
for (int i = 0; i < 100; i++) {Bean bean = new Bean("ok i find you" + i);datas.add(bean);}ListView lv = findViewById(R.id.lv);// 配置数据lv.setAdapter(new MyAdapter(this,datas));// 点击监听lv.setOnItemClickListener(new AdapterView.OnItemClickListener() {@Overridepublic void onItemClick(AdapterView<?> adapterView, View view, int i, long l) {Log.e(TAG, "onItemClick: ");}});八 RecyclerView
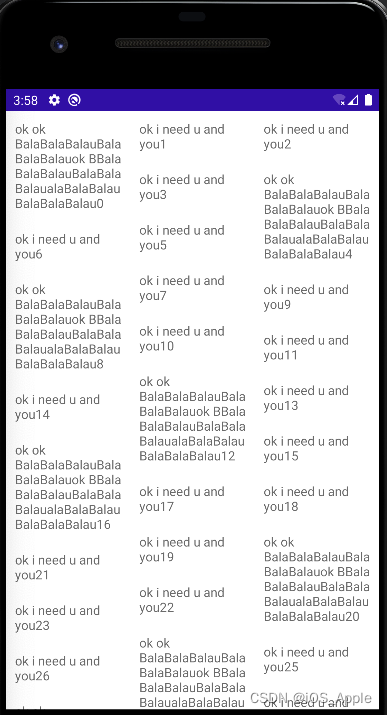
更为强大的滚动组件
因为ListView 只能实现纵向滚动。要是实现横向滚动的时候就不行了 。
首先想要使用这个控件,必须在build.gradle 中添加相应的依赖库才行
implementation 'androidx.recyclerview:recyclerview:1.3.0'
xml
<androidx.recyclerview.widget.RecyclerViewandroid:id="@+id/rv"android:layout_width="match_parent"android:layout_height="match_parent"/>adapter
package com.example.leonardoday1;import android.content.Context;
import android.view.View;
import android.view.ViewGroup;
import android.widget.TextView;import androidx.annotation.NonNull;
import androidx.recyclerview.widget.RecyclerView;import org.w3c.dom.Text;import java.util.List;public class MyRecyclerAdapter extends RecyclerView.Adapter<MyRecyclerAdapter.MyViewHolder> {private List<Bean> datas;private Context context;public MyRecyclerAdapter(List<Bean> datas, Context context) {this.datas = datas;this.context = context;}@NonNull@Overridepublic MyRecyclerAdapter.MyViewHolder onCreateViewHolder(@NonNull ViewGroup parent, int viewType) {View view = View.inflate(context,R.layout.recyclerview_item,null);return new MyViewHolder(view);}@Overridepublic void onBindViewHolder(@NonNull MyRecyclerAdapter.MyViewHolder holder, int position) {// 绑定数据方法设置值holder.tv.setText(datas.get(position).name);}@Overridepublic int getItemCount() {// 这个方式显示多少itemreturn datas == null ?  0 :  datas.size();}public class MyViewHolder extends RecyclerView.ViewHolder {private TextView tv;public MyViewHolder(@NonNull View itemView) {super(itemView);tv = itemView.findViewById(R.id.tv);itemView.setOnClickListener(new View.OnClickListener() {@Overridepublic void onClick(View view) {
//             Google废弃了getAdapterPosition()方法,但是却又提供了getBindingAdapterPosition()和
//             getAbsoluteAdapterPosition()这两个方法。从方法名可以看出来,一个是用于获取元素位于当前绑定Adapter的位置
//             一个是用于获取元素位于Adapter中的绝对位置(一般常用的就是这个)。// 调用自己的监听方法mItemClickListener.onReceiveItemClick(getBindingAdapterPosition());}});}}private  OnRecyclerItemClickListener mItemClickListener;public void setRecyclerItemClickListener(OnRecyclerItemClickListener listener){mItemClickListener = listener;}// 创建一个接口 回调点击事件public interface OnRecyclerItemClickListener{void onReceiveItemClick(int position);}
}
调用
package com.example.leonardoday1;import android.os.Bundle;
import android.util.Log;
import android.widget.LinearLayout;import androidx.appcompat.app.AppCompatActivity;
import androidx.recyclerview.widget.GridLayoutManager;
import androidx.recyclerview.widget.LinearLayoutManager;
import androidx.recyclerview.widget.RecyclerView;
import androidx.recyclerview.widget.StaggeredGridLayoutManager;import java.util.ArrayList;
import java.util.List;public class MainActivity extends AppCompatActivity {private static final String TAG = "Leonardo";private List<Bean> datas = new ArrayList<>();@Overrideprotected void onCreate(Bundle savedInstanceState) {super.onCreate(savedInstanceState);setContentView(R.layout.activity_main);for (int i = 0; i < 100; i++) {Bean bean;if (i % 4 != 0){bean = new Bean("ok i need u and you" + i);}else{bean = new Bean("ok ok BalaBalaBalauBalaBalaBalauok BBalaBalaBalauBalaBalaBalaualaBalaBalauBalaBalaBalau" + i);}datas.add(bean);}RecyclerView rv = findViewById(R.id.rv);MyRecyclerAdapter adapter =  new MyRecyclerAdapter(datas,this);// 设置adapterrv.setAdapter(adapter);// 设置布局// 这里设置为线性的布局
//        LinearLayoutManager layoutManager = new LinearLayoutManager(this);
//        rv.setLayoutManager(layoutManager);// 网格布局
//         Context context,
//    int spanCount, 一行显示3个
//    int orientation,
//    boolean reverseLayout
//        GridLayoutManager gridLayoutManager = new GridLayoutManager(this, 3);
//        rv.setLayoutManager(gridLayoutManager);//         int spanCount, 一行几个
//    int orientation// 瀑布流布局StaggeredGridLayoutManager staggeredGridLayoutManager = new StaggeredGridLayoutManager(3, LinearLayout.VERTICAL);rv.setLayoutManager(staggeredGridLayoutManager);// 设置监听 自己实现的监听方法adapter.setRecyclerItemClickListener(new MyRecyclerAdapter.OnRecyclerItemClickListener() {@Overridepublic void onReceiveItemClick(int position) {Log.e(TAG, "onReceiveItemClick: " + position);}});}}