SpringCloud GateWay与Nacos使用

网关就相当于一个内网与外网的出入口,起着 安全、验证的功能,如果没有网关,那么如果需要实现验证的功能,除非
SpringCloud GateWay 作为微服务的网关,起着如下作用
① 作为所有API接口服务请求的接入点
② 作为所有后端业务服务的聚合点,所有业务服务都可以在这里被调用
③ 实现安全、验证、路由、过滤、流控等策略,进行一些必要的中介处理
④ 统一管理: 提供配置管理工具,对所有API服务的调用生命周期和相应的中介策略进行统一的管理
(当然 由于多了一次中间转发,所以 QPS 就会下降)
下面就总结一下 SpringCloud GateWay 与 Nacos 的整合与使用
一、基础项目搭建
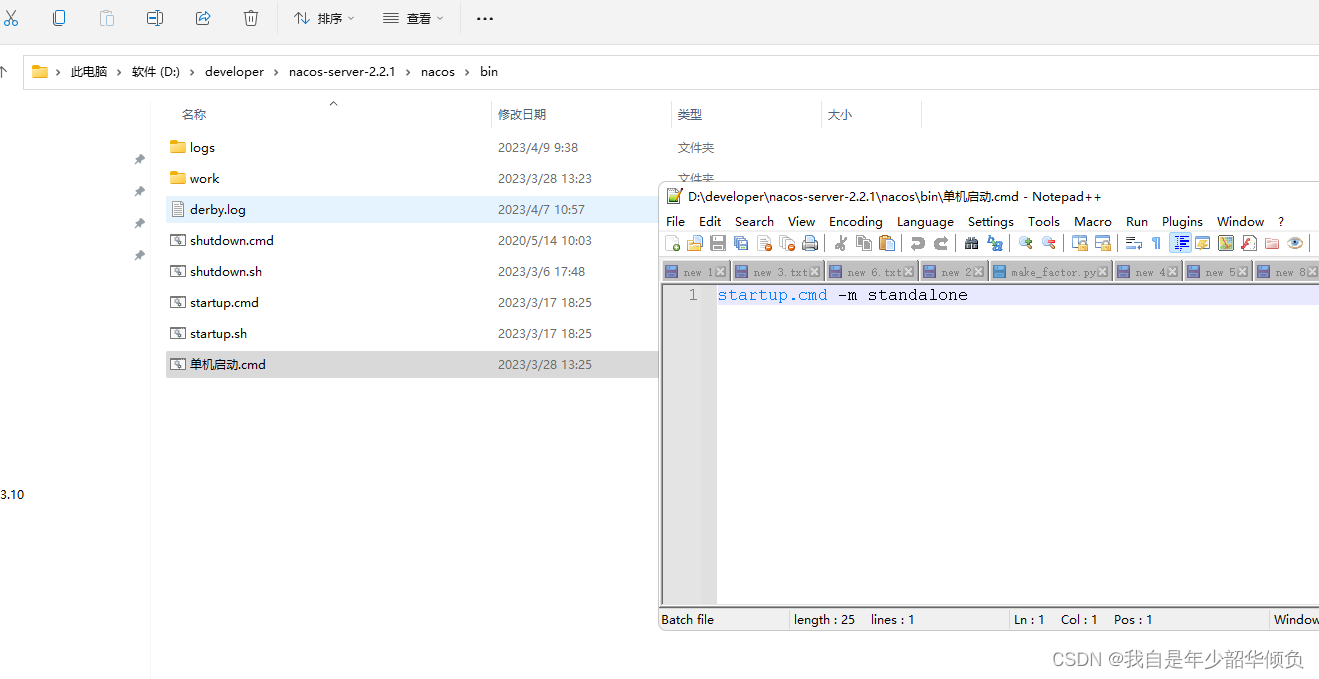
① 启动nacos 服务,这里是以单击的形式启动(nacos 下载地址可以自己百度)
其默认端口为8848 账户名为nacos 密码为nacos
② 创建项目
父项目 (定义SpringCloud 版本 以及 SpringBoot 版本 以及公共 依赖)
gateway-service ( 子项目,实现Nacos 服务发现以及 权限过滤)
user-service (子项目,实现Nacos 服务注册以及充当服务提供者的功能)
其结构图如下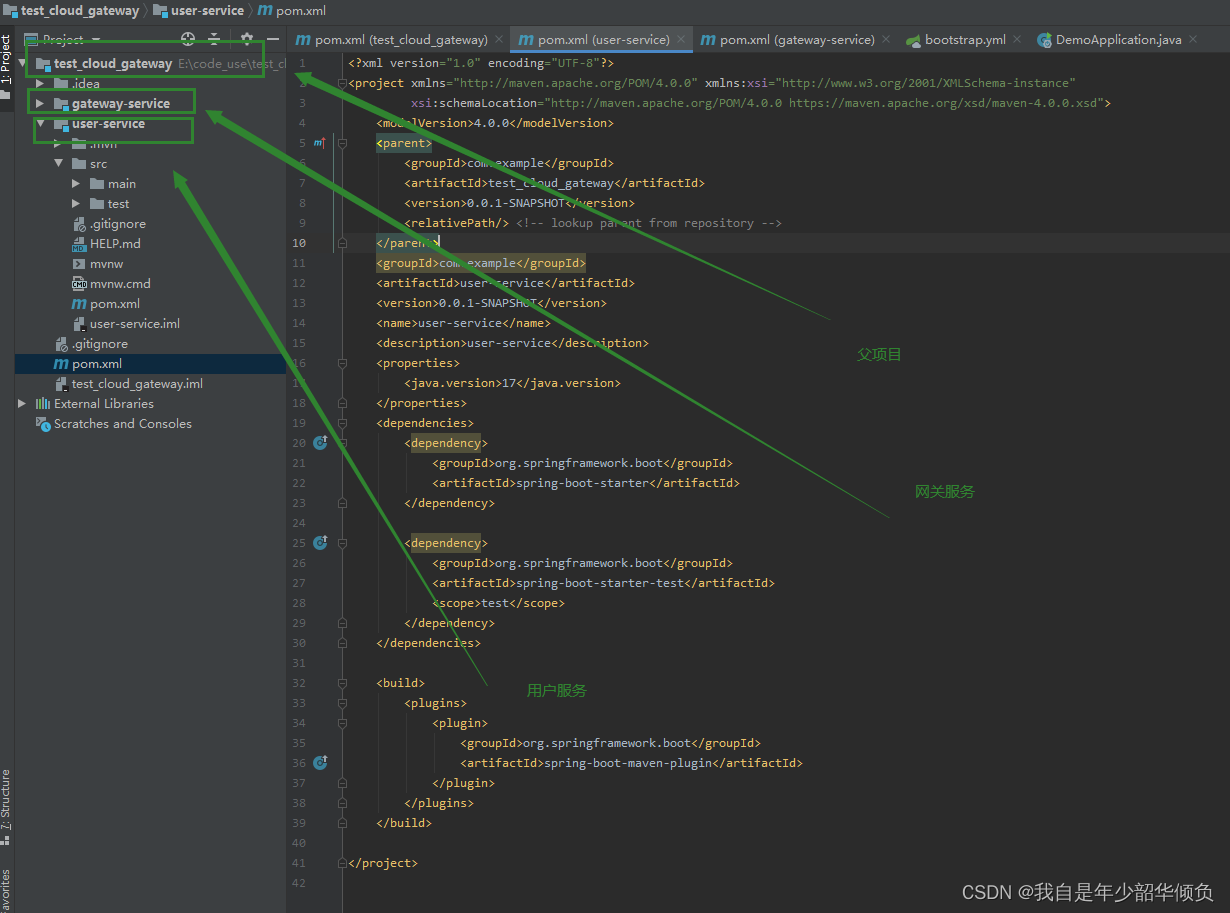
父项目 pom.xml 文件
<?xml version="1.0" encoding="UTF-8"?>
<project xmlns="http://maven.apache.org/POM/4.0.0" xmlns:xsi="http://www.w3.org/2001/XMLSchema-instance"xsi:schemaLocation="http://maven.apache.org/POM/4.0.0 https://maven.apache.org/xsd/maven-4.0.0.xsd"><modelVersion>4.0.0</modelVersion><parent><groupId>org.springframework.boot</groupId><artifactId>spring-boot-starter-parent</artifactId><version>2.4.2</version><relativePath/> <!-- lookup parent from repository --></parent><groupId>com.example</groupId><artifactId>test_cloud_gateway</artifactId><version>0.0.1-SNAPSHOT</version><name>demo</name><description>test_cloud_gateway</description><modules><module>gateway-service</module><module>user-service</module></modules><properties><java.version>8</java.version><spring.boot.version>2.4.2</spring.boot.version><alibaba.cloud.version>2021.1</alibaba.cloud.version><spring.cloud.version>2020.0.1</spring.cloud.version><jackson.verson>2.8.9</jackson.verson><maven.compiler.source>1.8</maven.compiler.source><maven.compiler.target>1.8</maven.compiler.target></properties><dependencies><dependency><groupId>org.springframework.boot</groupId><artifactId>spring-boot-starter</artifactId></dependency><dependency><groupId>org.springframework.boot</groupId><artifactId>spring-boot-starter-test</artifactId><scope>test</scope></dependency><!-- Nacos 配置管理 --><dependency><groupId>com.alibaba.cloud</groupId><artifactId>spring-cloud-starter-alibaba-nacos-config</artifactId></dependency><!-- Nacos 服务发现 --><dependency><groupId>com.alibaba.cloud</groupId><artifactId>spring-cloud-starter-alibaba-nacos-discovery</artifactId></dependency><!-- 使用log4j2 作为项目日志 --><dependency><groupId>org.springframework.boot</groupId><artifactId>spring-boot-starter</artifactId><exclusions> <!-- 去掉springboot自带的日志 --><exclusion><groupId>org.springframework.boot</groupId><artifactId>spring-boot-starter-logging</artifactId></exclusion></exclusions></dependency><dependency><groupId>org.springframework.boot</groupId><artifactId>spring-boot-starter-log4j2</artifactId></dependency><!-- apache.commons begin --><dependency><groupId>org.apache.commons</groupId><artifactId>commons-lang3</artifactId></dependency><!-- SpringCloud 框架 --><dependency><groupId>org.springframework.cloud</groupId><artifactId>spring-cloud-starter</artifactId></dependency><dependency><groupId>org.projectlombok</groupId><artifactId>lombok</artifactId><optional>true</optional><version>1.18.20</version></dependency><dependency><groupId>org.springframework.cloud</groupId><artifactId>spring-cloud-starter-bootstrap</artifactId><version>3.1.1</version></dependency></dependencies><dependencyManagement><dependencies><!-- spring cloud 依赖 --><dependency><groupId>org.springframework.cloud</groupId><artifactId>spring-cloud-dependencies</artifactId><version>${spring.cloud.version}</version><type>pom</type><scope>import</scope></dependency><dependency><groupId>org.springframework.boot</groupId><artifactId>spring-boot-dependencies</artifactId><version>${spring.boot.version}</version><type>pom</type><scope>import</scope></dependency><dependency><groupId>com.alibaba.cloud</groupId><artifactId>spring-cloud-alibaba-dependencies</artifactId><version>${alibaba.cloud.version}</version><type>pom</type><scope>import</scope></dependency></dependencies></dependencyManagement><build><plugins><plugin><groupId>org.springframework.boot</groupId><artifactId>spring-boot-maven-plugin</artifactId><version>${spring.boot.version}</version></plugin></plugins></build></project>
( 吐槽一下: SpringCloud 以及 SpringCloug Alibaba 的组件的版本之间有点坑,稍不注意就有可能导致 类缺少或者其他的问题)
GateWay-service 服务
pom.xml 文件
<?xml version="1.0" encoding="UTF-8"?>
<project xmlns="http://maven.apache.org/POM/4.0.0" xmlns:xsi="http://www.w3.org/2001/XMLSchema-instance"xsi:schemaLocation="http://maven.apache.org/POM/4.0.0 https://maven.apache.org/xsd/maven-4.0.0.xsd"><modelVersion>4.0.0</modelVersion><parent><groupId>com.example</groupId><artifactId>test_cloud_gateway</artifactId><version>0.0.1-SNAPSHOT</version><relativePath/> <!-- lookup parent from repository --></parent><groupId>com.example</groupId><artifactId>gateway-service</artifactId><version>0.0.1-SNAPSHOT</version><name>demo</name><description>gateway-service</description><properties><java.version>17</java.version></properties><dependencies><dependency><groupId>org.springframework.cloud</groupId><artifactId>spring-cloud-starter-gateway</artifactId><version>3.0.4</version></dependency><dependency><groupId>org.springframework.cloud</groupId><artifactId>spring-cloud-starter-loadbalancer</artifactId><version>3.0.4</version>  <!-- 版本号是必须要加的 --></dependency><dependency><groupId>org.springframework.boot</groupId><artifactId>spring-boot-configuration-processor</artifactId><optional>true</optional></dependency></dependencies><build><plugins><plugin><groupId>org.springframework.boot</groupId><artifactId>spring-boot-maven-plugin</artifactId></plugin></plugins></build></project>
application.yml 文件
spring:cloud:nacos:discovery:server-addr: 127.0.0.1:8848 # 注册中心地址username: nacospassword: nacoslocator:enabled: true # gateway 可以从nacos 中发现微服务application:name: gateway-serviceserver:port: 9091
(因为在bootstrap.yml文件中声明了配置中心以及文件的后缀格式,这时候项目启动就会自动获取nacos 上的gate-way-service.yaml 文件作为其启动配置项)
User-service 服务
pom.xml 文件
<?xml version="1.0" encoding="UTF-8"?>
<project xmlns="http://maven.apache.org/POM/4.0.0" xmlns:xsi="http://www.w3.org/2001/XMLSchema-instance"xsi:schemaLocation="http://maven.apache.org/POM/4.0.0 https://maven.apache.org/xsd/maven-4.0.0.xsd"><modelVersion>4.0.0</modelVersion><parent><groupId>com.example</groupId><artifactId>test_cloud_gateway</artifactId><version>0.0.1-SNAPSHOT</version><relativePath/> <!-- lookup parent from repository --></parent><groupId>com.example</groupId><artifactId>user-service</artifactId><version>0.0.1-SNAPSHOT</version><name>user-service</name><description>user-service</description><properties><java.version>8</java.version></properties><dependencies><dependency><groupId>org.springframework.boot</groupId><artifactId>spring-boot-starter</artifactId></dependency><dependency><groupId>org.springframework.boot</groupId><artifactId>spring-boot-starter-test</artifactId><scope>test</scope></dependency><dependency><groupId>com.fasterxml.jackson.core</groupId><artifactId>jackson-databind</artifactId><version>2.10.2</version></dependency><dependency><groupId>org.springframework.boot</groupId><artifactId>spring-boot-starter-web</artifactId><version>${spring.boot.version}</version><exclusions> <!-- 去掉springboot自带的日志 --><exclusion><groupId>org.springframework.boot</groupId><artifactId>spring-boot-starter-logging</artifactId></exclusion></exclusions></dependency></dependencies><build><plugins><plugin><groupId>org.springframework.boot</groupId><artifactId>spring-boot-maven-plugin</artifactId></plugin></plugins></build></project>
application.yml
server:port: 8099
dubbo:application:name: ${spring.application.name}qos-enable: falseregistry:address: nacos://127.0.0.1:8848use-as-metadata-center: falseuse-as-config-center: falseparameters:register-mode: instance
请求类:
package com.example.userservice.controller;import com.example.userservice.pojo.User;
import org.springframework.web.bind.annotation.PathVariable;
import org.springframework.web.bind.annotation.RequestMapping;
import org.springframework.web.bind.annotation.RestController;import java.util.HashMap;
import java.util.Map;/* @author zhangyang* @version 1.0* @Date 2023/4/9 15:44* @Description*/
@RestController
@RequestMapping("/user")
public class UserController {private static Map<Integer, User> userMap;static {userMap = new HashMap<>();userMap.put(1, new User(1, "张三"));userMap.put(2, new User(2, "李四"));userMap.put(3, new User(3, "王五"));}@RequestMapping("/findById/{id}")public User findById(@PathVariable("id") Integer id) {// 为了测试方便,用此方式模拟用户查询return userMap.get(id);}
}
package com.example.userservice.pojo;import lombok.AllArgsConstructor;
import lombok.Data;/* @author zhangyang* @version 1.0* @Date 2023/4/9 15:46* @Description*/
@AllArgsConstructor
@Data
public class User {private Integer id;private String name;
}
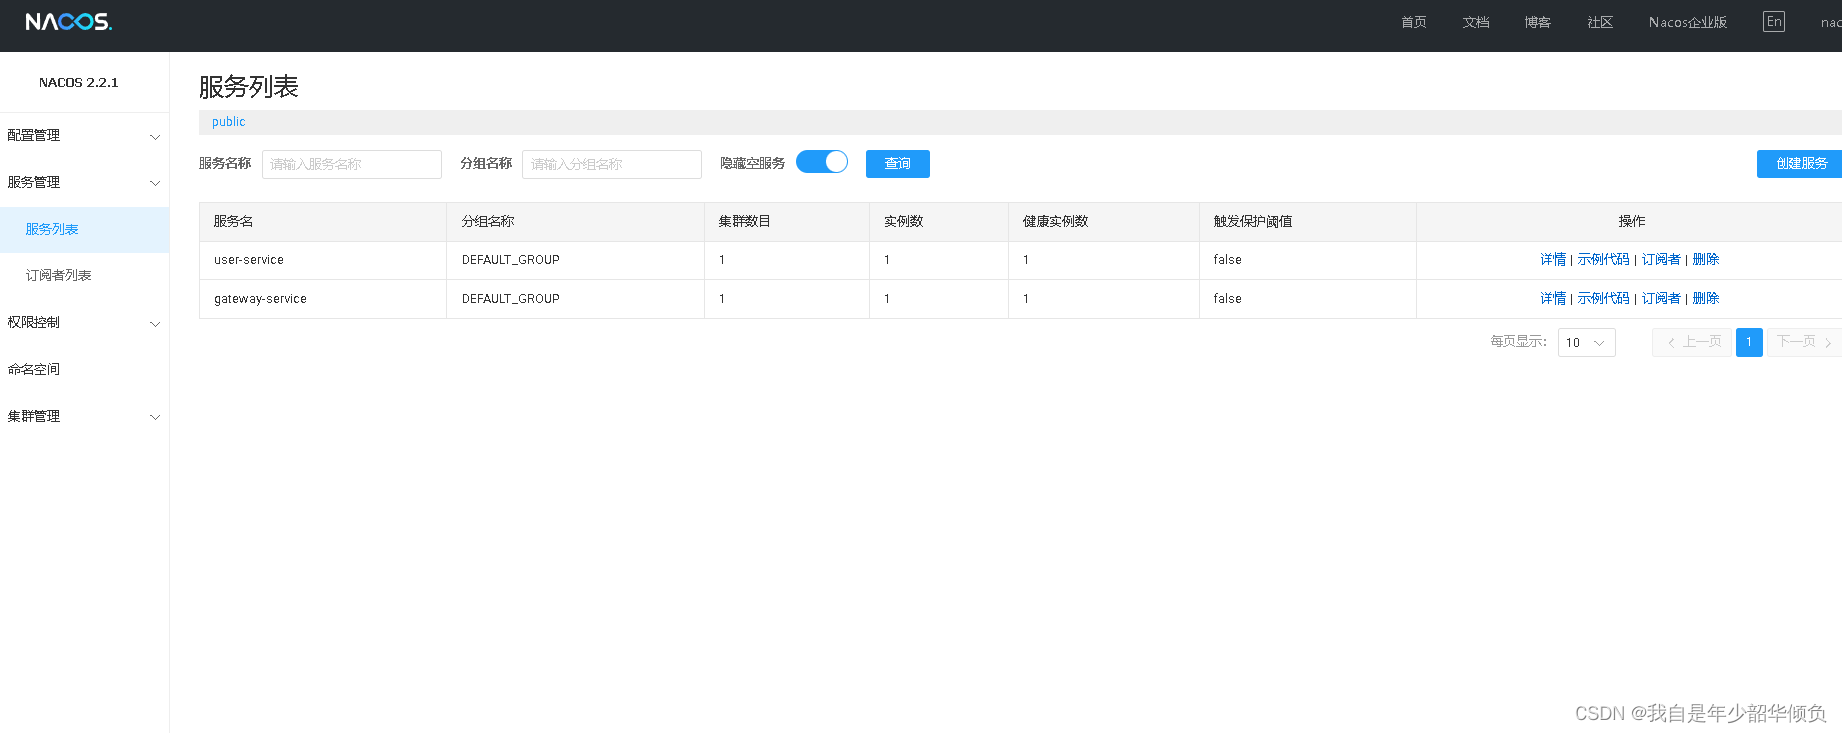
③ 启动项目
当我们启动项目后,就会在nacos 上看到注册的gateway-service 服务、user-service 服务
二、Springcloud Gateway 配置说明
Gateway 本质上就是相当于 将请求封装成一个对象,然后去匹配设置的路由信息,
然后去通过filter 处理,然后调用微服务。
1、路由服务
spring:cloud:nacos:discovery:server-addr: 127.0.0.1:8848 # 注册中心地址username: nacospassword: nacoslocator:enabled: true # gateway 可以从nacos 中发现微服务gateway:routes:- id: user-service-route # 路由的id,要保证其唯一性uri: lb://user-service # lb 表示 从nacos 中按照名称获取微服务,并遵循负载均衡策略, user-service 即微服务注册名predicates:- Path=/user-api/ # 使用断言filters:- StripPrefix=1 # 使用过滤器application:name: gateway-serviceserver:port: 9091
其中
id: 路由标识符,用于区分其他route
uri: 路由指向目的地uri,即客户端请求最终转发到微服务
predicate: 断言,用于条件判断,只有断言都返回真,才会真正的执行路由
filter : 过滤器由于修改请求和响应信息
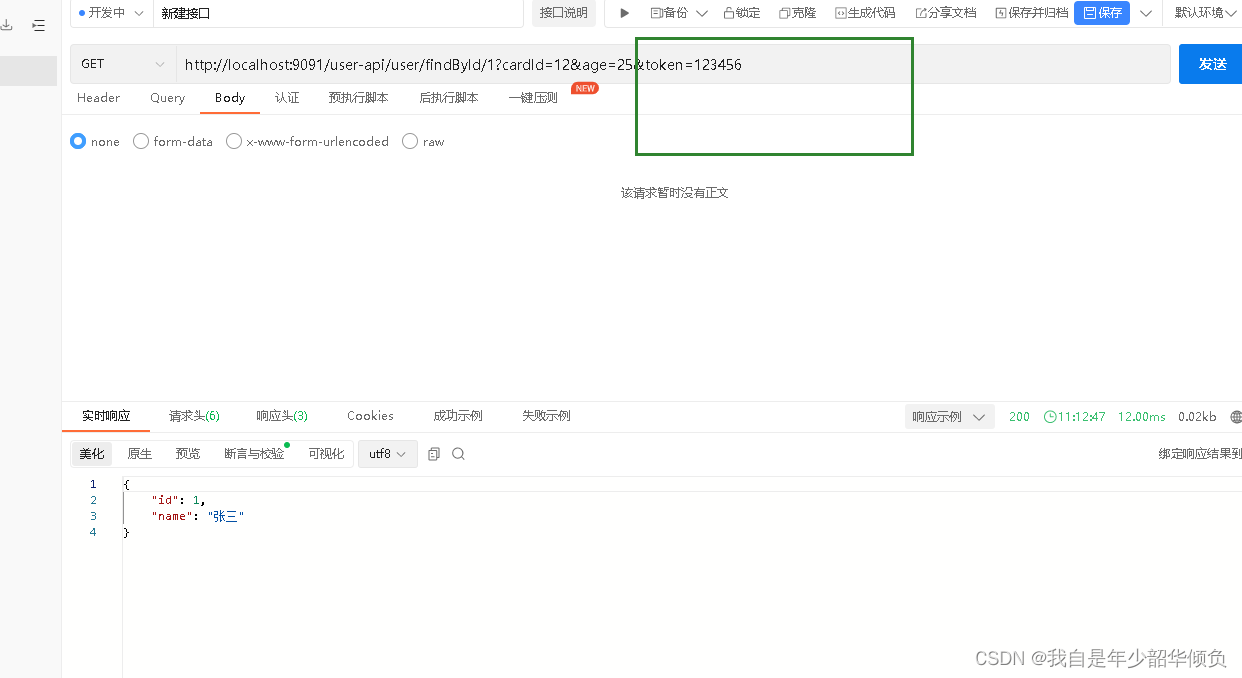
重新服务后,在地址栏上访问
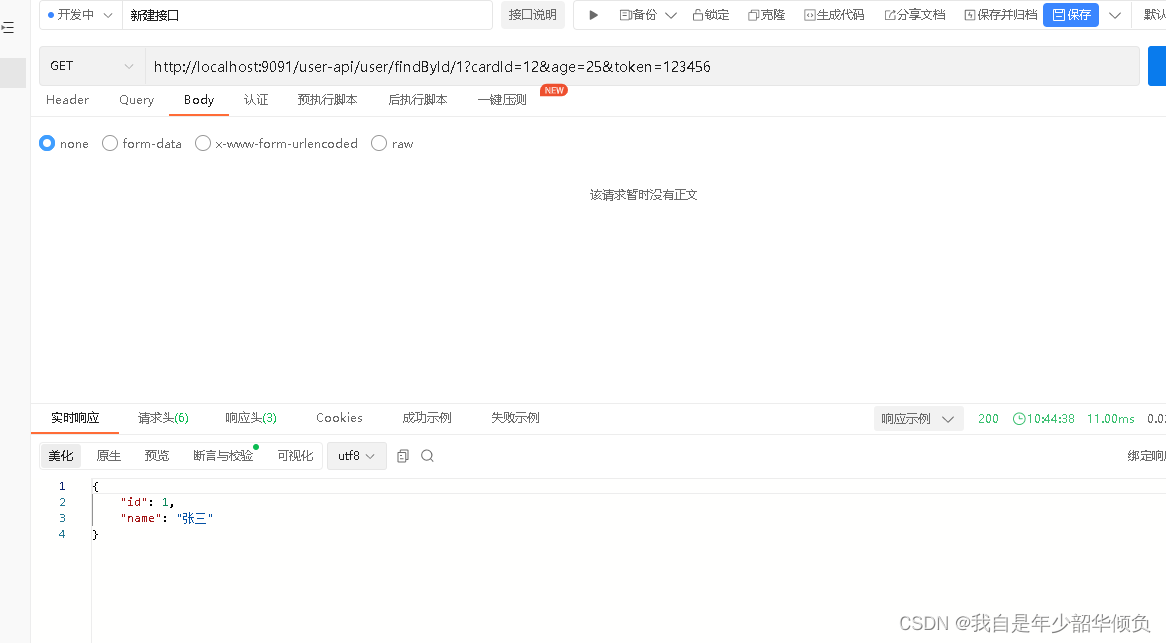
就会通过gateway 服务查询查询到对应的user-service 服务
全局过滤器
全局过滤器作用域所有路由,无需配置,通过全局过滤器可以实现对权限的统一校验,安全性验证等功能
package com.example.demo.filter;import com.fasterxml.jackson.databind.ObjectMapper;
import lombok.SneakyThrows;
import lombok.extern.slf4j.Slf4j;
import org.springframework.cloud.gateway.filter.GatewayFilterChain;
import org.springframework.cloud.gateway.filter.GlobalFilter;
import org.springframework.core.Ordered;
import org.springframework.core.io.buffer.DataBuffer;
import org.springframework.http.HttpStatus;
import org.springframework.http.server.reactive.ServerHttpResponse;
import org.springframework.stereotype.Component;
import org.springframework.web.server.ServerWebExchange;
import reactor.core.publisher.Flux;
import reactor.core.publisher.Mono;import java.util.HashMap;
import java.util.Map;/* @author zhangyang* @version 1.0* @Date 2023/4/10 10:53* @Description*/
@Component
@Slf4j
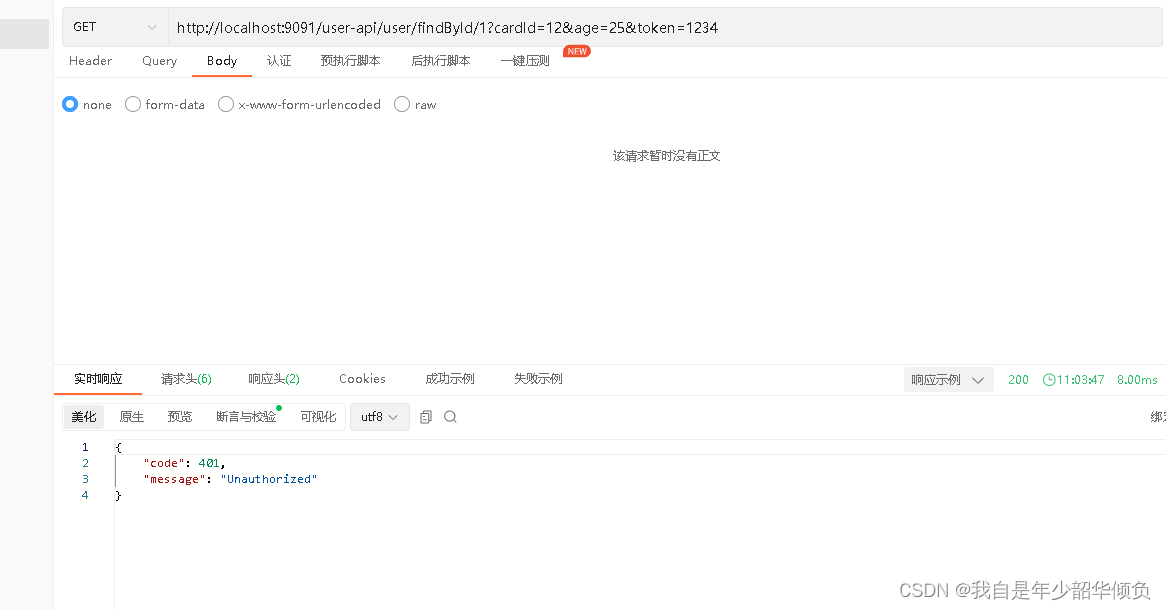
public class TokenGlobalFilter implements GlobalFilter, Ordered {@SneakyThrows@Overridepublic Mono<Void> filter(ServerWebExchange exchange, GatewayFilterChain chain) {String token = exchange.getRequest().getQueryParams().getFirst("token");if (token == null || token.length() == 0 || !token.equals("123456")) {log.error("鉴权失败");ServerHttpResponse serverHttpResponse = exchange.getResponse();serverHttpResponse.setStatusCode(HttpStatus.OK);serverHttpResponse.getHeaders().add("Content-type", "application/json;charset=UTF-8");// 鉴权失败,返回的数据结构Map<String, Object> map = new HashMap<>();map.put("code", HttpStatus.UNAUTHORIZED.value());map.put("message", HttpStatus.UNAUTHORIZED.getReasonPhrase());DataBuffer buffer = serverHttpResponse.bufferFactory().wrap(new ObjectMapper().writeValueAsBytes(map));return serverHttpResponse.writeWith(Flux.just(buffer));}return chain.filter(exchange);}@Overridepublic int getOrder() {return 0;}
}
这里是通过 网关的GlobalFilter 拦截请求头上的的token 字符串,然后用于获取token 如果不符合条件则直接异常信息
转发规则
假设: uri 都设定为 http://localhost:9023
| 规则 | 实例 | 说明 |
|---|---|---|
| Path | - Path=/gate/,/rule/ | 当请求的路径为gate、rule开头的时,转发到http:9023服务器上 |
| before | - Before=2017-01-20T17:42:47.789-07:00[America/Denver] | 在某个时间之前的请求才会被转发到http://localhost:9023服务器上 |
| After | - After=2017-01-20T17:42:47.789-07:00[America/Denver] | 在某个时间之后请求才会被转发 |
| Beteween | - Between=2017-01-20T17:42:47.789-07:00[America/Denver],2017-01-21T17:42:47.789-07:00[America/Denver] | 在某个时间段之间的才会被转发 |
| Cookie | - Cookie=chocolate, ch.p | 名为chocolate的表单或者满足正则ch.p的表单才会被匹配到进行请求转发 |
| Method | - Method=GET | 只有GET方法才会匹配转发请求,还可以限定POST、PUT等请求方式 |
过滤器规则(Filter)
| 过滤器规则 | 实例 | 说明 |
| PrefixPath | - PrefixPath=/app | 在请求路径前加上app |
| RewritePath | - RewritePath=/test, /app/test | 访问localhost:9092/test,请求会转发到localhost:8001/app/test |
| SetPath | SetPath=/app/{path} | 通过模板设置路径,转发的规则时会在路径前增加app,{path} 表示原请求路径 |
路由失败处理
当请求路由地址不匹配或者断言为false 的时候,GateWay 会默认返回Whitelabel ErrorPage 错误页面,这种错误提示不符合我们的业务需求。
我们可以自定义返回一个较为友好的错误提示,需要创建一个类继承DefaultErrorWebExceptionHandler 类,重写其方法
public class MyErrorWebExceptionHandler extends DefaultErrorWebExceptionHandler {public MyErrorWebExceptionHandler(ErrorAttributes errorAttributes,ResourceProperties resourceProperties,ErrorProperties errorProperties,ApplicationContext applicationContext) {super(errorAttributes, resourceProperties, errorProperties, applicationContext);}@Overrideprotected RouterFunction<ServerResponse> getRoutingFunction(ErrorAttributes errorAttributes) {return RouterFunctions.route(RequestPredicates.all(), this::renderErrorResponse);}@Overrideprotected Mono<ServerResponse> renderErrorResponse(ServerRequest request) {boolean includeStackTrace = isIncludeStackTrace(request, MediaType.ALL);Map<String, Object> errorMap = getErrorAttributes(request, includeStackTrace);int status = Integer.valueOf(errorMap.get("status").toString());Map<String, Object> response = this.response(status, errorMap.get("error").toString(), errorMap);return ServerResponse.status(status).contentType(MediaType.APPLICATION_JSON).body(BodyInserters.fromValue(response));}// 我们希望返回的数据结构public static Map<String, Object> response(int status, String errorMessage, Map<String, Object> errorMap) {Map<String, Object> map = new HashMap<>();map.put("code", status);map.put("message", errorMessage);map.put("data", errorMap);return map;}
}
配置Bean 实例
@Configuration
public class GatewayConfiguration {private final ServerProperties serverProperties;private final ApplicationContext applicationContext;private final ResourceProperties resourceProperties;private final List<ViewResolver> viewResolvers;private final ServerCodecConfigurer serverCodecConfigurer;public GatewayConfiguration(ServerProperties serverProperties,ApplicationContext applicationContext,ResourceProperties resourceProperties,ObjectProvider<List<ViewResolver>> viewResolversProvider,ServerCodecConfigurer serverCodecConfigurer) {this.serverProperties = serverProperties;this.applicationContext = applicationContext;this.resourceProperties = resourceProperties;this.viewResolvers = viewResolversProvider.getIfAvailable(Collections::emptyList);this.serverCodecConfigurer = serverCodecConfigurer;}@Bean("myErrorWebExceptionHandler")@Order(Ordered.HIGHEST_PRECEDENCE)public ErrorWebExceptionHandler myErrorWebExceptionHandler(ErrorAttributes errorAttributes) {MyErrorWebExceptionHandler exceptionHandler = new MyErrorWebExceptionHandler(errorAttributes,this.resourceProperties,this.serverProperties.getError(),this.applicationContext);exceptionHandler.setViewResolvers(this.viewResolvers);exceptionHandler.setMessageWriters(this.serverCodecConfigurer.getWriters());exceptionHandler.setMessageReaders(this.serverCodecConfigurer.getReaders());return exceptionHandler;}
}
重启Gateway项目后,访问一个不符合条件的断言

跨域访问
修改配置文件
spring:cloud:nacos:discovery:server-addr: 127.0.0.1:8848 # 注册中心地址username: nacospassword: nacoslocator:enabled: true # gateway 可以从nacos 中发现微服务gateway:globalcors:cors-configurations:'[/]':allowedOrigins: "*"allowedMethods: "*"alloedHeaders: "*"routes:- id: user-service-route # 路由的id,要保证其唯一性uri: lb://user-service # lb 表示 从nacos 中按照名称获取微服务,并遵循负载均衡策略, user-service 即微服务注册名predicates:- Path=/user-api/ # 使用断言filters:- StripPrefix=1 # 使用过滤器application:name: gateway-serviceserver:port: 9091
整合Setinel 进行限流
添加对应的依赖
<dependency><groupId>com.alibaba.cloud</groupId><artifactId>spring-cloud-starter-alibaba-sentinel</artifactId>
</dependency><dependency><groupId>com.alibaba.csp</groupId><artifactId>sentinel-spring-cloud-gateway-adapter</artifactId>
</dependency>
复制代码
修改对应的配置文件,连接Sentinel 控制台:
spring:cloud:sentinel:transport:port: 8719dashboard: localhost:8081配置对应的SentinelFilter 实例
@Configuration
public class GatewayConfiguration {@Bean@Order(-1)public GlobalFilter sentinelGatewayFilter() {return new SentinelGatewayFilter();}
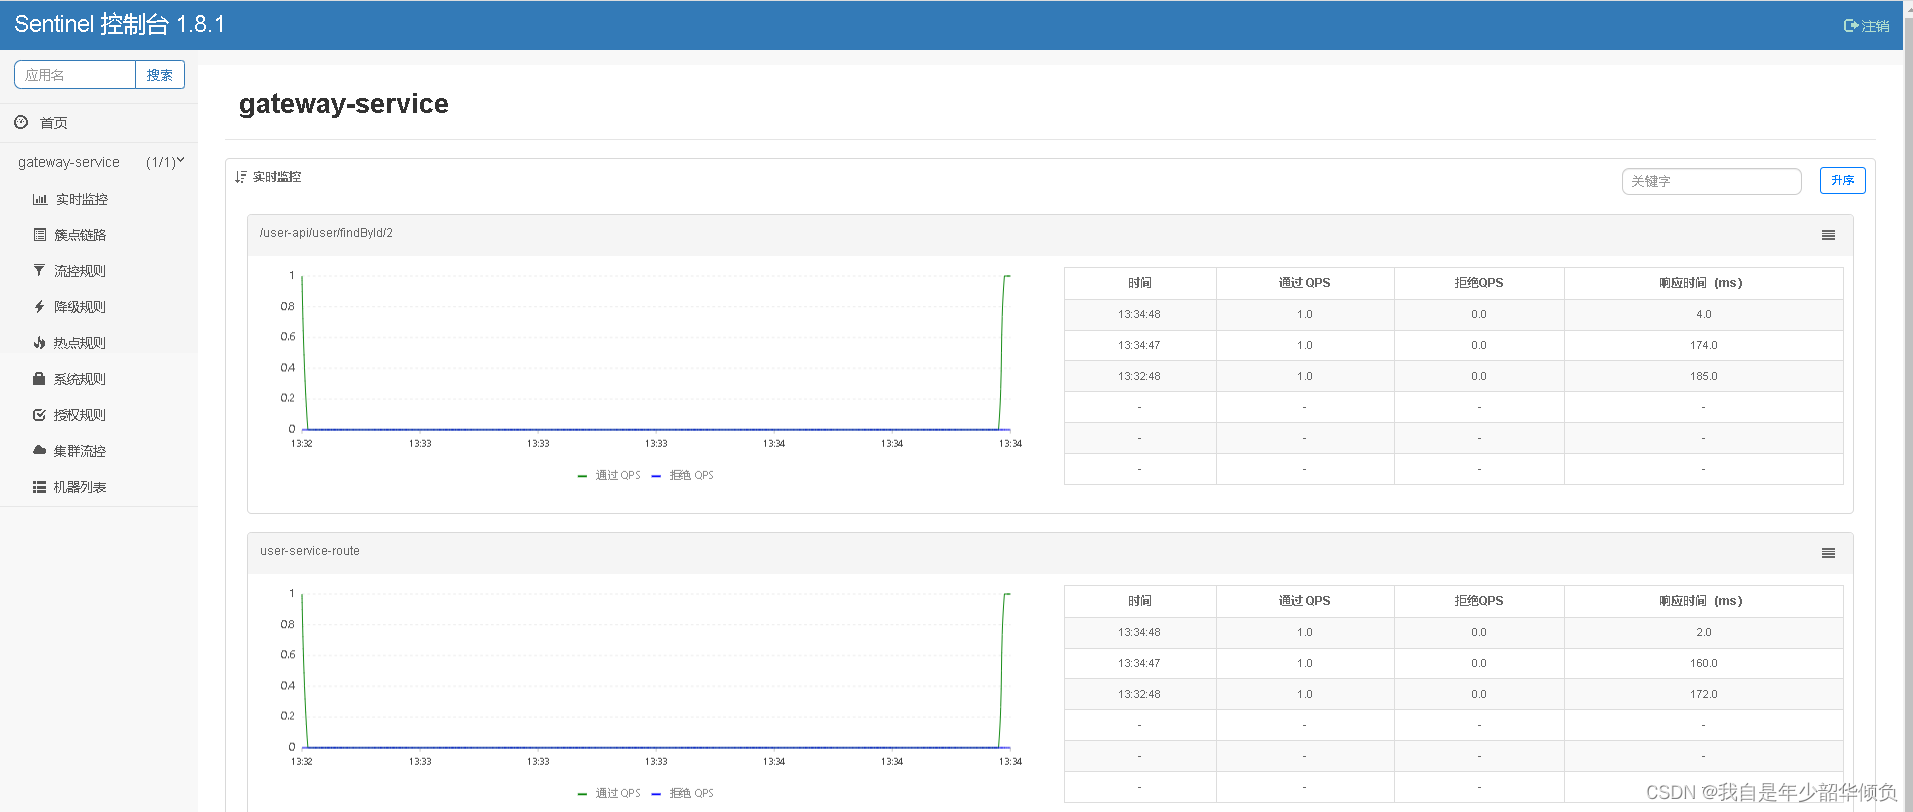
}然后重启网关,登录Sentinel 控制台查看