nginx-代理多个服务

目录
1.主机多Ip
1.1单网卡多ip主机配置
1.2修改default.conf
1.3server1.conf
1.3server2.conf
1.4测试文件
1.4重启测试
2.主机多端口
2.1server1.conf
2.2server2.conf
3.多域名代理
3.1server1.conf
3.2server2.conf
1.主机多Ip
1.1单网卡多ip主机配置
# 查看网络信息 1: lo: 本地  2: enp0s3:添加ip的网卡位置,名字可能不一样
# inet 192.168.1.124 虚拟机ip
[root@localhost html]# ip a1: lo: <LOOPBACK,UP,LOWER_UP> mtu 65536 qdisc noqueue state UNKNOWN group default qlen 1000link/loopback 00:00:00:00:00:00 brd 00:00:00:00:00:00inet 127.0.0.1/8 scope host lovalid_lft forever preferred_lft foreverinet6 ::1/128 scope host valid_lft forever preferred_lft forever
2: enp0s3: <BROADCAST,MULTICAST,UP,LOWER_UP> mtu 1500 qdisc pfifo_fast state UP group default qlen 1000link/ether 08:00:27:8a:00:a7 brd ff:ff:ff:ff:ff:ffinet 192.168.1.124/24 brd 192.168.1.255 scope global noprefixroute dynamic enp0s3valid_lft 988sec preferred_lft 988secinet6 fe80::e09e:e70e:87c8:45f2/64 scope link noprefixroute valid_lft forever preferred_lft forever
# 对于 enp0s3 添加另外的ip/掩码,添加的ip在局域网内不能被使用的,不确定可以使用ping命令
ip a add 192.168.1.125/24  dev enp0s3
# ip a 可以看到多了一个地址
[root@localhost html]# ip a1: lo: <LOOPBACK,UP,LOWER_UP> mtu 65536 qdisc noqueue state UNKNOWN group default qlen 1000link/loopback 00:00:00:00:00:00 brd 00:00:00:00:00:00inet 127.0.0.1/8 scope host lovalid_lft forever preferred_lft foreverinet6 ::1/128 scope host valid_lft forever preferred_lft forever
2: enp0s3: <BROADCAST,MULTICAST,UP,LOWER_UP> mtu 1500 qdisc pfifo_fast state UP group default qlen 1000link/ether 08:00:27:8a:00:a7 brd ff:ff:ff:ff:ff:ffinet 192.168.1.124/24 brd 192.168.1.255 scope global noprefixroute dynamic enp0s3valid_lft 6895sec preferred_lft 6895secinet 192.168.1.125/24 scope global secondary enp0s3valid_lft forever preferred_lft foreverinet6 fe80::e09e:e70e:87c8:45f2/64 scope link noprefixroute valid_lft forever preferred_lft forever
1.2修改default.conf
cd /etc/nginx/conf.d/
# 备份
cp default.conf  /opt/backup/default.conf
# 重命名default名称
mv default.conf server1.conf
# 复制一份
cp server1.conf server2.conf
vi /etc/nginx/conf.d/server1.conf
vi /etc/nginx/conf.d/server2.conf
1.3server1.conf
server {listen      192.168.1.124:80;server_name  localhost;location / {root   /opt/app/server1;index  server2.html;}error_page   500 502 503 504 /50x.html;error_page   404 /404x.html;location = /50x.html {root   /usr/share/nginx/html;}location = /404x.html {root  /usr/share/nginx/html;}
}
1.3server2.conf
server {listen      192.168.1.125:80;server_name  localhost;location / {root   /opt/app/server2;index  server2.html;}error_page   500 502 503 504 /50x.html;error_page   404 /404x.html;location = /50x.html {root   /usr/share/nginx/html;}location = /404x.html {root  /usr/share/nginx/html;}
}
1.4测试文件
mkdir /opt/app/server1
vi  /opt/app/server1/server1.html
<!DOCTYPE html>
<html>
<head>
<title>Welcome to nginx!</title>
<style>
html { color-scheme: light dark; }
body { width: 35em; margin: 0 auto;
font-family: Tahoma, Verdana, Arial, sans-serif; }
</style>
</head>
<body>
<h1>service1</h1>
</body>
</html>
mkdir /opt/app/server2
vi /opt/app/server2/server2.html
<!DOCTYPE html>
<html>
<head>
<title>Welcome to nginx!</title>
<style>
html { color-scheme: light dark; }
body { width: 35em; margin: 0 auto;
font-family: Tahoma, Verdana, Arial, sans-serif; }
</style>
</head>
<body>
<h1>service2</h1>
</body>
</html>
1.4重启测试
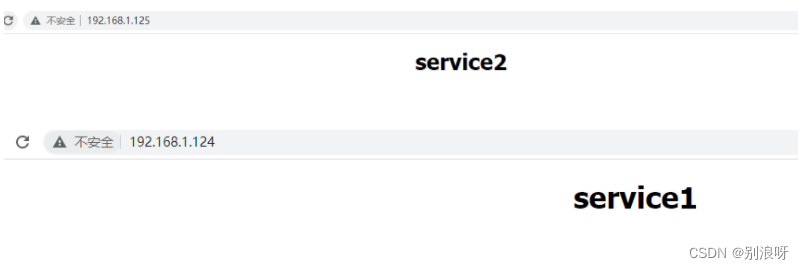
systemctl restart nginx.service
http://192.168.1.125/
http://192.168.1.124/
2.主机多端口
# 文件在下面
vi /etc/nginx/conf.d/server1.conf
vi /etc/nginx/conf.d/server2.conf
firewall-cmd --zone=public --add-port=81/tcp --permanent
firewall-cmd --zone=public --add-port=82/tcp --permanent
firewall-cmd --reload
# 检查配置文件语法是否正确
nginx -tc /etc/nginx/nginx.conf
# 重启nginx
sudo systemctl restart nginx.service
http://192.168.1.124:81
http://192.168.1.124:82
# 查看再用的端口
ss -luntp
cp LISTEN 0 128 *:81 *:* users:(("nginx",pid=1700,fd=6),("nginx",pid=1699,fd=6))
tcp LISTEN 0 128 *:82 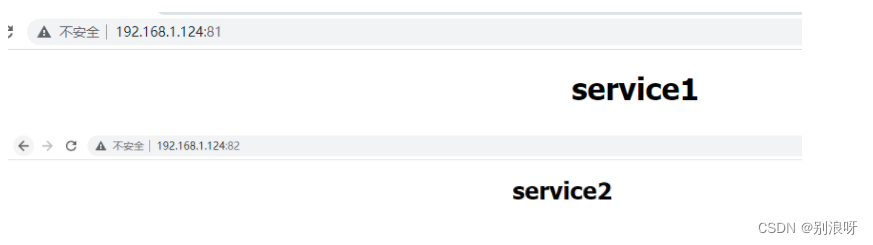
2.1server1.conf
server {listen      81;server_name  localhost;location / {root   /opt/app/server1;index  server2.html;}error_page   500 502 503 504 /50x.html;error_page   404 /404x.html;location = /50x.html {root   /usr/share/nginx/html;}location = /404x.html {root  /usr/share/nginx/html;}
}
2.2server2.conf
server {listen      82;server_name  localhost;location / {root   /opt/app/server2;index  server2.html;}error_page   500 502 503 504 /50x.html;error_page   404 /404x.html;location = /50x.html {root   /usr/share/nginx/html;}location = /404x.html {root  /usr/share/nginx/html;}
}
3.多域名代理
# 修改主机host文件
192.168.1.124 1.nginx.cn
192.168.1.124 2.nginx.cn
# Win+R->C:\\windows\\System32\\drivers\\etc
# 记事本管理员权限,编辑hosts文件粘贴在最下面即可,或者复制到桌面然后在复制进去即可
# 文件在下面
vi /etc/nginx/conf.d/server1.conf
vi /etc/nginx/conf.d/server2.conf
# 检查配置文件语法是否正确
[root@localhost ~]# nginx -tc /etc/nginx/nginx.conf
nginx: the configuration file /etc/nginx/nginx.conf syntax is ok
nginx: configuration file /etc/nginx/nginx.conf test is successful
# 重启nginx
sudo systemctl restart nginx.service
1.nginx.cn
2.nginx.cn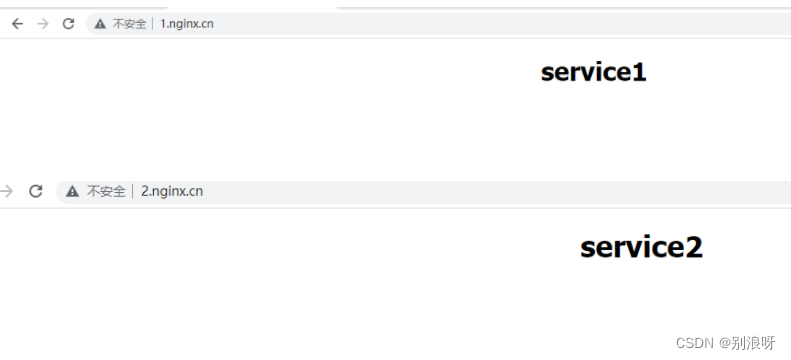
3.1server1.conf
 server {listen      80;server_name  1.nginx.cn;location / {root   /opt/app/server1;index  server2.html;}error_page   500 502 503 504 /50x.html;error_page   404 /404x.html;location = /50x.html {root   /usr/share/nginx/html;}location = /404x.html {root  /usr/share/nginx/html;}
}
3.2server2.conf
server {listen      80;server_name  2.nginx.cn;location / {root   /opt/app/server2;index  server2.html;}error_page   500 502 503 504 /50x.html;error_page   404 /404x.html;location = /50x.html {root   /usr/share/nginx/html;}location = /404x.html {root  /usr/share/nginx/html;}
}