笔记--学习mini3d代码

主要是记录学习mini3d代码时,查的资料;
从github下载的代码:
GitHub - skywind3000/mini3d: 3D Software Renderer in 700 Lines !!3D Software Renderer in 700 Lines !! Contribute to skywind3000/mini3d development by creating an account on GitHub. https://github.com/skywind3000/mini3d
1. 数学运算
1.1 类型定义以及结构体
typedef unsigned int IUINT32;//=====================================================================
// 数学库:此部分应该不用详解,熟悉 D3D 矩阵变换即可
//=====================================================================
typedef struct { float m[4][4]; } matrix_t;
typedef struct { float x, y, z, w; } vector_t;
typedef vector_t point_t;
定义了向量类型(vector_t)、矩阵类型(matrix_t)、点类型(point_t);
1.2 基础判断方法
int CMID(int x, int min, int max) { return (x < min)? min : ((x > max)? max : x); }// 计算插值:t 为 [0, 1] 之间的数值
float interp(float x1, float x2, float t) { return x1 + (x2 - x1) * t; }
CMID使用用来将x的值约束在min和max之间的有效值;如果小于min,则返回min;如果大于max,则返回max;
interp用来计算两个数值之间的线性插值,在x1到x2范围内的值,分割x1-x2为两部分,即0-t和t-1两部分,可以计算得到t点对应的数值。范围在[x1,x2]内;
1.3 向量(点)运算
向量的运算主要有,对向量取模、归一化处理求得单位向量、加、减、点积、叉积;
坐标点的运算,则只有加、减、插值;
这里有困惑的地方是,按照GAMES101中的说法,点的w都是1,向量的w都是0,这里在加减、叉积、插值等运算中都将w设置为了1;不过也可能是代码比较简洁,省略了这个地方;
// | v |
float vector_length(const vector_t *v) {float sq = v->x * v->x + v->y * v->y + v->z * v->z;return (float)sqrt(sq);
}// z = x + y
void vector_add(vector_t *z, const vector_t *x, const vector_t *y) {z->x = x->x + y->x;z->y = x->y + y->y;z->z = x->z + y->z;z->w = 1.0;
}// z = x - y
void vector_sub(vector_t *z, const vector_t *x, const vector_t *y) {z->x = x->x - y->x;z->y = x->y - y->y;z->z = x->z - y->z;z->w = 1.0;
}// 矢量点乘
float vector_dotproduct(const vector_t *x, const vector_t *y) {return x->x * y->x + x->y * y->y + x->z * y->z;
}// 矢量叉乘
void vector_crossproduct(vector_t *z, const vector_t *x, const vector_t *y) {float m1, m2, m3;m1 = x->y * y->z - x->z * y->y;m2 = x->z * y->x - x->x * y->z;m3 = x->x * y->y - x->y * y->x;z->x = m1;z->y = m2;z->z = m3;z->w = 1.0f;
}// 矢量插值,t取值 [0, 1]
void vector_interp(vector_t *z, const vector_t *x1, const vector_t *x2, float t) {z->x = interp(x1->x, x2->x, t);z->y = interp(x1->y, x2->y, t);z->z = interp(x1->z, x2->z, t);z->w = 1.0f;
}// 矢量归一化
void vector_normalize(vector_t *v) {float length = vector_length(v);if (length != 0.0f) {float inv = 1.0f / length;v->x *= inv; v->y *= inv;v->z *= inv;}
}
1.4 矩阵运算
1.4.1 矩阵间运算
包括了矩阵之间的加法、减法以及矩阵乘法;
// c = a + b
void matrix_add(matrix_t *c, const matrix_t *a, const matrix_t *b) {int i, j;for (i = 0; i < 4; i++) {for (j = 0; j < 4; j++)c->m[i][j] = a->m[i][j] + b->m[i][j];}
}// c = a - b
void matrix_sub(matrix_t *c, const matrix_t *a, const matrix_t *b) {int i, j;for (i = 0; i < 4; i++) {for (j = 0; j < 4; j++)c->m[i][j] = a->m[i][j] - b->m[i][j];}
}// c = a * b
void matrix_mul(matrix_t *c, const matrix_t *a, const matrix_t *b) {matrix_t z;int i, j;for (i = 0; i < 4; i++) {for (j = 0; j < 4; j++) {z.m[j][i] = (a->m[j][0] * b->m[0][i]) +(a->m[j][1] * b->m[1][i]) +(a->m[j][2] * b->m[2][i]) +(a->m[j][3] * b->m[3][i]);}}c[0] = z;
}
1.4.2 矩阵与常数
// c = a * f
void matrix_scale(matrix_t *c, const matrix_t *a, float f) {int i, j;for (i = 0; i < 4; i++) {for (j = 0; j < 4; j++) c->m[i][j] = a->m[i][j] * f;}
}
1.4.3 矩阵与向量
在该代码中,将向量设置为行向量,则与矩阵的乘法为向量右乘矩阵;
// y = x * m
void matrix_apply(vector_t *y, const vector_t *x, const matrix_t *m) {float X = x->x, Y = x->y, Z = x->z, W = x->w;y->x = X * m->m[0][0] + Y * m->m[1][0] + Z * m->m[2][0] + W * m->m[3][0];y->y = X * m->m[0][1] + Y * m->m[1][1] + Z * m->m[2][1] + W * m->m[3][1];y->z = X * m->m[0][2] + Y * m->m[1][2] + Z * m->m[2][2] + W * m->m[3][2];y->w = X * m->m[0][3] + Y * m->m[1][3] + Z * m->m[2][3] + W * m->m[3][3];
}
1.4.4 初始化矩阵
// 设置为单位矩阵
void matrix_set_identity(matrix_t *m) {m->m[0][0] = m->m[1][1] = m->m[2][2] = m->m[3][3] = 1.0f; m->m[0][1] = m->m[0][2] = m->m[0][3] = 0.0f;m->m[1][0] = m->m[1][2] = m->m[1][3] = 0.0f;m->m[2][0] = m->m[2][1] = m->m[2][3] = 0.0f;m->m[3][0] = m->m[3][1] = m->m[3][2] = 0.0f;
}
// 设置为全0矩阵
void matrix_set_zero(matrix_t *m) {m->m[0][0] = m->m[0][1] = m->m[0][2] = m->m[0][3] = 0.0f;m->m[1][0] = m->m[1][1] = m->m[1][2] = m->m[1][3] = 0.0f;m->m[2][0] = m->m[2][1] = m->m[2][2] = m->m[2][3] = 0.0f;m->m[3][0] = m->m[3][1] = m->m[3][2] = m->m[3][3] = 0.0f;
}
1.5 缩放、平移、旋转
齐次矩阵被用于图形学中对图像的缩放、平移以及旋转的操作;
2D图像使用三维齐次矩阵,3D图像使用四维齐次矩阵;多出来的一个维度是w和平移值;一般情况下w为0表示该行向量或者列向量为向量,w为1表示该行或者该列为一个点;
关于缩放、平移以及旋转的原理,请查图形学相关章节;
平移
// 平移变换
void matrix_set_translate(matrix_t *m, float x, float y, float z) {matrix_set_identity(m);m->m[3][0] = x;m->m[3][1] = y;m->m[3][2] = z;
}
缩放
// 缩放变换
void matrix_set_scale(matrix_t *m, float x, float y, float z) {matrix_set_identity(m);m->m[0][0] = x;m->m[1][1] = y;m->m[2][2] = z;
}
旋转
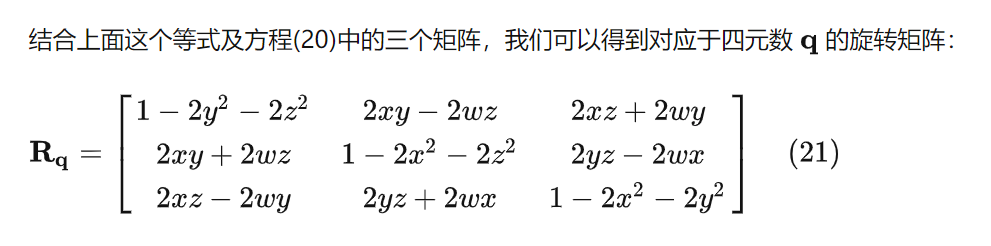
实现绕(x,y,z)向量旋转theta度的变换矩阵,一般情况下,使用四元数的旋转计算公式即可;
// 旋转矩阵
void matrix_set_rotate(matrix_t *m, float x, float y, float z, float theta) {float qsin = (float)sin(theta * 0.5f);float qcos = (float)cos(theta * 0.5f);vector_t vec = { x, y, z, 1.0f };float w = qcos;vector_normalize(&vec);x = vec.x * qsin;y = vec.y * qsin;z = vec.z * qsin;m->m[0][0] = 1 - 2 * y * y - 2 * z * z;m->m[1][0] = 2 * x * y - 2 * w * z;m->m[2][0] = 2 * x * z + 2 * w * y;m->m[0][1] = 2 * x * y + 2 * w * z;m->m[1][1] = 1 - 2 * x * x - 2 * z * z;m->m[2][1] = 2 * y * z - 2 * w * x;m->m[0][2] = 2 * x * z - 2 * w * y;m->m[1][2] = 2 * y * z + 2 * w * x;m->m[2][2] = 1 - 2 * x * x - 2 * y * y;m->m[0][3] = m->m[1][3] = m->m[2][3] = 0.0f;m->m[3][0] = m->m[3][1] = m->m[3][2] = 0.0f;    m->m[3][3] = 1.0f;
}
详细内容请参见四元数的旋转:
四元数和旋转(Quaternion & rotation)![]() https://zhuanlan.zhihu.com/p/78987582
https://zhuanlan.zhihu.com/p/78987582
也可以看之前的笔记,关于绕任意轴旋转的笔记: VTK笔记-几何变换-绕任意轴旋转![]() https://blog.csdn.net/liushao1031177/article/details/119829226
https://blog.csdn.net/liushao1031177/article/details/119829226
2. MVP变换
2.1 模型视图变换
在计算投影图像之前,需要将相机平移到世界原点位置,将相机的朝向-z方向,将相机的向上方向与+y平行;
在移动和旋转相机的同时,将物体也一并移动和缩放;通过这一变换,就形成了标准的投影变换前的坐标系,后面只要通过投影变换、View变换就可以得到渲染2D图像;
详细的计算步骤,查看博客:
3、计算机图形学——模型视图变换、投影变换与视口变换![]() https://blog.csdn.net/Master_Cui/article/details/119219663
https://blog.csdn.net/Master_Cui/article/details/119219663
matrix_set_lookat函数是一并计算了平移和旋转后的变换矩阵;
// 设置摄像机
void matrix_set_lookat(matrix_t *m, const vector_t *eye, const vector_t *at, const vector_t *up) {vector_t xaxis, yaxis, zaxis;vector_sub(&zaxis, at, eye);vector_normalize(&zaxis);vector_crossproduct(&xaxis, up, &zaxis);vector_normalize(&xaxis);vector_crossproduct(&yaxis, &zaxis, &xaxis);m->m[0][0] = xaxis.x;m->m[1][0] = xaxis.y;m->m[2][0] = xaxis.z;m->m[3][0] = -vector_dotproduct(&xaxis, eye);m->m[0][1] = yaxis.x;m->m[1][1] = yaxis.y;m->m[2][1] = yaxis.z;m->m[3][1] = -vector_dotproduct(&yaxis, eye);m->m[0][2] = zaxis.x;m->m[1][2] = zaxis.y;m->m[2][2] = zaxis.z;m->m[3][2] = -vector_dotproduct(&zaxis, eye);m->m[0][3] = m->m[1][3] = m->m[2][3] = 0.0f;m->m[3][3] = 1.0f;
}
程序使用投影变换是采用D3DXMatrixPerspectiveFovLH的方法,z轴的映射范围为[0,1],x和y的范围为[-1,1],其计算方法和GAMES101中的方法有所不同:
按照GAMES101的投影变换的博客,可以参照上面那篇博客;
这是解析同样这个代码的笔记:
光栅化渲染器 学习笔记 - 知乎![]() https://zhuanlan.zhihu.com/p/74510058
https://zhuanlan.zhihu.com/p/74510058
其中fovy是fov的角度,aspect是屏幕的宽高比,zn为前裁剪平面z坐标;zf为后裁剪平面z坐标;
// D3DXMatrixPerspectiveFovLH
void matrix_set_perspective(matrix_t *m, float fovy, float aspect, float zn, float zf) {float fax = 1.0f / (float)tan(fovy * 0.5f);matrix_set_zero(m);m->m[0][0] = (float)(fax / aspect);m->m[1][1] = (float)(fax);m->m[2][2] = zf / (zf - zn);m->m[3][2] = - zn * zf / (zf - zn);m->m[2][3] = 1;
}
计算后的点坐标满足下面的等式:
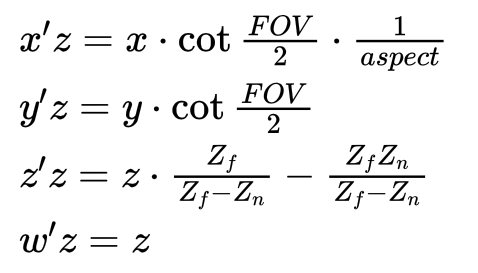
因为变换后的w的值是z;
定义一个记录变换信息的结构体transform_t,内部有三个变换矩阵,和一个由三个变换矩阵右乘后的结果变换矩阵,以及平面的宽w和高h;
//=====================================================================
// 坐标变换
//=====================================================================
typedef struct { matrix_t world;         // 世界坐标变换matrix_t view;          // 摄影机坐标变换matrix_t projection;    // 投影变换matrix_t transform;     // transform = world * view * projectionfloat w, h;             // 屏幕大小
}    transform_t;
调用方法transform_update可以更新ts对象内的transform最终变换矩阵;
// 矩阵更新,计算 transform = world * view * projection
void transform_update(transform_t *ts) {matrix_t m;matrix_mul(&m, &ts->world, &ts->view);matrix_mul(&ts->transform, &m, &ts->projection);
}
在初始时,由初设的宽度和高度,计算出初始的变换矩阵,这里将world和view设置为单位矩阵,FOV为45度,相机在原点,前裁剪平面位于(0,0,1)处,后裁剪平面位于(0,0,500)处;
// 初始化,设置屏幕长宽
void transform_init(transform_t *ts, int width, int height) {float aspect = (float)width / ((float)height);matrix_set_identity(&ts->world);matrix_set_identity(&ts->view);matrix_set_perspective(&ts->projection, 3.1415926f * 0.5f, aspect, 1.0f, 500.0f);ts->w = (float)width;ts->h = (float)height;transform_update(ts);
}
计算x坐标投影变换到视平面上的坐标:
// 将矢量 x 进行 project
void transform_apply(const transform_t *ts, vector_t *y, const vector_t *x) {matrix_apply(y, x, &ts->transform);
}
// 检查齐次坐标同 cvv 的边界用于视锥裁剪
int transform_check_cvv(const vector_t *v) {float w = v->w;int check = 0;if (v->z < 0.0f) check |= 1;if (v->z > w) check |= 2;if (v->x < -w) check |= 4;if (v->x > w) check |= 8;if (v->y < -w) check |= 16;if (v->y > w) check |= 32;return check;
}还不清楚这的x是什么坐标,这里的w值会是什么样子??
w是计算后的投影变换的结果,从结果上看值是等于z的;
这里加日志或者断点,看看-------------------
// 归一化,得到屏幕坐标
void transform_homogenize(const transform_t *ts, vector_t *y, const vector_t *x) {float rhw = 1.0f / x->w;y->x = (x->x * rhw + 1.0f) * ts->w * 0.5f;y->y = (1.0f - x->y * rhw) * ts->h * 0.5f;y->z = x->z * rhw;y->w = 1.0f;
}
和顶点相关的结构体:
//=====================================================================
// 几何计算:顶点、扫描线、边缘、矩形、步长计算
//=====================================================================
// 颜色
typedef struct { float r, g, b; } color_t;
// 纹理uv坐标
typedef struct { float u, v; } texcoord_t;
// 顶点信息
typedef struct { point_t pos;    // 三维坐标点texcoord_t tc;  // 纹理坐标color_t color;  // RGB颜色float rhw;      // W的倒数} vertex_t;typedef struct {vertex_t v;     // 边上的某一个点,用作输出或者标识;vertex_t v1;    // vertex_t v2;    // 边的两个端点} edge_t;
typedef struct { float top;      // 梯形上边的y值 float bottom;   // 梯形底边的y值edge_t left;    // 梯形左腰边信息edge_t right;   // 梯形右腰边信息} trapezoid_t;
typedef struct { vertex_t v, step; int x, y, w; } scanline_t;
Reciprocal of Homogeneous W的缩写是rhw,是齐次矩阵中的w的倒数;
void vertex_rhw_init(vertex_t *v) {float rhw = 1.0f / v->pos.w;v->rhw = rhw;v->tc.u *= rhw;v->tc.v *= rhw;v->color.r *= rhw;v->color.g *= rhw;v->color.b *= rhw;
}
这里没有看懂,记录下,后面看看这个博客:
深入探索透视纹理映射(下)![]() https://blog.csdn.net/popy007/article/details/5570803
https://blog.csdn.net/popy007/article/details/5570803
顶点间的运算
// 齐次坐标中所有元素的插值;
void vertex_interp(vertex_t *y, const vertex_t *x1, const vertex_t *x2, float t) {vector_interp(&y->pos, &x1->pos, &x2->pos, t);y->tc.u = interp(x1->tc.u, x2->tc.u, t);y->tc.v = interp(x1->tc.v, x2->tc.v, t);y->color.r = interp(x1->color.r, x2->color.r, t);y->color.g = interp(x1->color.g, x2->color.g, t);y->color.b = interp(x1->color.b, x2->color.b, t);y->rhw = interp(x1->rhw, x2->rhw, t);
}
// 顶点之间的除法,可以看做是做了一个变相的插值;
void vertex_division(vertex_t *y, const vertex_t *x1, const vertex_t *x2, float w) {float inv = 1.0f / w;y->pos.x = (x2->pos.x - x1->pos.x) * inv;y->pos.y = (x2->pos.y - x1->pos.y) * inv;y->pos.z = (x2->pos.z - x1->pos.z) * inv;y->pos.w = (x2->pos.w - x1->pos.w) * inv;y->tc.u = (x2->tc.u - x1->tc.u) * inv;y->tc.v = (x2->tc.v - x1->tc.v) * inv;y->color.r = (x2->color.r - x1->color.r) * inv;y->color.g = (x2->color.g - x1->color.g) * inv;y->color.b = (x2->color.b - x1->color.b) * inv;y->rhw = (x2->rhw - x1->rhw) * inv;
}
// 两个顶点的加法,即使齐次坐标的各个元素的加法;
void vertex_add(vertex_t *y, const vertex_t *x) {y->pos.x += x->pos.x;y->pos.y += x->pos.y;y->pos.z += x->pos.z;y->pos.w += x->pos.w;y->rhw += x->rhw;y->tc.u += x->tc.u;y->tc.v += x->tc.v;y->color.r += x->color.r;y->color.g += x->color.g;y->color.b += x->color.b;
}计算三角形,可以计算到待绘制三角形的信息,使用与x平行的线扫描方式,因此将三角形按照y方向的直线分割最为简单;
trapezoid_init_triangle方法分别根据三种不同的情况,生成0个、1个或2个梯形信息;包括了top的y最大值、y最小值,梯形的左腰边两端的顶点,梯形右腰边两端的顶点;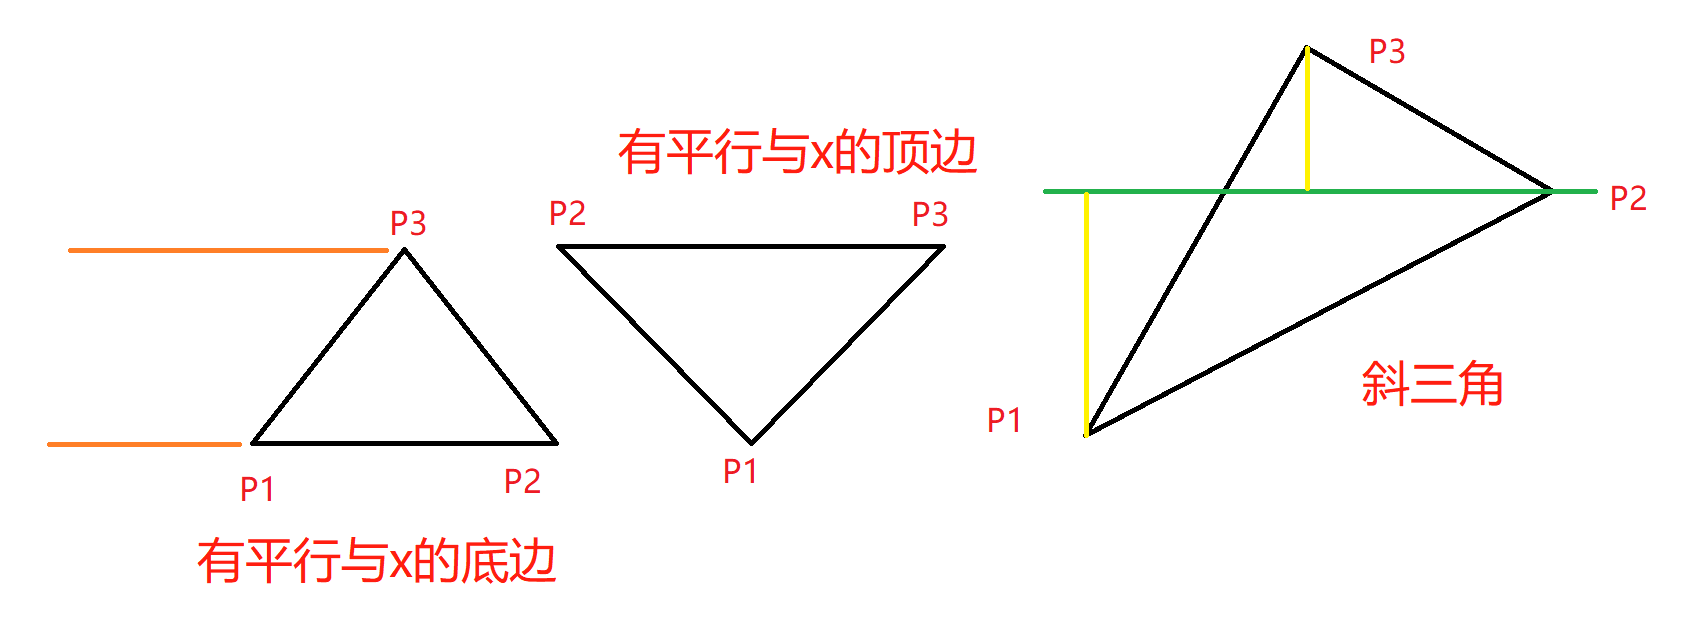
在之前学习TinyRenderer的时,填充三角网格的方法即是分别填充上三角形和下三角形;学习TinyRenderer![]() https://blog.csdn.net/liushao1031177/article/details/128733314
https://blog.csdn.net/liushao1031177/article/details/128733314
具体代码如下:
// 根据三角形生成 0-2 个梯形,并且返回合法梯形的数量
int trapezoid_init_triangle(trapezoid_t *trap, const vertex_t *p1, const vertex_t *p2, const vertex_t *p3) {const vertex_t *p;float k, x;// 三个点按照y,从小到大排列;if (p1->pos.y > p2->pos.y) p = p1, p1 = p2, p2 = p;if (p1->pos.y > p3->pos.y) p = p1, p1 = p3, p3 = p;if (p2->pos.y > p3->pos.y) p = p2, p2 = p3, p3 = p;// 如果三点在同一y方向上,或者在同一个x方向上,即共线,返回个数为0;if (p1->pos.y == p2->pos.y && p1->pos.y == p3->pos.y) return 0;if (p1->pos.x == p2->pos.x && p1->pos.x == p3->pos.x) return 0;// 如果前面两个点y相等,就以这两个点为三角形的底边;if (p1->pos.y == p2->pos.y) {    // triangle down// 底边上的两个点根据x坐标排序if (p1->pos.x > p2->pos.x) p = p1, p1 = p2, p2 = p;// 梯形的上下两个y值trap[0].top = p1->pos.y;trap[0].bottom = p3->pos.y;// 左侧腰,边上两个顶点;trap[0].left.v1 = *p1;trap[0].left.v2 = *p3;// 右侧腰,边上两个顶点;trap[0].right.v1 = *p2;trap[0].right.v2 = *p3;// 应该是用来判别方向的,感觉和梯形数据没啥关系;// 不对,由于已经根据Y排序了,这里不应该出现top小于bottom的情况;// 因此是用来验证结果的合法性;return (trap[0].top < trap[0].bottom)? 1 : 0;}// 如果后面两个点相等,则可以用这两个点作为倒三角的上边;if (p2->pos.y == p3->pos.y) {    // triangle up// 上边上的两个点根据x坐标排序if (p2->pos.x > p3->pos.x) p = p2, p2 = p3, p3 = p;trap[0].top = p1->pos.y;trap[0].bottom = p3->pos.y;trap[0].left.v1 = *p1;trap[0].left.v2 = *p2;trap[0].right.v1 = *p1;trap[0].right.v2 = *p3;// 同上return (trap[0].top < trap[0].bottom)? 1 : 0;}// 如果没有两个点在一个水平方向上,则三角形为斜着的;// 根据中间的点的Y坐标分割三角形;// 分为上三角和下三角trap[0].top = p1->pos.y;trap[0].bottom = p2->pos.y;trap[1].top = p2->pos.y;trap[1].bottom = p3->pos.y;k = (p3->pos.y - p1->pos.y) / (p2->pos.y - p1->pos.y);x = p1->pos.x + (p2->pos.x - p1->pos.x) * k;if (x <= p3->pos.x) {        // triangle lefttrap[0].left.v1 = *p1;trap[0].left.v2 = *p2;trap[0].right.v1 = *p1;trap[0].right.v2 = *p3;trap[1].left.v1 = *p2;trap[1].left.v2 = *p3;trap[1].right.v1 = *p1;trap[1].right.v2 = *p3;} else {                    // triangle righttrap[0].left.v1 = *p1;trap[0].left.v2 = *p3;trap[0].right.v1 = *p1;trap[0].right.v2 = *p2;trap[1].left.v1 = *p1;trap[1].left.v2 = *p3;trap[1].right.v1 = *p2;trap[1].right.v2 = *p3;}// 会有两个三角形return 2;
}
使用 trapezoid_edge_interp方法可以计算到y=y的直线与梯形的左腰和右腰边的交点,这里是分别计算了用y分割两个边的比例,然后插值得到目标点的坐标;
这里应该没有必要必要分别计算t1和t2,感觉t1和t2在数值上应该是相等的;
需要验证一下。。。。。。。
// 按照 Y 坐标计算出左右两条边纵坐标等于 Y 的顶点
void trapezoid_edge_interp(trapezoid_t *trap, float y) {float s1 = trap->left.v2.pos.y  - trap->left.v1.pos.y;float s2 = trap->right.v2.pos.y - trap->right.v1.pos.y;float t1 = (y - trap->left.v1.pos.y) / s1;float t2 = (y - trap->right.v1.pos.y) / s2;vertex_interp(&trap->left.v, &trap->left.v1, &trap->left.v2, t1);vertex_interp(&trap->right.v, &trap->right.v1, &trap->right.v2, t2);
}
vertex_division可以计算出每个扫描点之前的差值,用于做线绘制时使用;
// 根据左右两边的端点,初始化计算出扫描线的起点和步长
void trapezoid_init_scan_line(const trapezoid_t *trap, scanline_t *scanline, int y) {float width = trap->right.v.pos.x - trap->left.v.pos.x;scanline->x = (int)(trap->left.v.pos.x + 0.5f);scanline->w = (int)(trap->right.v.pos.x + 0.5f) - scanline->x;scanline->y = y;scanline->v = trap->left.v;if (trap->left.v.pos.x >= trap->right.v.pos.x) scanline->w = 0;vertex_division(&scanline->step, &trap->left.v, &trap->right.v, width);
}
画布-绘制设备
设备信息结构体:
//=====================================================================
// 渲染设备
//=====================================================================
typedef struct {transform_t transform;      // 坐标变换器int width;                  // 窗口宽度int height;                 // 窗口高度IUINT32 framebuffer;      // 像素缓存:framebuffer[y] 代表第 y行float zbuffer;            // 深度缓存:zbuffer[y] 为第 y行指针IUINT32 texture;          // 纹理:同样是每行索引int tex_width;              // 纹理宽度int tex_height;             // 纹理高度float max_u;                // 纹理最大宽度:tex_width - 1float max_v;                // 纹理最大高度:tex_height - 1int render_state;           // 渲染状态IUINT32 background;         // 背景颜色IUINT32 foreground;         // 线框颜色
} device_t;#define RENDER_STATE_WIREFRAME      1        // 渲染线框
#define RENDER_STATE_TEXTURE        2        // 渲染纹理
#define RENDER_STATE_COLOR          4        // 渲染颜色
初始化设备,清理设备;
// 设备初始化,fb为外部帧缓存,非 NULL 将引用外部帧缓存(每行 4字节对齐)
void device_init(device_t *device, int width, int height, void *fb) {int need = sizeof(void*) * (height * 2 + 1024) + width * height * 8;char *ptr = (char*)malloc(need + 64);char *framebuf, *zbuf;int j;assert(ptr);device->framebuffer = (IUINT32)ptr;device->zbuffer = (float)(ptr + sizeof(void*) * height);ptr += sizeof(void*) * height * 2;device->texture = (IUINT32)ptr;ptr += sizeof(void*) * 1024;framebuf = (char*)ptr;zbuf = (char*)ptr + width * height * 4;ptr += width * height * 8;if (fb != NULL) framebuf = (char*)fb;for (j = 0; j < height; j++) {device->framebuffer[j] = (IUINT32*)(framebuf + width * 4 * j);device->zbuffer[j] = (float*)(zbuf + width * 4 * j);}device->texture[0] = (IUINT32*)ptr;device->texture[1] = (IUINT32*)(ptr + 16);memset(device->texture[0], 0, 64);device->tex_width = 2;device->tex_height = 2;device->max_u = 1.0f;device->max_v = 1.0f;device->width = width;device->height = height;device->background = 0xc0c0c0;device->foreground = 0;transform_init(&device->transform, width, height);device->render_state = RENDER_STATE_WIREFRAME;
}// 删除设备
void device_destroy(device_t *device) {if (device->framebuffer) free(device->framebuffer);device->framebuffer = NULL;device->zbuffer = NULL;device->texture = NULL;
}
设置当前纹理,将bits指针指向的纹理二维数组的行首指针赋值给texture;更新设备信息中纹理相关的数据;
// 设置当前纹理
void device_set_texture(device_t *device, void *bits, long pitch, int w, int h) {char *ptr = (char*)bits;int j;assert(w <= 1024 && h <= 1024);for (j = 0; j < h; ptr += pitch, j++)     // 重新计算每行纹理的指针device->texture[j] = (IUINT32*)ptr;device->tex_width = w;device->tex_height = h;device->max_u = (float)(w - 1);device->max_v = (float)(h - 1);
}
根据坐标读取纹理
IUINT32 device_texture_read(const device_t *device, float u, float v) {int x, y;u = u * device->max_u;v = v * device->max_v;x = (int)(u + 0.5f);y = (int)(v + 0.5f);x = CMID(x, 0, device->tex_width - 1);y = CMID(y, 0, device->tex_height - 1);return device->texture[y][x];
}
在设备上绘制点线面
// 画点
void device_pixel(device_t *device, int x, int y, IUINT32 color) {if (((IUINT32)x) < (IUINT32)device->width && ((IUINT32)y) < (IUINT32)device->height) {device->framebuffer[y][x] = color;}
}// 绘制线段
void device_draw_line(device_t *device, int x1, int y1, int x2, int y2, IUINT32 c) {int x, y, rem = 0;if (x1 == x2 && y1 == y2) {device_pixel(device, x1, y1, c);}    else if (x1 == x2) {int inc = (y1 <= y2)? 1 : -1;for (y = y1; y != y2; y += inc) device_pixel(device, x1, y, c);device_pixel(device, x2, y2, c);}    else if (y1 == y2) {int inc = (x1 <= x2)? 1 : -1;for (x = x1; x != x2; x += inc) device_pixel(device, x, y1, c);device_pixel(device, x2, y2, c);}    else {int dx = (x1 < x2)? x2 - x1 : x1 - x2;int dy = (y1 < y2)? y2 - y1 : y1 - y2;if (dx >= dy) {if (x2 < x1) x = x1, y = y1, x1 = x2, y1 = y2, x2 = x, y2 = y;for (x = x1, y = y1; x <= x2; x++) {device_pixel(device, x, y, c);rem += dy;if (rem >= dx) {rem -= dx;y += (y2 >= y1)? 1 : -1;device_pixel(device, x, y, c);}}device_pixel(device, x2, y2, c);}    else {if (y2 < y1) x = x1, y = y1, x1 = x2, y1 = y2, x2 = x, y2 = y;for (x = x1, y = y1; y <= y2; y++) {device_pixel(device, x, y, c);rem += dx;if (rem >= dy) {rem -= dy;x += (x2 >= x1)? 1 : -1;device_pixel(device, x, y, c);}}device_pixel(device, x2, y2, c);}}
}// 绘制扫描线
void device_draw_scanline(device_t *device, scanline_t *scanline) {IUINT32 *framebuffer = device->framebuffer[scanline->y];float *zbuffer = device->zbuffer[scanline->y];int x = scanline->x;int w = scanline->w;int width = device->width;int render_state = device->render_state;for (; w > 0; x++, w--) {if (x >= 0 && x < width) {float rhw = scanline->v.rhw;if (rhw >= zbuffer[x]) {    float w = 1.0f / rhw;zbuffer[x] = rhw;if (render_state & RENDER_STATE_COLOR) {float r = scanline->v.color.r * w;float g = scanline->v.color.g * w;float b = scanline->v.color.b * w;int R = (int)(r * 255.0f);int G = (int)(g * 255.0f);int B = (int)(b * 255.0f);R = CMID(R, 0, 255);G = CMID(G, 0, 255);B = CMID(B, 0, 255);framebuffer[x] = (R << 16) | (G << 8) | (B);}if (render_state & RENDER_STATE_TEXTURE) {float u = scanline->v.tc.u * w;float v = scanline->v.tc.v * w;IUINT32 cc = device_texture_read(device, u, v);framebuffer[x] = cc;}}}vertex_add(&scanline->v, &scanline->step);if (x >= width) break;}
}
// 清空 framebuffer 和 zbuffer
void device_clear(device_t *device, int mode) {int y, x, height = device->height;for (y = 0; y < device->height; y++) {IUINT32 *dst = device->framebuffer[y];IUINT32 cc = (height - 1 - y) * 230 / (height - 1);cc = (cc << 16) | (cc << 8) | cc;if (mode == 0) cc = device->background;for (x = device->width; x > 0; dst++, x--) dst[0] = cc;}for (y = 0; y < device->height; y++) {float *dst = device->zbuffer[y];for (x = device->width; x > 0; dst++, x--) dst[0] = 0.0f;}
}
// 主渲染函数
void device_render_trap(device_t *device, trapezoid_t *trap) {scanline_t scanline;int j, top, bottom;top = (int)(trap->top + 0.5f);bottom = (int)(trap->bottom + 0.5f);for (j = top; j < bottom; j++) {if (j >= 0 && j < device->height) {trapezoid_edge_interp(trap, (float)j + 0.5f);trapezoid_init_scan_line(trap, &scanline, j);device_draw_scanline(device, &scanline);}if (j >= device->height) break;}
}// 根据 render_state 绘制原始三角形
void device_draw_primitive(device_t *device, const vertex_t *v1, const vertex_t *v2, const vertex_t *v3) {point_t p1, p2, p3, c1, c2, c3;int render_state = device->render_state;// 按照 Transform 变化transform_apply(&device->transform, &c1, &v1->pos);transform_apply(&device->transform, &c2, &v2->pos);transform_apply(&device->transform, &c3, &v3->pos);// 裁剪,注意此处可以完善为具体判断几个点在 cvv内以及同cvv相交平面的坐标比例// 进行进一步精细裁剪,将一个分解为几个完全处在 cvv内的三角形if (transform_check_cvv(&c1) != 0) return;if (transform_check_cvv(&c2) != 0) return;if (transform_check_cvv(&c3) != 0) return;// 归一化transform_homogenize(&device->transform, &p1, &c1);transform_homogenize(&device->transform, &p2, &c2);transform_homogenize(&device->transform, &p3, &c3);// 纹理或者色彩绘制if (render_state & (RENDER_STATE_TEXTURE | RENDER_STATE_COLOR)) {vertex_t t1 = *v1, t2 = *v2, t3 = *v3;trapezoid_t traps[2];int n;t1.pos = p1; t2.pos = p2;t3.pos = p3;t1.pos.w = c1.w;t2.pos.w = c2.w;t3.pos.w = c3.w;vertex_rhw_init(&t1); // 初始化 wvertex_rhw_init(&t2); // 初始化 wvertex_rhw_init(&t3); // 初始化 w// 拆分三角形为0-2个梯形,并且返回可用梯形数量n = trapezoid_init_triangle(traps, &t1, &t2, &t3);if (n >= 1) device_render_trap(device, &traps[0]);if (n >= 2) device_render_trap(device, &traps[1]);}if (render_state & RENDER_STATE_WIREFRAME) { // 线框绘制device_draw_line(device, (int)p1.x, (int)p1.y, (int)p2.x, (int)p2.y, device->foreground);device_draw_line(device, (int)p1.x, (int)p1.y, (int)p3.x, (int)p3.y, device->foreground);device_draw_line(device, (int)p3.x, (int)p3.y, (int)p2.x, (int)p2.y, device->foreground);}
}//=====================================================================
// Win32 窗口及图形绘制:为 device 提供一个 DibSection 的 FB
//=====================================================================
int screen_w, screen_h, screen_exit = 0;
int screen_mx = 0, screen_my = 0, screen_mb = 0;
int screen_keys[512]; // 当前键盘按下状态
static HWND screen_handle = NULL; // 主窗口 HWND
static HDC screen_dc = NULL; // 配套的 HDC
static HBITMAP screen_hb = NULL; // DIB
static HBITMAP screen_ob = NULL; // 老的 BITMAP
unsigned char *screen_fb = NULL; // frame buffer
long screen_pitch = 0;int screen_init(int w, int h, const TCHAR *title); // 屏幕初始化
int screen_close(void); // 关闭屏幕
void screen_dispatch(void); // 处理消息
void screen_update(void); // 显示 FrameBuffer// win32 event handler
static LRESULT screen_events(HWND, UINT, WPARAM, LPARAM); #ifdef _MSC_VER
#pragma comment(lib, "gdi32.lib")
#pragma comment(lib, "user32.lib")
#endif// 初始化窗口并设置标题
int screen_init(int w, int h, const TCHAR *title) {WNDCLASS wc = { CS_BYTEALIGNCLIENT, (WNDPROC)screen_events, 0, 0, 0, NULL, NULL, NULL, NULL, _T("SCREEN3.1415926") };BITMAPINFO bi = { { sizeof(BITMAPINFOHEADER), w, -h, 1, 32, BI_RGB, w * h * 4, 0, 0, 0, 0 } };RECT rect = { 0, 0, w, h };int wx, wy, sx, sy;LPVOID ptr;HDC hDC;screen_close();wc.hbrBackground = (HBRUSH)GetStockObject(BLACK_BRUSH);wc.hInstance = GetModuleHandle(NULL);wc.hCursor = LoadCursor(NULL, IDC_ARROW);if (!RegisterClass(&wc)) return -1;screen_handle = CreateWindow(_T("SCREEN3.1415926"), title,WS_OVERLAPPED | WS_CAPTION | WS_SYSMENU | WS_MINIMIZEBOX,0, 0, 0, 0, NULL, NULL, wc.hInstance, NULL);if (screen_handle == NULL) return -2;screen_exit = 0;hDC = GetDC(screen_handle);screen_dc = CreateCompatibleDC(hDC);ReleaseDC(screen_handle, hDC);screen_hb = CreateDIBSection(screen_dc, &bi, DIB_RGB_COLORS, &ptr, 0, 0);if (screen_hb == NULL) return -3;screen_ob = (HBITMAP)SelectObject(screen_dc, screen_hb);screen_fb = (unsigned char*)ptr;screen_w = w;screen_h = h;screen_pitch = w * 4;AdjustWindowRect(&rect, GetWindowLong(screen_handle, GWL_STYLE), 0);wx = rect.right - rect.left;wy = rect.bottom - rect.top;sx = (GetSystemMetrics(SM_CXSCREEN) - wx) / 2;sy = (GetSystemMetrics(SM_CYSCREEN) - wy) / 2;if (sy < 0) sy = 0;SetWindowPos(screen_handle, NULL, sx, sy, wx, wy, (SWP_NOCOPYBITS | SWP_NOZORDER | SWP_SHOWWINDOW));SetForegroundWindow(screen_handle);ShowWindow(screen_handle, SW_NORMAL);screen_dispatch();memset(screen_keys, 0, sizeof(int) * 512);memset(screen_fb, 0, w * h * 4);return 0;
}int screen_close(void) {if (screen_dc) {if (screen_ob) { SelectObject(screen_dc, screen_ob); screen_ob = NULL; }DeleteDC(screen_dc);screen_dc = NULL;}if (screen_hb) { DeleteObject(screen_hb); screen_hb = NULL; }if (screen_handle) { CloseWindow(screen_handle); screen_handle = NULL; }return 0;
}static LRESULT screen_events(HWND hWnd, UINT msg, WPARAM wParam, LPARAM lParam) {switch (msg) {case WM_CLOSE: screen_exit = 1; break;case WM_KEYDOWN: screen_keys[wParam & 511] = 1; break;case WM_KEYUP: screen_keys[wParam & 511] = 0; break;default: return DefWindowProc(hWnd, msg, wParam, lParam);}return 0;
}void screen_dispatch(void) {MSG msg;while (1) {if (!PeekMessage(&msg, NULL, 0, 0, PM_NOREMOVE)) break;if (!GetMessage(&msg, NULL, 0, 0)) break;DispatchMessage(&msg);}
}void screen_update(void) {HDC hDC = GetDC(screen_handle);BitBlt(hDC, 0, 0, screen_w, screen_h, screen_dc, 0, 0, SRCCOPY);ReleaseDC(screen_handle, hDC);screen_dispatch();
}//=====================================================================
// 主程序
//=====================================================================
vertex_t mesh[8] = {{ { -1, -1, 1, 1 }, { 0, 0 }, { 1.0f, 0.2f, 0.2f }, 1 },{ { 1, -1, 1, 1 }, { 0, 1 }, { 0.2f, 1.0f, 0.2f }, 1 },{ { 1, 1, 1, 1 }, { 1, 1 }, { 0.2f, 0.2f, 1.0f }, 1 },{ { -1, 1, 1, 1 }, { 1, 0 }, { 1.0f, 0.2f, 1.0f }, 1 },{ { -1, -1, -1, 1 }, { 0, 0 }, { 1.0f, 1.0f, 0.2f }, 1 },{ { 1, -1, -1, 1 }, { 0, 1 }, { 0.2f, 1.0f, 1.0f }, 1 },{ { 1, 1, -1, 1 }, { 1, 1 }, { 1.0f, 0.3f, 0.3f }, 1 },{ { -1, 1, -1, 1 }, { 1, 0 }, { 0.2f, 1.0f, 0.3f }, 1 },
};void draw_plane(device_t *device, int a, int b, int c, int d) {vertex_t p1 = mesh[a], p2 = mesh[b], p3 = mesh[c], p4 = mesh[d];p1.tc.u = 0, p1.tc.v = 0, p2.tc.u = 0, p2.tc.v = 1;p3.tc.u = 1, p3.tc.v = 1, p4.tc.u = 1, p4.tc.v = 0;device_draw_primitive(device, &p1, &p2, &p3);device_draw_primitive(device, &p3, &p4, &p1);
}void draw_box(device_t *device, float theta) {matrix_t m;matrix_set_rotate(&m, -1, -0.5, 1, theta);device->transform.world = m;transform_update(&device->transform);draw_plane(device, 0, 1, 2, 3);draw_plane(device, 7, 6, 5, 4);draw_plane(device, 0, 4, 5, 1);draw_plane(device, 1, 5, 6, 2);draw_plane(device, 2, 6, 7, 3);draw_plane(device, 3, 7, 4, 0);
}void camera_at_zero(device_t *device, float x, float y, float z) {point_t eye = { x, y, z, 1 }, at = { 0, 0, 0, 1 }, up = { 0, 0, 1, 1 };matrix_set_lookat(&device->transform.view, &eye, &at, &up);transform_update(&device->transform);
}void init_texture(device_t *device) {static IUINT32 texture[256][256];int i, j;for (j = 0; j < 256; j++) {for (i = 0; i < 256; i++) {int x = i / 32, y = j / 32;texture[j][i] = ((x + y) & 1)? 0xffffff : 0x3fbcef;}}device_set_texture(device, texture, 256 * 4, 256, 256);
}int main(void)
{device_t device;int states[] = { RENDER_STATE_TEXTURE, RENDER_STATE_COLOR, RENDER_STATE_WIREFRAME };int indicator = 0;int kbhit = 0;float alpha = 1;float pos = 3.5;TCHAR *title = _T("Mini3d (software render tutorial) - ")_T("Left/Right: rotation, Up/Down: forward/backward, Space: switch state");if (screen_init(800, 600, title)) return -1;device_init(&device, 800, 600, screen_fb);camera_at_zero(&device, 3, 0, 0);init_texture(&device);device.render_state = RENDER_STATE_TEXTURE;while (screen_exit == 0 && screen_keys[VK_ESCAPE] == 0) {screen_dispatch();device_clear(&device, 1);camera_at_zero(&device, pos, 0, 0);if (screen_keys[VK_UP]) pos -= 0.01f;if (screen_keys[VK_DOWN]) pos += 0.01f;if (screen_keys[VK_LEFT]) alpha += 0.01f;if (screen_keys[VK_RIGHT]) alpha -= 0.01f;if (screen_keys[VK_SPACE]) {if (kbhit == 0) {kbhit = 1;if (++indicator >= 3) indicator = 0;device.render_state = states[indicator];}} else {kbhit = 0;}draw_box(&device, alpha);screen_update();Sleep(1);}return 0;
}从0开始制作软渲染器(三)本文开始编写渲染器的代码。 本着色器很大程度上参考了韦易笑大神的RenderHelp渲染器。我的渲染器的理论是跟着Games101和《Fundamentals of Computer Graphics, Fourth Edition》这本书来的,和韦大神渲染器中的方程不太一样(尤其是透视投影,深度测试的地方),所以如果要跟着我这系列博客学习,请务必从头看到尾,以避免公式和细节不一致的情况出现。 最![]() https://visualgmq.gitee.io/2022/03/08/%E4%BB%8E0%E5%BC%80%E5%A7%8B%E5%88%B6%E4%BD%9C%E8%BD%AF%E6%B8%B2%E6%9F%93%E5%99%A8%EF%BC%88%E4%B8%89%EF%BC%89/
https://visualgmq.gitee.io/2022/03/08/%E4%BB%8E0%E5%BC%80%E5%A7%8B%E5%88%B6%E4%BD%9C%E8%BD%AF%E6%B8%B2%E6%9F%93%E5%99%A8%EF%BC%88%E4%B8%89%EF%BC%89/
纹理UV坐标UV![]() https://baike.baidu.com/item/UV/2490475?fr=aladdin
https://baike.baidu.com/item/UV/2490475?fr=aladdin