TenserRT(二)解决模型部署中的难题

第二章:解决模型部署中的难题 — mmdeploy 0.12.0 文档
PyTorch 74.自定义操作torch.autograd.Function - 知乎
简述python中的@staticmethod作用及用法 - 腾讯云开发者社区-腾讯云
(一)指定的图片放大倍数是固定的,本节通过部署一个支持动态放大倍数的模型,来体验模型部署中可能遇到的困难。
模型部署中常见的难题
- 模型的动态化:如何让推理框架中静态的输入、输出形状和结构,泛化为动态的。
- 新算子的实现:在ONNX和推理引擎中支持新的算子。
- 中间表示与推理引擎的兼容问题:为特定推理引擎定制模型代码。
import torch
from torch import nn
from torch.nn.functional import interpolate
import torch.onnx
import cv2
import numpy as npclass SuperResolutionNet(nn.Module):#继承nn.Module类,并实现forward方法def __init__(self):#构造函数,类的本身实例变量selfsuper().__init__()self.conv1 = nn.Conv2d(3, 64, kernel_size=9, padding=4)self.conv2 = nn.Conv2d(64, 32, kernel_size=1, padding=0)self.conv3 = nn.Conv2d(32, 3, kernel_size=5, padding=2)self.relu = nn.ReLU()def forward(self, x, upscale_factor):#将原先构造函数初始化阶段nn.Upsample固化的放大倍数upscale_factor,调整为运行阶段输入的interpolate放大倍数x = interpolate(x,scale_factor=upscale_factor.item(),#这里是因为pytorch模型导出到ONNX模型时输入必须是torch.Tensor,int类型是不可以的,因此使用torch.Tensor.item()把torch.Tensor转换成数值。mode='bicubic',align_corners=False)out = self.relu(self.conv1(x))out = self.relu(self.conv2(out))out = self.conv3(out)return outdef init_torch_model():torch_model = SuperResolutionNet()# Please read the code about downloading 'srcnn.pth' and 'face.png' in# https://mmdeploy.readthedocs.io/zh_CN/latest/tutorials/chapter_01_introduction_to_model_deployment.html#pytorchstate_dict = torch.load('srcnn.pth')['state_dict']# Adapt the checkpointfor old_key in list(state_dict.keys()):new_key = '.'.join(old_key.split('.')[1:])state_dict[new_key] = state_dict.pop(old_key)torch_model.load_state_dict(state_dict)torch_model.eval()return torch_modelmodel = init_torch_model()input_img = cv2.imread('face.png').astype(np.float32)# HWC to NCHW
input_img = np.transpose(input_img, [2, 0, 1])
input_img = np.expand_dims(input_img, 0)# Inference
torch_output = model(torch.from_numpy(input_img), torch.tensor(3)).detach().numpy()# NCHW to HWC
torch_output = np.squeeze(torch_output, 0)
torch_output = np.clip(torch_output, 0, 255)
torch_output = np.transpose(torch_output, [1, 2, 0]).astype(np.uint8)# Show image
cv2.imwrite("face_torch_2.png", torch_output)
导出动态超分辨率模型
import torch
from tensorrtdemo.dyn_torch_inference import init_torch_model
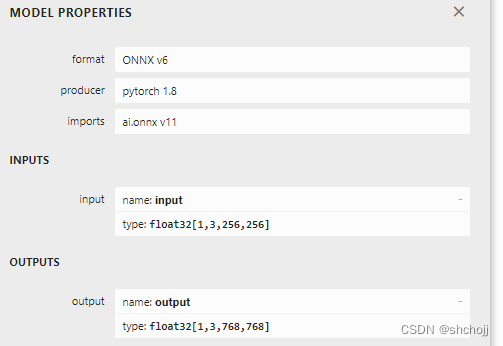
x = torch.randn(1, 3, 256, 256)#随机产生一个大小固定的输入
y = 3
model = init_torch_model()#获取带参数的模型
with torch.no_grad():#上下文管理器,禁止梯度计算,在网络推断中可以节省显存torch.onnx.export(model,#带参模型(x, torch.tensor(3)),#随机的输入形式,将torch.tensor(3)代替3,是因为PyTorch输入必须全部是torch.Tensor"srcnn2.onnx",#存储的onnx文件opset_version=11,# opset版本是指onnx定义的算子集合input_names=['input','factor'],#输入对象名称output_names=['output'])#输出对象名称错误“TracerWarning: Converting a tensor to a Python number might cause the trace to be incorrect. We can't record the data flow of Python values, so this value will be treated as a constant in the future. This means that the trace might not generalize to other inputs!scale_factor=upscale_factor.item(),”提示追踪失败。
Netorn查看对比,发现即便模型推理输入设置成了2个,但实际上ONNX的输入还是只有一个Input
这是因为即便是将torch.tensor(3)作为输入,但torch.Tensor.item()还是把数据从Tensor取出来了,因而ONNX导出时,操作无法被记录,因而有一个TraceWarning,因此scale_factor还是一个固定值。因此还只是一个输入。
pytorch转ONNX实际上是将PyTorch操作映射成ONNX定义的算子,如PyTorch的nn.Upsample和interpolate都转换成ONNX的Resize操作。
点击resize算子,展开scales
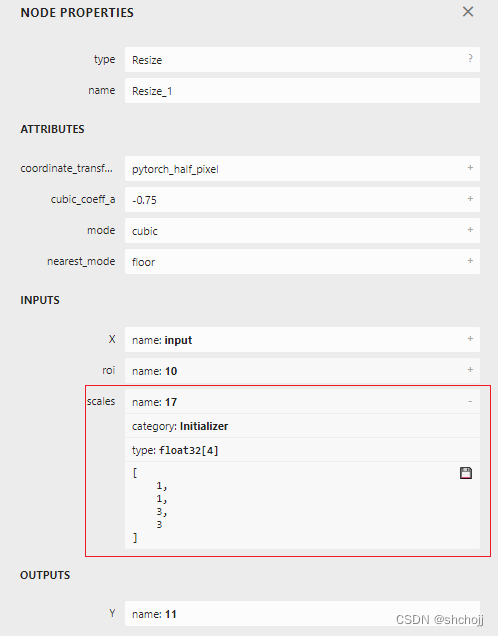
scales是一个长度为4的一维张量,内容是[1,1,3,3]表示在NCWH对应维度放缩系数,其类型为Initializer,表示该scales值是根据常量scale_factor初始化出来的,假定自定义一个ONNX的Resize算子,使得scales成为一个可变量而不是常量,则与x一样,该超分辨率模型就可以动态缩放。
通过运行模型来验证自定义的PyTorch算子是否正确
import torch
from torch import nn
from torch.nn.functional import interpolate
import torch.onnx
import cv2
import numpy as npclass NewInterpolate(torch.autograd.Function):#自定义求导方式(即Extending torch.autograd)#Function只定义一个操作,因为其无法保存参数;Module是保存了参数#Function__init__, forward, backward(需要自己写求导公式);Module只需定义__init__和forward,而backward的计算由自动求导机制构成#Module是由一系列Function组成,因此其在forward的过程中,Function和Variable组成了计算图,在backward时,只需调用Function的backward就得到结果,因此Module不需要再定义backward。#@staticmethoddef symbolic(g, input, scales): #新算子映射到ONNX算子,通过算子的symbolic方法决定# 第一个参数必须是g#自定义输入和forward函数一样。#具体实现由g.op实现,每个参数都可以映射ONNX的算子属性return g.op("Resize",#参照Netron设置对应参数属性input,g.op("Constant",value_t=torch.tensor([], dtype=torch.float32)),scales,#希望scale参数由输入动态决定,因此填入ONNX的scales时可以吧 symbolic方法输入参数的scales填入。coordinate_transformation_mode_s="pytorch_half_pixel",cubic_coeff_a_f=-0.75,mode_s='cubic',nearest_mode_s="floor")#forward()和backward()都应该是staticmethod。#静态方法就是类对外部函数的封装,有助于优化代码结构和提高程序的可读性。@staticmethoddef forward(ctx, input, scales):#输入:图像、放缩比例[1,1,w,h]的张量,w、h分别是图像的宽和高的放大倍数。#forward的第一个参数必须是ctxscales = scales.tolist()[-2:]#截取输入张量的后两个元素,把这两个元素以list格式传入到interpolate的scale_factor参数return interpolate(input,scale_factor=scales,mode='bicubic',align_corners=False)class StrangeSuperResolutionNet(nn.Module):def __init__(self):super().__init__()self.conv1 = nn.Conv2d(3, 64, kernel_size=9, padding=4)self.conv2 = nn.Conv2d(64, 32, kernel_size=1, padding=0)self.conv3 = nn.Conv2d(32, 3, kernel_size=5, padding=2)self.relu = nn.ReLU()def forward(self, x, upscale_factor):x = NewInterpolate.apply(x, upscale_factor)out = self.relu(self.conv1(x))out = self.relu(self.conv2(out))out = self.conv3(out)return outdef init_torch_model():torch_model = StrangeSuperResolutionNet()state_dict = torch.load('srcnn.pth')['state_dict']# Adapt the checkpointfor old_key in list(state_dict.keys()):new_key = '.'.join(old_key.split('.')[1:])state_dict[new_key] = state_dict.pop(old_key)torch_model.load_state_dict(state_dict)torch_model.eval()return torch_modelmodel = init_torch_model()
factor = torch.tensor([1, 1, 3, 3], dtype=torch.float)input_img = cv2.imread('face.png').astype(np.float32)# HWC to NCHW
input_img = np.transpose(input_img, [2, 0, 1])
input_img = np.expand_dims(input_img, 0)# Inference
torch_output = model(torch.from_numpy(input_img), factor).detach().numpy()# NCHW to HWC
torch_output = np.squeeze(torch_output, 0)
torch_output = np.clip(torch_output, 0, 255)
torch_output = np.transpose(torch_output, [1, 2, 0]).astype(np.uint8)# Show image
cv2.imwrite("face_torch_3.png", torch_output)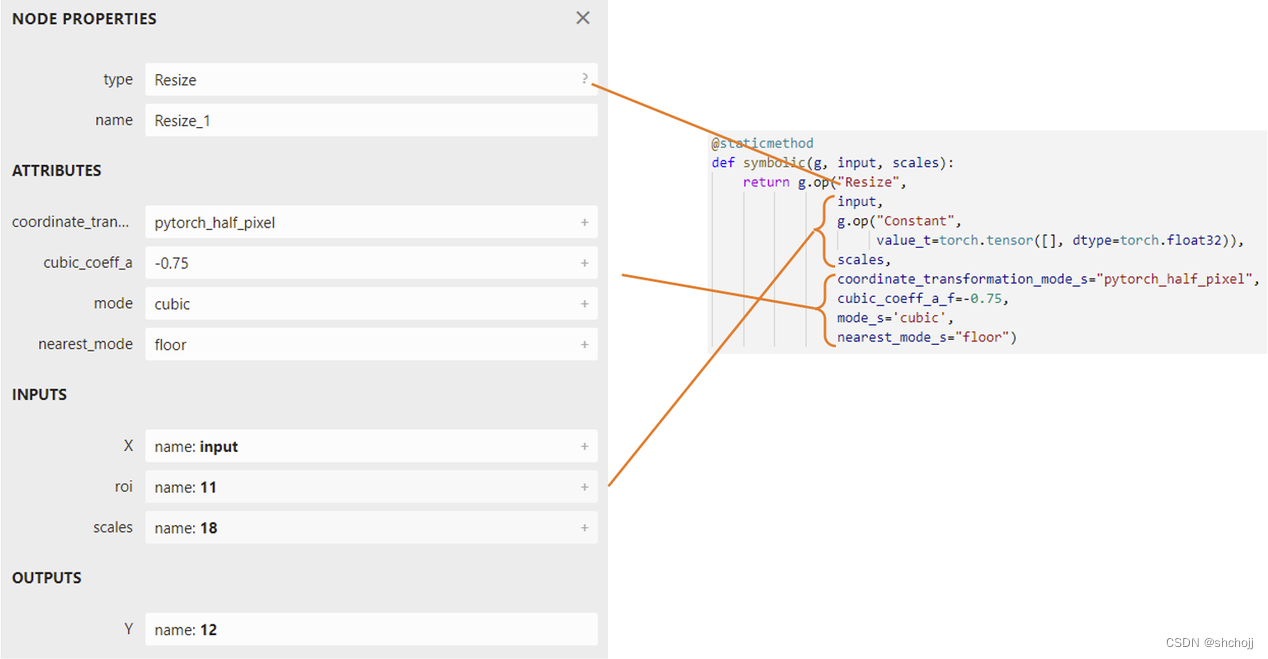
import torch
from tensorrtdemo.dyn_custom_opt_inference import  init_torch_modelx = torch.randn(1, 3, 256, 256)
factor = torch.tensor([1, 1, 3, 3], dtype=torch.float)model = init_torch_model()#获取带参数的模型with torch.no_grad():torch.onnx.export(model, (x, factor),"srcnn3.onnx",opset_version=11,input_names=['input', 'factor'],output_names=['output'])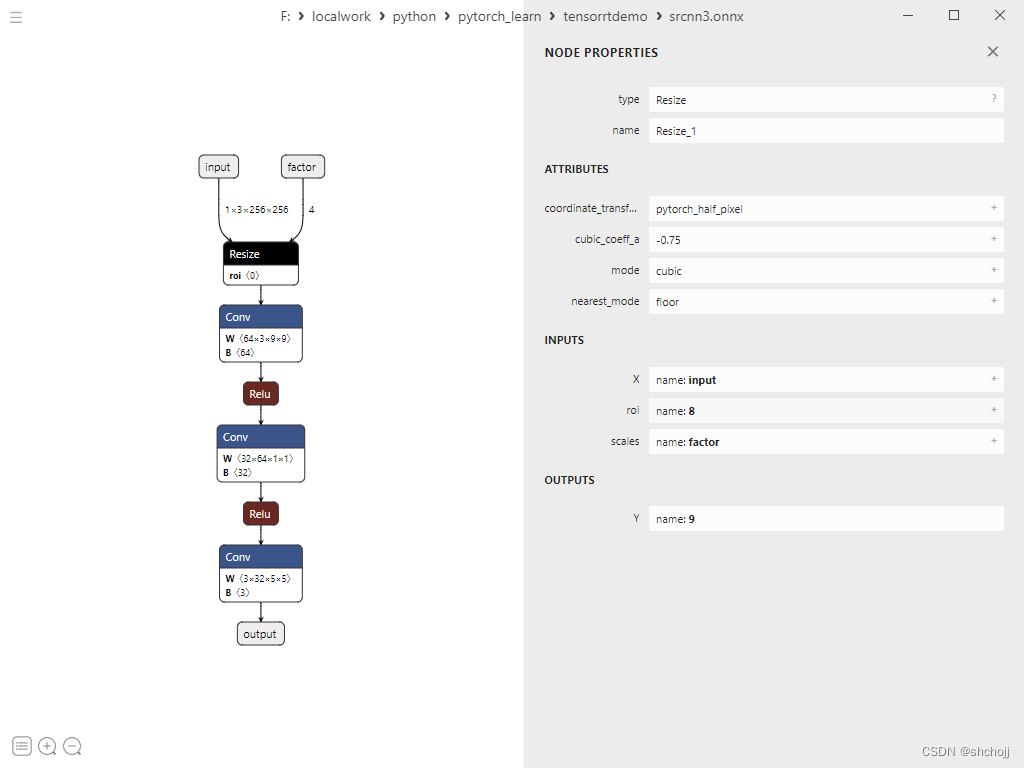
可以看到输入变成了两个
import onnxruntime
import numpy as np
import cv2
input_img = cv2.imread('face.png').astype(np.float32)# HWC to NCHW
input_img = np.transpose(input_img, [2, 0, 1])
input_img = np.expand_dims(input_img, 0)input_factor = np.array([1, 1, 4, 4], dtype=np.float32)
ort_session = onnxruntime.InferenceSession("srcnn3.onnx")
ort_inputs = {'input': input_img, 'factor': input_factor}
ort_output = ort_session.run(None, ort_inputs)[0]ort_output = np.squeeze(ort_output, 0)
ort_output = np.clip(ort_output, 0, 255)
ort_output = np.transpose(ort_output, [1, 2, 0]).astype(np.uint8)
cv2.imwrite("face_ort_3.png", ort_output)
总结
模型部署中的困难:模型的动态化;新算子的实现;框架间的兼容。
PyTorch转ONNX:实际上是将操作转换为ONNX定义的算子。
自定义算子映射到ONNX算子:修改继承torch.autograd.Function算子的symbolic。