【Java实战篇】Day6.在线教育网课平台

文章目录
- 一、需求:绑定媒资
-
- 1、需求分析
- 2、库表设计与模型类
- 3、接口定义
- 4、Mapper层开发
- 5、Service层开发
- 6、完善controller层
- 二、需求:课程预览
-
- 1、需求分析
- 2、实现技术
- 3、模板引擎
- 4、Freemarker入门
- 5、部署网站门户
- 6、接口定义
- 7、接口开发
- 8、编写模板
- 9、视频播放页面接口
一、需求:绑定媒资
1、需求分析
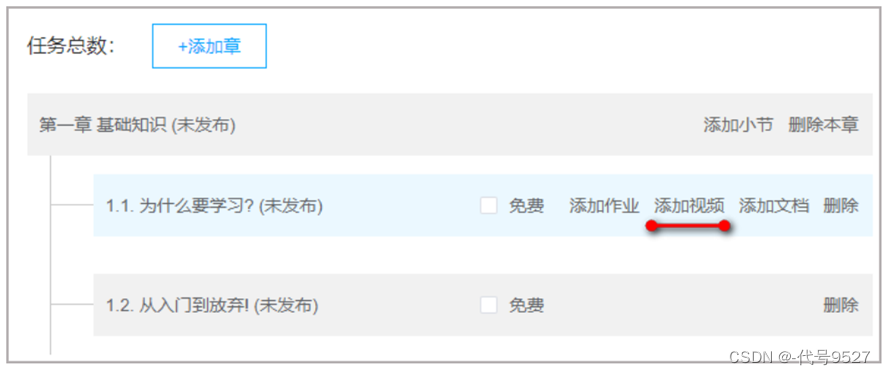
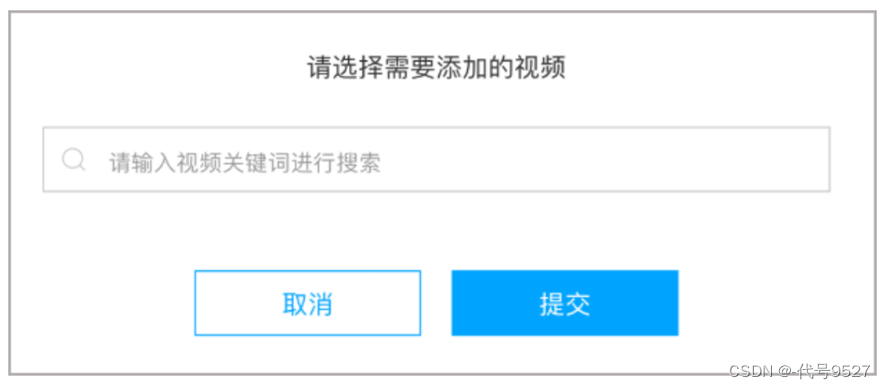
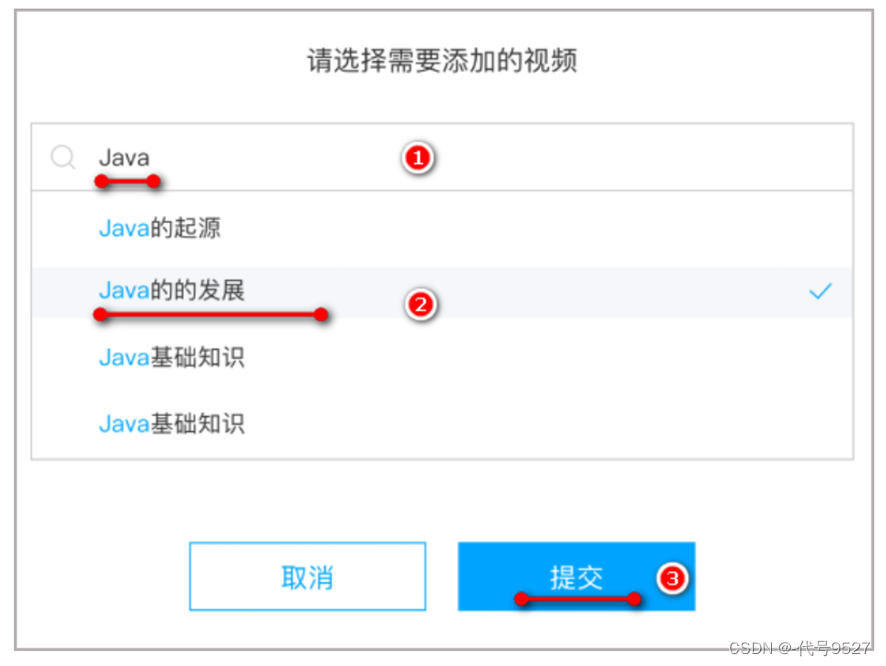
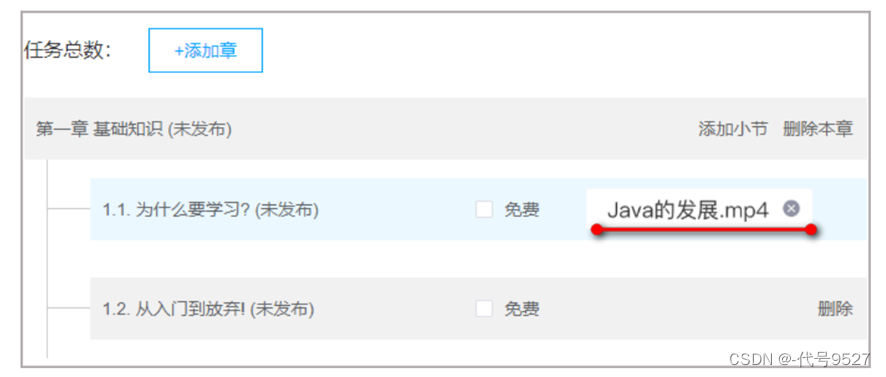
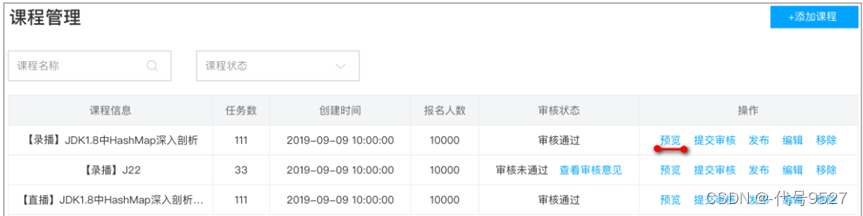
在前面完成视频的上传与转码处理后,需要将视频与教学计划进行绑定。UI如下:
-
点击编辑课程页面的添加视频
-
通过视频关键字搜索已审核通过的视频
-
点击提交,即绑定
-
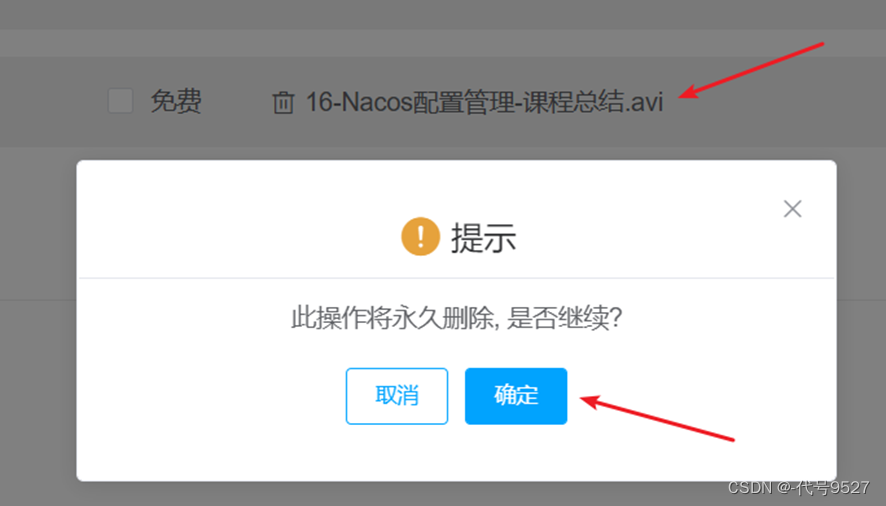
点击视频名称可解除绑定
2、库表设计与模型类
设计绑定媒资表teachplan_media:这种关联表通常记录双方主键即可。
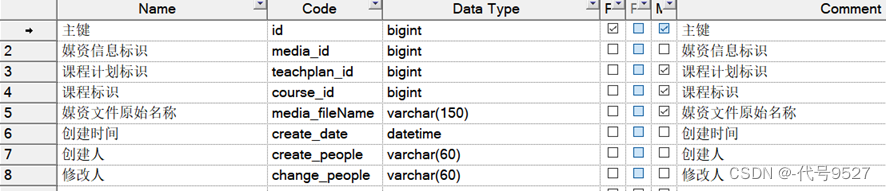
前端传参:媒资文件id、文件名称、教学计划id
{"mediaId": "70a98b4a2fffc89e50b101f959cc33ca","fileName": "22-Hmily实现TCC事务-开发bank2的confirm方法.avi","teachplanId": 257
}
定义对应的Dto类:
@Data
@ApiModel(value="BindTeachplanMediaDto", description="教学计划-媒资绑定提交数据")
public class BindTeachplanMediaDto {@ApiModelProperty(value = "媒资文件id", required = true)private String mediaId;@ApiModelProperty(value = "媒资文件名称", required = true)private String fileName;@ApiModelProperty(value = "课程计划标识", required = true)private Long teachplanId;}
3、接口定义
在TeachplanController类中定义接口如下:
@ApiOperation(value = "课程计划和媒资信息绑定")
@PostMapping("/teachplan/association/media")
public void associationMedia(@RequestBody BindTeachplanMediaDto bindTeachplanMediaDto){}
4、Mapper层开发
直接生成新增库表的PO类,并且定义Mapper接口,直接继承BaseMapper
5、Service层开发
接口定义:
/* @description 教学计划绑定媒资* @param bindTeachplanMediaDto
*/
public TeachplanMedia associationMedia(BindTeachplanMediaDto bindTeachplanMediaDto);实现新加接口:(这里涉及到若存在、先删除、后添加,需要加事务控制)
@Transactional
@Override
public TeachplanMedia associationMedia(BindTeachplanMediaDto bindTeachplanMediaDto) {//业务逻辑校验//教学计划idLong teachplanId = bindTeachplanMediaDto.getTeachplanId();Teachplan teachplan = teachplanMapper.selectById(teachplanId);if(teachplan==null){XueChengPlusException.cast("教学计划不存在");}Integer grade = teachplan.getGrade();if(grade!=2){XueChengPlusException.cast("只允许第二级教学计划绑定媒资文件");}//课程idLong courseId = teachplan.getCourseId();//若原先有绑定的,先删除原来该教学计划绑定的媒资teachplanMediaMapper.delete(new LambdaQueryWrapper<TeachplanMedia>().eq(TeachplanMedia::getTeachplanId,teachplanId));//再添加教学计划与媒资的绑定关系TeachplanMedia teachplanMedia = new TeachplanMedia();teachplanMedia.setCourseId(courseId);teachplanMedia.setTeachplanId(teachplanId);teachplanMedia.setMediaFilename(bindTeachplanMediaDto.getFileName());teachplanMedia.setMediaId(bindTeachplanMediaDto.getMediaId());teachplanMedia.setCreateDate(LocalDateTime.now());teachplanMediaMapper.insert(teachplanMedia);return teachplanMedia;
}
6、完善controller层
@ApiOperation(value = "课程计划和媒资信息绑定")
@PostMapping("/teachplan/association/media")
void associationMedia(@RequestBody BindTeachplanMediaDto bindTeachplanMediaDto){teachplanService.associationMedia(bindTeachplanMediaDto);
}
----------------------------------------------------------------------------
----------------------------------------------------------------------------
接下来是课程发布模块:
课程信息编辑完成后,接下来是发布课程。为了课程内容没有违规信息,需要平台运营方进行审核。而课程发布方(即教学机构)在课程发布前可通过预览功能看到课程发布后的效果。即课程发布模块包含三部分:
- 课程预览
- 课程审核
- 课程发布
----------------------------------------------------------------------------
----------------------------------------------------------------------------
二、需求:课程预览
1、需求分析
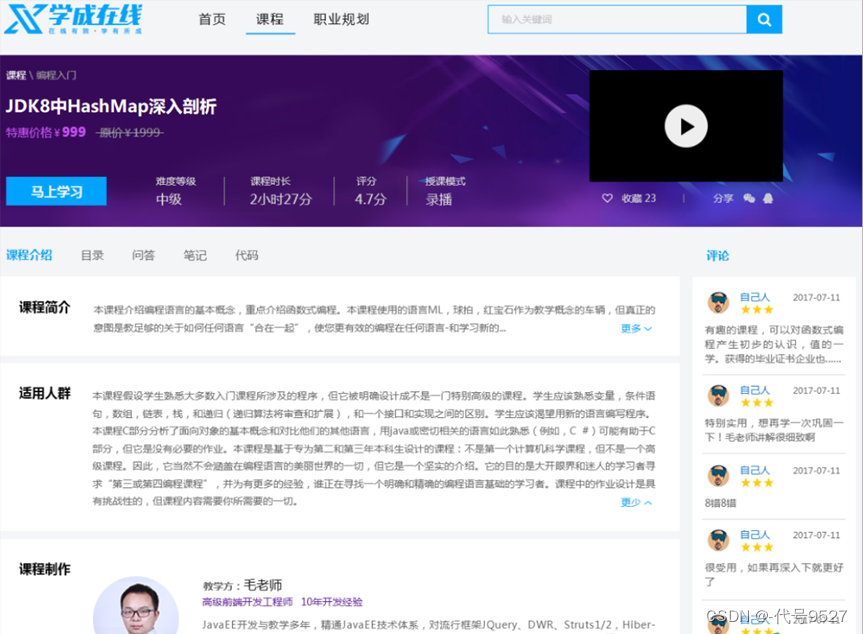
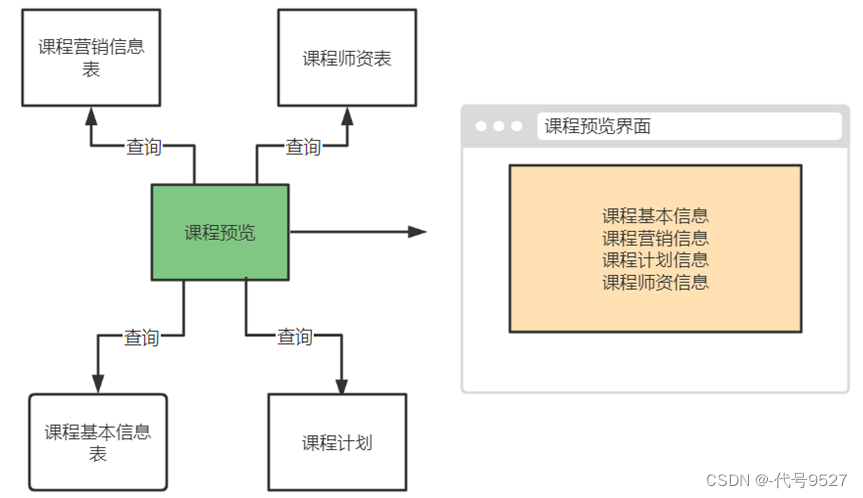
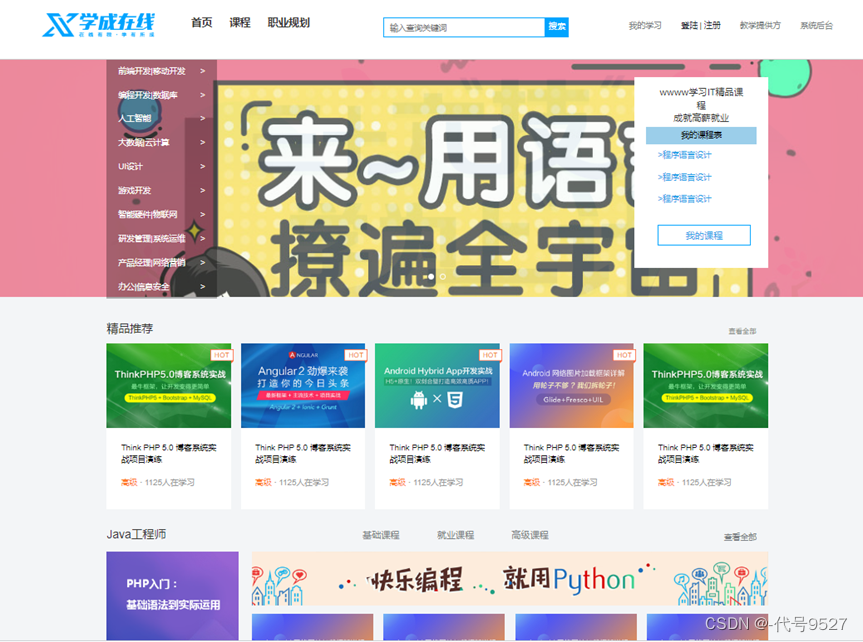
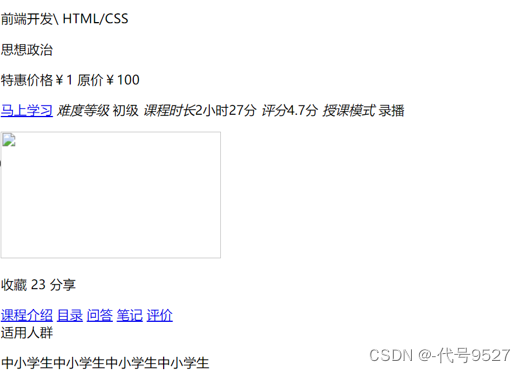
课程预览即整合课程的相关信息,在页面进行展示。UI图:
从页面上分析,数据源相关的表有:
2、实现技术
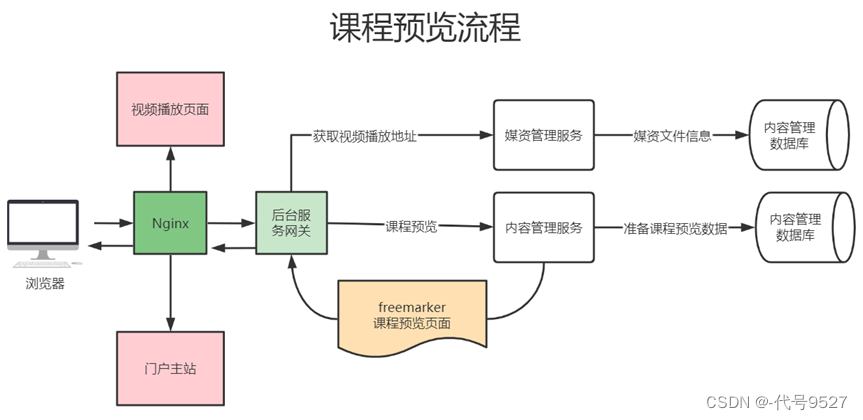
- 点击课程预览,通过Nginx、后台服务网关请求内容管理服务进行课程预览
- 内容管理服务查询课程相关信息进行整合,并通过模板引擎技术在服务端渲染生成页面,返回给浏览器
- 通过课程预览页面点击”马上学习“打开视频播放页面
- 视频播放页面通过Nginx请求后台服务网关,查询课程信息展示课程计划目录,请求媒资服务查询课程计划绑定的视频文件地址,在线浏览播放视频
3、模板引擎
模板引擎是为了解决用户界面(显示)与业务数据(内容)分离而产生的。他可以生成特定格式的文档,常用的如格式如HTML、xml以及其他格式的文本格式。如早期的JSP:
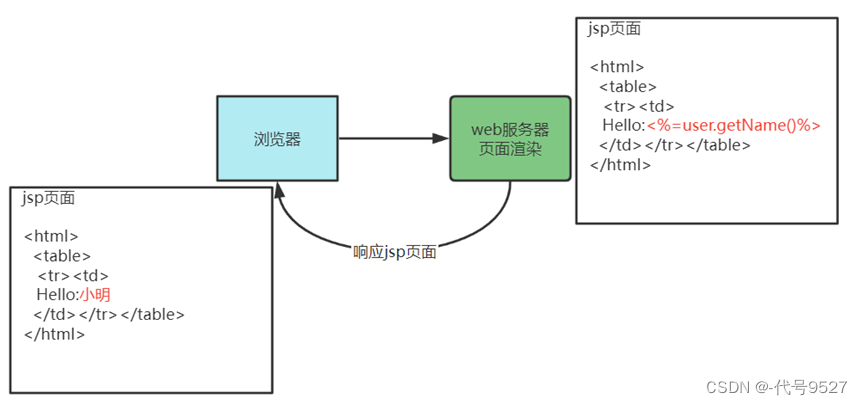
- 浏览器请求web服务器
- 服务器渲染页面,渲染的过程就是向jsp页面(模板)内填充数据(模型)
- 服务器将渲染生成的页面返回给浏览器
所以模板引擎就是:
模板+数据=输出,Jsp页面就是模板,页面中嵌入的jsp标签就是数据,两者相结合输出html网页。
常用的java模板引擎有:
- Jsp
- Freemarker
- Thymeleaf
- Velocity 等
4、Freemarker入门
- 添加Freemarker与SpringBoot的整合包
<!-- Spring Boot 对结果视图 Freemarker 集成 -->
<dependency><groupId>org.springframework.boot</groupId><artifactId>spring-boot-starter-freemarker</artifactId>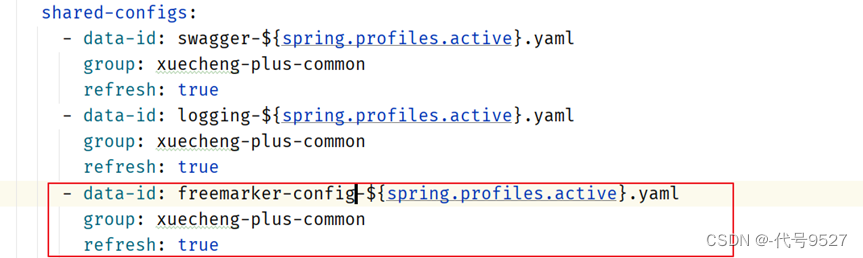
</dependency>- nacos公用配置组新加一个freemarker-config-dev.yaml
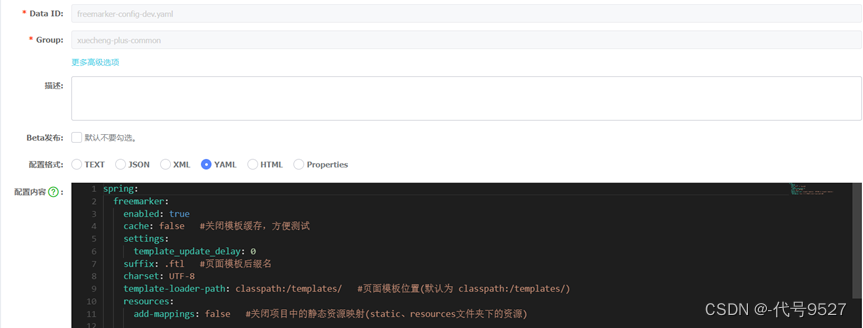
spring:freemarker:enabled: truecache: false #关闭模板缓存,方便测试settings:template_update_delay: 0suffix: .ftl #页面模板后缀名charset: UTF-8template-loader-path: classpath:/templates/ #页面模板位置(默认为 classpath:/templates/)resources:add-mappings: false #关闭项目中的静态资源映射(static、resources文件夹下的资源)- 在公共配置选项中加入上面的freemarker-config-dev.yaml
- 添加模板,在resources下创建templates目录,添加test
.ftl模板文件
<!DOCTYPE html>
<html>
<head><meta charset="utf-8"><title>Hello World!</title>
</head>
<body>
Hello ${name}!
</body>
</html><!--
freemarker提供很多指令用于解析各种类型的数据模型,
参考地址:
http://freemarker.foofun.cn/ref_directives.html
-->
- 模板有了,编写controller方法,准备数据
import org.bouncycastle.math.raw.Mod;
import org.springframework.stereotype.Controller;
import org.springframework.web.bind.annotation.GetMapping;
import org.springframework.web.servlet.ModelAndView;
import java.util.Map;/* @description freemarker测试*/@Controller  //注意这里是controller
public class FreemarkerController {@GetMapping("/testfreemarker")public ModelAndView test(){ModelAndView modelAndView = new ModelAndView();//设置模型数据modelAndView.addObject("name","小明");//设置模板名称modelAndView.setViewName("test");return modelAndView;}}- 浏览器中请求上面的接口,页面响应成功

5、部署网站门户
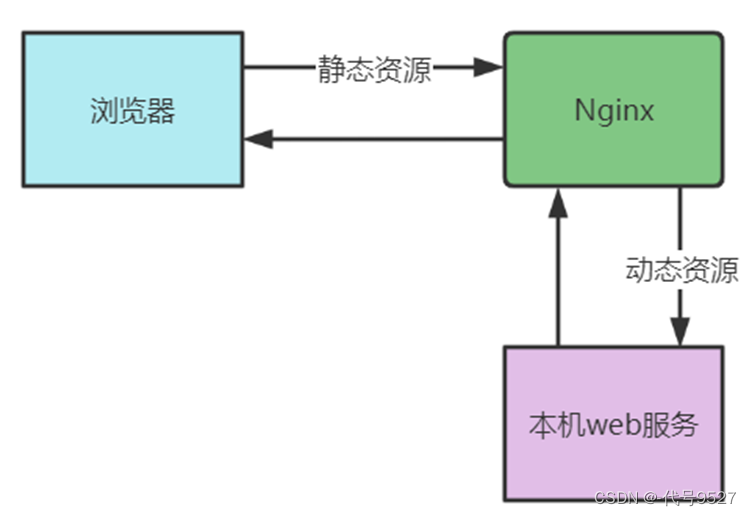
在课程预览界面上要加载css、js、图片等内容,这属于静态资源,通过部署nginx来访问。对于SpringBoot服务的动态资源由Nginx去代理请求,如下图:
启动Nginx
- 下载 nginx-1.23.1.zip并解压
链接:https://pan.baidu.com/s/1Rc1EoxeOukVGYiFQO7UE4A?pwd=9yf2
提取码:9yf2
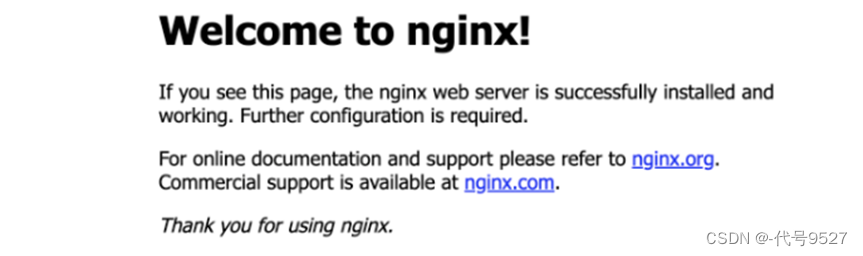
- 运行nginx-1.23.1目录下的nginx.exe(默认端口80,可在conf/nginx.conf中修改)

- 访问http://localhost,以下页面即启动成功
启动前端工程
-
解压包含静态资源的前端工程
-
在host文件中加入:
127.0.0.1 www.51xuecheng.cn 51xuecheng.cn
即访问这两个域名时,服务器IP是127.0.0.1
host文件位置:window10操作系统hosts文件在C:\\Windows\\System32\\drivers\\etc下
Centos7操作系统的hosts文件在/etc目录下
------------------
hosts文件负责IP地址与域名快递解析,比如键入域名www.baidu.com,
首先会去看看hosts文件汇总有没有关于此域名IP地址的记录。如果有,就直接登陆该网站;
如果没有再查询DNS服务器
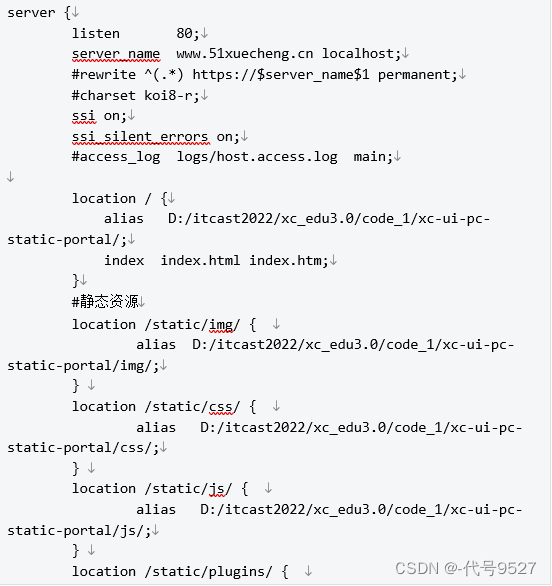
- 配置nginx.conf文件
server {listen 80;server_name www.51xuecheng.cn localhost;#rewrite ^(.*) https://$server_name$1 permanent;#charset koi8-r;ssi on;ssi_silent_errors on;#access_log logs/host.access.log main;location / {alias D:/静态资源目录/xc-ui-pc-static-portal/;index index.html index.htm;}- cmd进入nginx.exe,执行
nginx.exe -s reload即可重新加载nginx配置文件 - 访问http://www.51xuecheng.cn
文件服务器
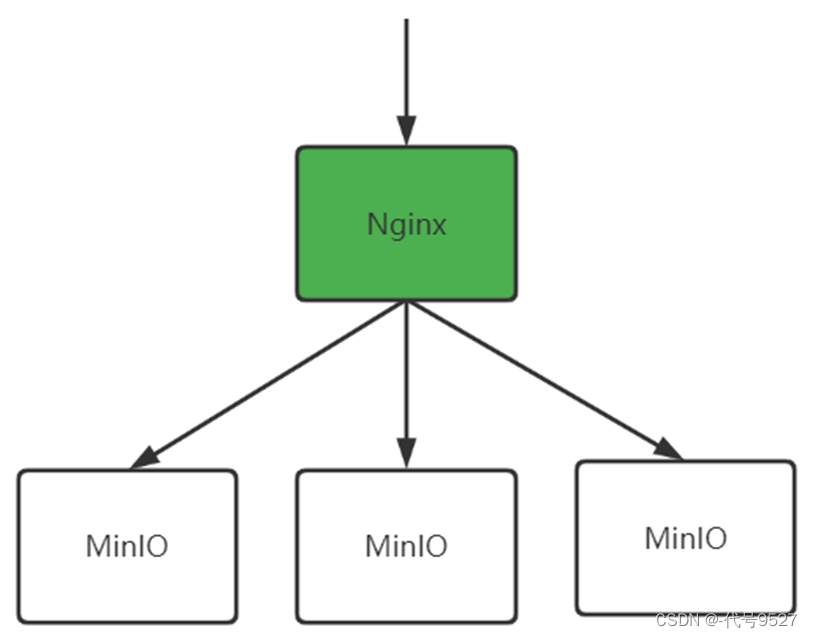
课程预览时需要展示课程图片、视频等,而它们在MinIOn中存着,由Nginx代理,通过文件服务域名统一访问。
- 配置文件服务域名的服务器IP是localhost
127.0.0.1 file.51xuecheng.cn
- 在nginx.conf中配置文件服务器的代理地址
#文件服务upstream fileserver{#MinIOn的实际IP,权重无所谓,就一台server 192.168.101.65:9000 weight=10;} server {listen 80;server_name file.51xuecheng.cn;#charset koi8-r;ssi on;ssi_silent_errors on;#access_log logs/host.access.log main;location /video {proxy_pass http://fileserver;}location /mediafiles {proxy_pass http://fileserver;}}以上即访问/video和/mediafiles都会代理到fileserver文件服务
-
重新加载nginx配置 nginx.exe -s reload
-
以后访问图片,直接通过文件域名http://file.51xuecheng.cn/mediafiles/{图片文件地址路径}
file.51xuecheng.cn解析为localhost
/mediafiles在localhost的nginx中会代理到文件服务192.168.101.65:9000
6、接口定义
课程预览接口需要:
- 在多张表中整合出课程预览需要的信息(数据)
- 使用模板引擎渲染出页面返回给浏览器
因此:
- 传参为:课程id,表示要预览哪一门课程
响应为:课程详情页面(注意返回的不再是json,而是页面)
要试用freemarker模板引擎,先把预览页面的模板course_template.html放到resources/templates下,起名course_template.ftl。
接下来定义预览接口:
@Controller
public class CoursePublishController {@GetMapping("/coursepreview/{courseId}")public ModelAndView preview(@PathVariable("courseId") Long courseId){//先new一个模型视图对象ModelAndView modelAndView = new ModelAndView();//数据    modelAndView.addObject("model",null);//指定模板,不用加扩展名,扩展名我写在了nacos配置中modelAndView.setViewName("course_template");return modelAndView;}}
注意这里,@RestController响应json,而@Controller可以响应页面。此时可以http://localhost:PORT/xxService/coursepreview/74 先看看效果:
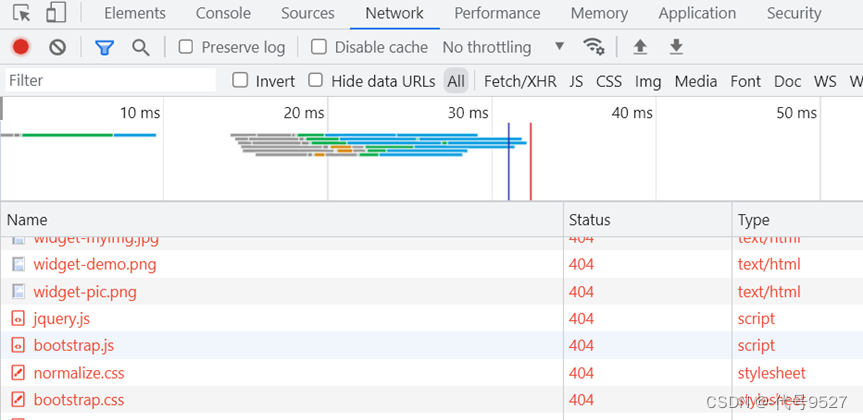
看到:接口可以正常访问,而样式404。样式等静态资源在门户下,配置nginx反向代理来访问课程预览接口。
#后台网关
#这里直接配置代理到网关,由网关路由到不同服务
#单独配置一个个服务也行,但配置网关一劳永逸
upstream gatewayserver{server 127.0.0.1:63010 weight=10;
}
server {listen       80;server_name  www.51xuecheng.cn localhost;....#即所有以api开头的请求,统统进入网关location /api/ {proxy_pass http://gatewayserver/;} ....//改完后nginx.exe -s reload
此时通过域名访问:http://www.51xuecheng.cn/api/xxService/coursepreview/74
静态资源都有了,页面正常显示:(数据也是静态的,等后面实现接口)

目前的逻辑是:
- 先访问到nginx
- 以api开头,代理到Gateway网关
- 根据/xxService由网关路由到对应的服务

7、接口开发
使用freemarker渲染生成视图时需要数据模型,此数据模型包括了基本信息、营销信息、课程计划、师资等信息:
/* @description 课程预览数据模型*/
@Data
@ToString
public class CoursePreviewVo {//课程基本信息,课程营销信息private CourseBaseInfoDto courseBase;//课程计划信息private List<TeachplanDto> teachplans;//师资信息暂时不加...}
定义Service接口:
public interface CoursePublishService {/* @description 获取课程预览信息* @param courseId 课程id*/public CoursePreviewVo getCoursePreviewInfo(Long courseId);}实现接口:
@Service
public class CoursePublishServiceImpl implements CoursePublishService {@AutowiredCourseBaseInfoService courseBaseInfoService;@AutowiredTeachplanService teachplanService;@Overridepublic CoursePreviewVo getCoursePreviewInfo(Long courseId) {//课程基本信息、营销信息CourseBaseInfoDto courseBaseInfo = courseBaseInfoService.getCourseBaseInfo(courseId);//课程计划信息List<TeachplanDto> teachplanTree= teachplanService.findTeachplanTree(courseId);CoursePreviewDto coursePreviewDto = new CoursePreviewDto();coursePreviewDto.setCourseBase(courseBaseInfo);coursePreviewDto.setTeachplans(teachplanTree);return coursePreviewVo;}
}
完善controller:
@Autowired
CoursePublishService coursePublishService;@GetMapping("/coursepreview/{courseId}")
public ModelAndView preview(@PathVariable("courseId") Long courseId){//获取课程预览信息CoursePreviewVo coursePreviewInfo = coursePublishService.getCoursePreviewInfo(courseId);ModelAndView modelAndView = new ModelAndView();modelAndView.addObject("model",coursePreviewInfo);modelAndView.setViewName("course_template");return modelAndView;}
8、编写模板
此时,接口已经可以拿到需要展示的数据,并返回。但模板course_template.ftl上还是写死的,要拿dollar大括号来接数据并填充。边写边调,改完course_template.ftl不用重启整个服务,直接编译:

需要IF–else或者其他语法的,参考官方文档http://freemarker.foofun.cn/ref_directives.html
<!--举例:--><P> ${model.courseBase.mtName !''}</P>!''即如果前面拿到的值为null,则赋一个空字符串。
9、视频播放页面接口

分析页面,需要返回的有:
- 课程计划的相关信息
- 视频播放地址
/open/content/course/whole/课程id响应:同课程预览service接口返回数据/open/media/preview/mediaId响应:
{"code":0,"msg":"success","result":"视频的url","successful":true}将这两个接口定义为open,对外开放(不用登录就能请求),nginx中加配置:
#openapi
location /open/content/ {proxy_pass http://gatewayserver/content/open/;
}
location /open/media/ {proxy_pass http://gatewayserver/media/open/;
}
专门定义openAPI的类CourseOpenController类:
@Api(value = "课程公开查询接口",tags = "课程公开查询接口")
@RestController
@RequestMapping("/open")
public class CourseOpenController {@Autowiredprivate CourseBaseInfoService courseBaseInfoService;@Autowiredprivate CoursePublishService coursePublishService;@GetMapping("/course/whole/{courseId}")
public CoursePreviewVo getPreviewInfo(@PathVariable("courseId") Long courseId) {//获取课程预览信息CoursePreviewVo coursePreviewInfo = coursePublishService.getCoursePreviewInfo(courseId);return coursePreviewInfo;
}}
在媒资服务中定义另一个类MediaOpenController类:
@Api(value = "媒资文件管理接口",tags = "媒资文件管理接口")
@RestController
@RequestMapping("/open")
public class MediaOpenController {@AutowiredMediaFileService mediaFileService;@ApiOperation("预览文件")@GetMapping("/preview/{mediaId}")public RestResponse<String> getPlayUrlByMediaId(@PathVariable String mediaId){MediaFiles mediaFiles = mediaFileService.getFileById(mediaId);if(mediaFiles == null || StringUtils.isEmpty(mediaFiles.getUrl())){MyException.cast("视频还没有转码处理");}return RestResponse.success(mediaFiles.getUrl());}}