【Linux】用LCD文字祝愿(Framebuffer+Freetype)

目录
前言
一、LCD操作原理
(1)LCD和Framebuffer。
(2)LCD的操作:
(3)核心函数(后续也会经常用到)
①open函数
②ioctl函数
③mmap函数
(1)字符的编码方式
①字符的标准
②UNICODE的编码实现
(2)字符的点阵显示
①ASCII字符的点阵显示
②中文字符的点阵显示
(3)点阵显示的缺点
三、Freetype的手工交叉编译
(1)基础知识以及解决方法
①交叉编译程序的万能命令
(2)imx6ull交叉编译freetype
①确定头文件、库文件在工具链中的位置
②交叉编译、安装libpng
③交叉编译、安装freetype
四、使用Freetype显示单个文字
(1)实现流程步骤
①一个文字的显示过程:
②具体的函数实现过程:
(2)具体实现
①描点函数(lcd_put_pixel)
②显示位图函数(draw_bitmap)
③主函数(main)
(3)实现效果
五、使用Freetype显示多行文字(支持倾斜角度)
(1)方法原理
①字符大小示意
②在指定位置显示一行文字
(2)具体实现
①具体的实现流程
②核心函数
(3)实现效果
前言
在一定了解LCD显示文字的原理后,实现一行文字的显示过程,熟悉和认知Linux系统下的编译和常用函数。
1.LCD的显示,是基于Framebuffer来实现的,主体使用open、ioctl以及mmap来实现。
2.相较于字符点阵显示,使用矢量字体可以很好实现字体不同尺寸的显示。
3.一行文字里字符大小不一,采用统一大小显示,效果是不好的。基于笛卡尔坐标和字符大小表示认知,定义字符外框和调整到下一个字符的原点,使用freetype可以实现一行文字的显示。
一、LCD操作原理
(1)LCD和Framebuffer。
在Linux中用Framebuffer驱动程序来控制LCD。
- 这里Framebuffer是一块内存,里面保存着一帧图像。
- 以现用的LCD屏(1024*768)为例,每一个像素的颜色用32为表示,Framebuffer的大小:→1024*768*32/8=3MB
- 对Framebuffer写入,也会相应的映射到LCD屏幕上。
(2)LCD的操作:
- 驱动程序设置好LCD程序,
- 根据LCD的参数设置LCD控制器的时序、信号极性;
- 根据LCD分辨率、BPP分配Framebuffer。
- APP使用ioctl函数来获得LCD分辨率、BPP
- APP通过mmap映射Framebuffer,在Framebuffer中写入数据。

(3)核心函数(后续也会经常用到)
①open函数
open函数用于打开相应的设备节点,这里就是打开LCD设备节点。
//头文件
#include <sys/types.h>
#include <sys/stat.h>
#include <fcntl.h>//函数原型
int open(const char *pathname, int flags);
int open(const char *pathname, int flags, mode_t mode);//核心参数
pathname:文件的路径
flags:表示打开文件的方式
mode:表示创建文件的权限,一般不起效,当flags为O_CREAT时有效
返回值:打开成功返回文件描述符,失败则返回-1
②ioctl函数
ioctl函数一般用于跟驱动程序交互,读出和传递一些参数(例如分辨率、BPP)。
//头文件
#include <sys/ioctl.h>//函数原型
int ioctl(int fd, unsigned long request, ...);//核心参数
fd:文件描述符---接open返回值
request:表示与驱动程序交互的命令,用不同的命令控制驱动程序输出我们需要的数据。
返回值:打开成功返回文件描述符,失败返回-1.
③mmap函数
mmap函数用于将设备文件映射到内存,构建联系。
//头文件
#include <sys/mman.h>//函数原型
void *mmap(void *addr, size_t length, int prot, int flags,int fd, off_t offset);//核心参数
addr:表示指定映射的内存起始地址。设为NULL表示系统自动选定地址,在成功映射后返回该地址。
length:表示将文件中多大的内容映射到内存中。
prot:表示映射区域的保护方式PROT_EXEC 映射区域可被执行PROT_READ 映射区域可被读出PROT_WRITE 映射区域可被写入PROT_NONE 映射区域不能存取
flags:表示影响映射区域的不同特性,通常有两种:MAP_SHARED 表示对映射区域写入的数据会复制回文件内,原来的文件会改变。MAP_PRIVATE 表示对映射区域的操作会产生一个映射文件的复制,对此区域的任何修改都不会写回原来的文件内容中。
返回值:若成功映射,将返回指向映射的区域的指针,失败将返回-1。
二、字符的点阵显示
字符的核心---它的编码值,字符对应什么样的形状,这是由字符文件决定的。
两个分析软件:Hex Editor Neno以及Notepad。使用Hex Editor Neno可以详细分析输入字符具体的编码值,用Notepad可以分析不同编码方式之间的区别联系。
(1)字符的编码方式
①字符的标准
- 字符的标准有ASCII、ANSI(ASCII的拓展)以及UNICODE
-
“American Standard Code for Information Interchange”,美国信息交换标准代码
- ANSI是不固定的,通常“本地化”密切相关,国内大陆地区就是采用的GB2312,港澳台地区则是BIG5。
- UNICODE是为了解决不同编码标准中一个数值对应不同字符问题,在地球上任意一个字符,都只有一个唯一的数值。
-
②UNICODE的编码实现
- UNICODE的编码实现---当遇到不同的编码,如何正确实现数值表示。
- 第一种方法:用3个字节表示一个UNICODE,很省事但是非常浪费空间。
- 第二种方法:UTF-16 LE;只用两个字节,小字节序,数值中权重低的字节放在前面。UTF-16 BE;大字节序,数值中权重低的字节放在后面。全世界常用的字符都可以表示。
- 但是缺点也很明显:①表示的字符数量有限②对于 ASCII 字符有空间浪费③如果文件中有某个字节丢失,这会使得后面所有字符都因为错位而无法显示
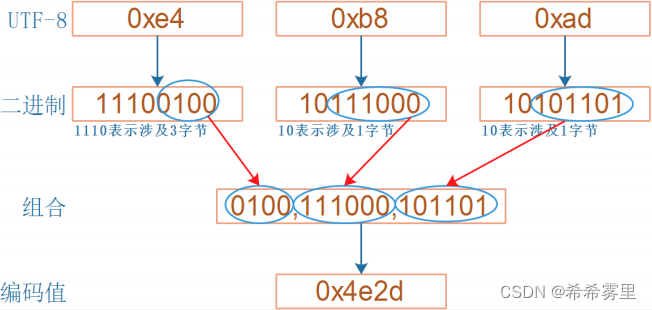
- 第三种方法:UTF8可解决上面的问题;具体原理图如下:
(2)字符的点阵显示
通过对每一个像素的点亮熄灭,来实现字符的显示,常见的是对ASCII字符和中文字符的点阵显示。
①ASCII字符的点阵显示
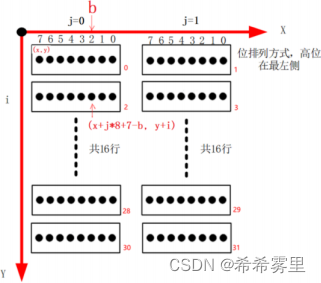
- 在 Linux 内核源码中有这个文件:lib\\fonts\\font_8x16.c, 里面以数组形式保存各个字符的点阵。
- 要显示某个字符时,根据它的 ASCII 码在 fontdata_8x16 数组中找到它的点阵,然后取出这 16 个字节去描画 16 行像素。

②中文字符的点阵显示
- 使用HZK16字库,它是常用汉字的16*16点阵字库。HZK16里每个汉字使用32字节来描述。
-
HZK16 中是以 GB2312 编码值来查找点阵的。所以要注意将文件编码格式转换成GB2312。具体如下:
(3)点阵显示的缺点
- 使用点阵字库显示英文字母、汉字时,大小是固定的。
- 如果进行文字的放大缩小则会模糊甚至有锯齿出现。
三、Freetype的手工交叉编译
针对点阵显示的缺点,这里引用矢量字体解决。
Freetype 是开源的字体引擎库,它提供统一的接口来访问多种字体格式文件,从而实现矢量字体显示。
(1)基础知识以及解决方法
①交叉编译程序的万能命令
//安装的库有configure命令时可采用,将库文件都安装到当前目录tmp文件夹里./configure --host=arm-buildroot-linux-gnueabihf --prefix=$PWD/tmpmakemake install
(2)imx6ull交叉编译freetype
这里freetype库依赖于libpng,libpng 又依赖于 zlib,所以我们应该:先编译安装 zlib,再编译安装 libpng,最后编译安装 freetype。对于imx6ull不用编译安装zlib,在其工具链中有zlib。
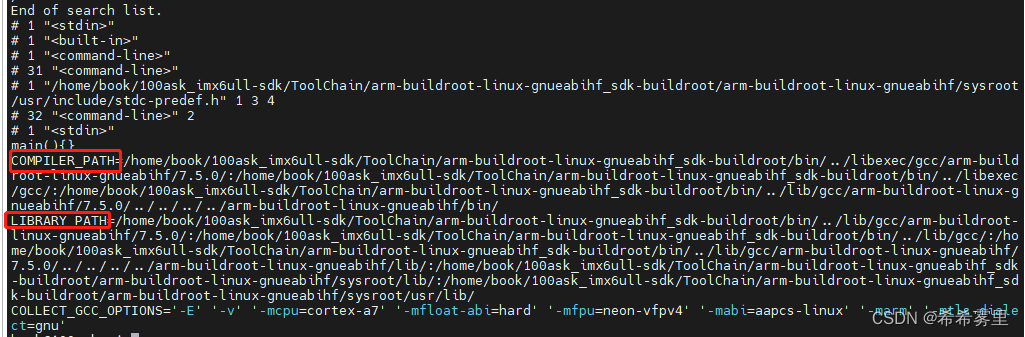
①确定头文件、库文件在工具链中的位置
//设置交叉编译工具链export ARCH=armexport CROSS_COMPILE=arm-buildroot-linux-gnueabihf-export PATH=$PATH:/home/book/100ask_imx6ull-sdk/ToolChain/arm-buildroot-linux-gnueabihf_sdk-buildroot/bin//编译main{}时,列出系统目录echo 'main(){}'| arm-buildroot-linux-gnueabihf-gcc -E -v -//确定头文件目录/home/book/100ask_imx6ull-sdk/ToolChain/arm-buildroot-linux-gnueabihf_sdk-buildroot/bin/../lib/gcc/arm-buildroot-linux-gnueabihf/7.5.0/include//确定库文件目录/home/book/100ask_imx6ull-sdk/ToolChain/arm-buildroot-linux-gnueabihf_sdk-buildroot/ bin/../lib/gcc/arm-buildroot-linux-gnueabihf/7.5.0/../../../../arm-buildroot-linux-gnueabihf/lib
头文件路径:

编译路径、库路径:
②交叉编译、安装libpng
//复制文件到当前目录cp /home/book/01_all_series_quickstart/04_嵌入式Linux应用开发基础知识/source/10_freetype/libpng-1.6.37.tar.xz .///解压
tar xJf libpng-1.6.37.tar.xz//交叉编译程序命令
cd libpng-1.6.37./configure --host=arm-buildroot-linux-gnueabihf --prefix=$PWD/tmpmakemake install//移动到tmp
cd tmp//将include以及lib文件拷贝到之前指定的系统头文件和库文件目录下
cp include/* -rf /home/book/100ask_imx6ull-sdk/ToolChain/arm-buildroot-linux-gnueabihf_sdk-buildroot/bin/../lib/gcc/arm-buildroot-linux-gnueabihf/7.5.0/includecp lib/* -rfd /home/book/100ask_imx6ull-sdk/ToolChain/arm-buildroot-linux-gnueabihf_sdk-buildroot/bin/../lib/gcc/arm-buildroot-linux-gnueabihf/7.5.0/../../../../arm-buildroot-linux-gnueabihf/lib
③交叉编译、安装freetype
//复制文件到当前目录cp /home/book/01_all_series_quickstart/04_嵌入式Linux应用开发基础知识/source/10_freetype/freetype-2.10.2.tar.xz .///解压
tar xJf freetype-2.10.2.tar.xz//交叉编译程序命令
cd freetype-2.10.2
./configure --host=arm-buildroot-linux-gnueabihf --prefix=$PWD/tmpmakemake install//移动到tmp
cd tmp//将include以及lib文件拷贝到之前指定的系统头文件和库文件目录下
cp include/* -rf /home/book/100ask_imx6ull-sdk/ToolChain/arm-buildroot-linux-gnueabihf_sdk-buildroot/bin/../lib/gcc/arm-buildroot-linux-gnueabihf/7.5.0/includecp lib/* -rfd /home/book/100ask_imx6ull-sdk/ToolChain/arm-buildroot-linux-gnueabihf_sdk-buildroot/bin/../lib/gcc/arm-buildroot-linux-gnueabihf/7.5.0/../../../../arm-buildroot-linux-gnueabihf/lib
四、使用Freetype显示单个文字
我们移植Freetype字体引擎,调用对应的 API 接口,提供字体文件,就可以让 freetype 库帮我们取出关键点、实现闭合曲线,填充颜色,达到显示矢量字体的目的。
(1)实现流程步骤
①一个文字的显示过程:
- 给定一个字符可以确定它的编码值(ASCII、UNICODE、GB2312)
- 设置字体大小
-
根据编码值,从文件头部中通过 charmap(字符映射表)找到对应的关键点(glyph),它会根据字体大小调整关键点;
-
把关键点转换为位图点阵
-
在LCD上显示出来
②具体的函数实现过程:
-
初始化:FT_InitFreetype
-
加载(打开)字体 Face:FT_New_Face
-
设置字体大小:FT_Set_Char_Sizes 或 FT_Set_Pixel_Sizes
-
选择 charmap:FT_Select_Charmap
-
根据编码值 charcode 找到 glyph_index:glyph_index = FT_Get_Char_Index(face,charcode)
-
根据 glyph_index 取出 glyph:FT_Load_Glyph(face,glyph_index)
-
转为位图:FT_Render_Glyph
-
移动或旋转:FT_Set_Transform
-
最后显示出来
(2)具体实现
①描点函数(lcd_put_pixel)
//输入参数: x坐标,y坐标,颜色
void lcd_put_pixel(int x, int y, unsigned int color)
{unsigned char *pen_8 = fbmem+y*line_width+x*pixel_width;unsigned short *pen_16;	unsigned int *pen_32;	unsigned int red, green, blue;	pen_16 = (unsigned short *)pen_8;pen_32 = (unsigned int *)pen_8;switch (var.bits_per_pixel){case 8:{*pen_8 = color;break;}case 16:{/* 565 */red   = (color >> 16) & 0xff;green = (color >> 8) & 0xff;blue  = (color >> 0) & 0xff;color = ((red >> 3) << 11) | ((green >> 2) << 5) | (blue >> 3);*pen_16 = color;break;}case 32:{*pen_32 = color;break;}default:{printf("can't surport %dbpp\\n", var.bits_per_pixel);break;}}
②显示位图函数(draw_bitmap)
根据bitmap位图,调用lcd_put_pixel描点函数在LCD指定位置显示汉字。
//输入参数: x坐标,y坐标,位图指针
void draw_bitmap( FT_Bitmap*  bitmap,FT_Int      x,FT_Int      y)
{FT_Int  i, j, p, q;FT_Int  x_max = x + bitmap->width;FT_Int  y_max = y + bitmap->rows;//printf("x = %d, y = %d\\n", x, y);for ( j = y, q = 0; j < y_max; j++, q++ ){for ( i = x, p = 0; i < x_max; i++, p++ ){if ( i < 0      || j < 0       ||i >= var.xres || j >= var.yres )continue;//image[j][i] |= bitmap->buffer[q * bitmap->width + p];lcd_put_pixel(i, j, bitmap->buffer[q * bitmap->width + p]);}}
}
③主函数(main)
具体的实现流程:
- 第一步:打开LCD的设备节点以及获取LCD参数
- 第二步:映射framebuffer
- 第三步:使用 wchar_t 获得字符的 UNICODE 值
- 第四步:屏幕、字体库初始化,构建字体文件对象
- 第五步:使用freetype获得位图(可设置倾斜角度)
- 最后:调用draw_bitmap函数显示位图
#include <sys/mman.h>
#include <sys/types.h>
#include <sys/stat.h>
#include <unistd.h>
#include <linux/fb.h>
#include <fcntl.h>
#include <stdio.h>
#include <string.h>
#include <math.h>
#include <wchar.h>
#include <sys/ioctl.h>
#include <ft2build.h>
#include FT_FREETYPE_H
#include FT_GLYPH_Hint fd_fb;
struct fb_var_screeninfo var;	/* Current var */
int screen_size;
unsigned char *fbmem;
unsigned int line_width;
unsigned int pixel_width;int main(int argc, char argv)
{FT_Library	  library;FT_Face 	  face;int error;FT_Vector     pen;FT_GlyphSlot  slot;int font_size = 24;FT_Matrix	  matrix;				  /* transformation matrix */double		  angle;//第一步:打开LCD的设备节点以及获取LCD参数if (argc < 2){printf("Usage : %s <font_file> [font_size]\\n", argv[0]);return -1;}if (argc == 3)font_size = strtoul(argv[2], NULL, 0);angle  = ( 1.0* strtoul(argv[2], NULL, 0) / 360 ) * 3.14159 * 2;	   /* use 25 degrees	 */if (argc == 4)font_size = strtoul(argv[3], NULL, 0);fd_fb = open("/dev/fb0", O_RDWR);if (fd_fb < 0){printf("can't open /dev/fb0\\n");return -1;}if (ioctl(fd_fb, FBIOGET_VSCREENINFO, &var)){printf("can't get var\\n");return -1;}//第二步:映射framebufferline_width  = var.xres * var.bits_per_pixel / 8;pixel_width = var.bits_per_pixel / 8;screen_size = var.xres * var.yres * var.bits_per_pixel / 8;fbmem = (unsigned char *)mmap(NULL , screen_size, PROT_READ | PROT_WRITE, MAP_SHARED, fd_fb, 0);if (fbmem == (unsigned char *)-1){printf("can't mmap\\n");return -1;}//第三步:使用 wchar_t 获得字符的 UNICODE 值wchar_t *chinese_str = L"希";//第四步:屏幕、字体库初始化,构建字体文件对象/* 清屏: 全部设为黑色 */memset(fbmem, 0, screen_size);/* 显示矢量字体 */error = FT_Init_FreeType( &library );			   /* initialize library *//* error handling omitted */error = FT_New_Face( library, argv[1], 0, &face ); /* create face object *//* error handling omitted */	slot = face->glyph;FT_Set_Pixel_Sizes(face, font_size, 0);//第五步:使用freetype得到位图/* 确定座标:*/pen.x = 0;pen.y = 0;/* set up matrix */matrix.xx = (FT_Fixed)( cos( angle ) * 0x10000L );matrix.xy = (FT_Fixed)(-sin( angle ) * 0x10000L );matrix.yx = (FT_Fixed)( sin( angle ) * 0x10000L );matrix.yy = (FT_Fixed)( cos( angle ) * 0x10000L );/* set transformation */FT_Set_Transform( face, &matrix, &pen);/* load glyph image into the slot (erase previous one) */error = FT_Load_Char( face, chinese_str[0], FT_LOAD_RENDER );if (error){printf("FT_Load_Char error\\n");return -1;}//最后一步:根据位图汉字显示draw_bitmap( &slot->bitmap,var.xres/2,var.yres/2);return 0;
}
(3)实现效果
交叉编译后,将文件复制到板子上运行,实现文字的LCD显示。
//交叉编译.c文件时,会报错,先执行以下的操作
//ft2build.h位于freetype2目录里,与工具链头文件不对应,需要移动到上级目录
cd /home/book/100ask_imx6ull-sdk/ToolChain/arm-buildroot-linux-gnueabihf_sdk-buildroot/arm-buildroot-linux-gnueabihf/sysroot/usr/include
mv freetype2/* ./
//编译并将文件复制到NFS挂载的目录下
arm-buildroot-linux-gnueabihf-gcc -o freetype_show_font freetype_show_font.c -lfreetype -lm
cp freetype_show_font simsun.ttc ~/nfs_rootfs
//上机测试
./freetype_show_font ./simsun.ttc 45 200

五、使用Freetype显示多行文字(支持倾斜角度)
只用上面的函数实现一行文字的显示,会出现一些问题,如每个字符的大小可能不同,如果设置的字体大小都一样,显示效果不好。针对这个问题,freetype库里有相应的解决方法。
在深入了解韦老师的示例代码后,进一步实现支持倾斜角度显示一行文字。这个过程中把代码思路进一步规整整理。
(1)方法原理
①字符大小示意
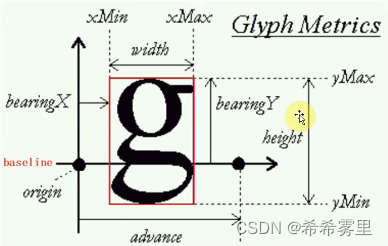
对于一个字符大小的定义如下图所示,具体需要考虑xMin、xMax、yMin以及yMax。这些参数我们可以通过FT_Glyph_Get_CBox函数获得。
②在指定位置显示一行文字
要是在指定位置(x,y)显示一行文字,步骤如图所示:
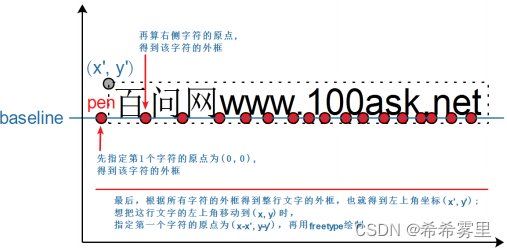
具体步骤为:
- 先指定第 1 个字符的原点 pen 坐标为(0, 0),计算出它的外框
- 再计算右边字符的原点,也计算出它的外框
-
在(x, y)处显示这行文字时,调整一下 pen 坐标。
(2)具体实现
①具体的实现流程
- 第一步:打开LCD的设备节点以及获取LCD参数
- 第二步:获得设置参数x_label、y_label、字体大小以及倾斜角度
- 第三步:映射framebuffer
- 第四步:使用 wchar_t 获得字符串的 UNICODE 值
- 第五步:屏幕、字体库初始化,构建字体文件对象
- 第六步:绘制一行字符串(计算外框以及调整原点)
②核心函数
在freetype显示单个字符里描点函数(lcd_put_pixel)以及显示位图函数(draw_bitmap)基础上。
a.计算一行文字的外框(compute_string_bbox)
int compute_string_bbox(FT_Face       face, wchar_t *wstr, FT_BBox  *abbox)
{int i;int error;FT_BBox bbox;FT_BBox glyph_bbox;FT_Vector pen;FT_Glyph  glyph;FT_GlyphSlot slot = face->glyph;/* 初始化 */bbox.xMin = bbox.yMin = 32000;bbox.xMax = bbox.yMax = -32000;/* 指定原点为(0, 0) */pen.x = 0;pen.y = 0;/* 计算每个字符的bounding box *//* 先translate, 再load char, 就可以得到它的外框了 */for (i = 0; i < wcslen(wstr); i++){/* 转换:transformation */FT_Set_Transform(face, 0, &pen);/* 加载位图: load glyph image into the slot (erase previous one) */error = FT_Load_Char(face, wstr[i], FT_LOAD_RENDER);if (error){printf("FT_Load_Char error\\n");return -1;}/* 取出glyph */error = FT_Get_Glyph(face->glyph, &glyph);if (error){printf("FT_Get_Glyph error!\\n");return -1;}/* 从glyph得到外框: bbox */FT_Glyph_Get_CBox(glyph, FT_GLYPH_BBOX_TRUNCATE, &glyph_bbox);/* 更新外框 */if ( glyph_bbox.xMin < bbox.xMin )bbox.xMin = glyph_bbox.xMin;if ( glyph_bbox.yMin < bbox.yMin )bbox.yMin = glyph_bbox.yMin;if ( glyph_bbox.xMax > bbox.xMax )bbox.xMax = glyph_bbox.xMax;if ( glyph_bbox.yMax > bbox.yMax )bbox.yMax = glyph_bbox.yMax;/* 计算下一个字符的原点: increment pen position */pen.x += slot->advance.x;pen.y += slot->advance.y;}/* return string bbox */*abbox = bbox;
}
b.调整原点并绘制 (支持倾斜角度)
int display_string(FT_Face     face, wchar_t *wstr, int lcd_x, int lcd_y, double angle)
{int i;int error;FT_BBox bbox;FT_Vector pen;							/*字符原点*/FT_Glyph  glyph;						/*对应字符的处理结果,含glyph和位图*/FT_Matrix	  matrix;				  	/* transformation matrix */FT_GlyphSlot slot = face->glyph;/* 把LCD坐标转换为笛卡尔坐标 */int x = lcd_x;int y = var.yres - lcd_y;/* 计算外框 */compute_string_bbox(face, wstr, &bbox);/* 反推原点 */pen.x = (x - bbox.xMin) * 64; /* 单位: 1/64像素 */pen.y = (y - bbox.yMax) * 64; /* 单位: 1/64像素 *//*设置matrix*/matrix.xx = (FT_Fixed)( cos( angle ) * 0x10000L );matrix.xy = (FT_Fixed)(-sin( angle ) * 0x10000L );matrix.yx = (FT_Fixed)( sin( angle ) * 0x10000L );matrix.yy = (FT_Fixed)( cos( angle ) * 0x10000L );/* 处理每个字符 */for (i = 0; i < wcslen(wstr); i++){/* 转换:transformation */FT_Set_Transform(face, &matrix, &pen);/* 加载位图: load glyph image into the slot (erase previous one) */error = FT_Load_Char(face, wstr[i], FT_LOAD_RENDER);if (error){printf("FT_Load_Char error\\n");return -1;}/* 在LCD上绘制: 使用LCD坐标 */draw_bitmap( &slot->bitmap,slot->bitmap_left,var.yres - slot->bitmap_top);/* 计算下一个字符的原点: increment pen position */pen.x += slot->advance.x;pen.y += slot->advance.y;}return 0;
}
c.main()
#include <sys/mman.h>
#include <sys/types.h>
#include <sys/stat.h>
#include <unistd.h>
#include <linux/fb.h>
#include <fcntl.h>
#include <stdio.h>
#include <string.h>
#include <math.h>
#include <wchar.h>
#include <sys/ioctl.h>
#include <ft2build.h>
#include FT_FREETYPE_H
#include FT_GLYPH_Hint fd_fb;
struct fb_var_screeninfo var;	/* Current var */
struct fb_fix_screeninfo fix;   /* Current fix */
int screen_size;
unsigned char *fbmem;
unsigned int line_width;
unsigned int pixel_width;int main(int argc, char argv)
{FT_Library	  library;					/*freetype库*/FT_Face 	  face;						/*对应字体文件*/FT_BBox bbox;int lcd_x, lcd_y, lcd_y2, lcd_y3;						/*初始坐标*/int error;int font_size = 24;FT_Matrix	  matrix;				  	/* transformation matrix */double		  angle;//第一步:打开LCD的设备节点以及获取LCD参数fd_fb = open("/dev/fb0", O_RDWR);if (fd_fb < 0){printf("can't open /dev/fb0\\n");return -1;}if (ioctl(fd_fb, FBIOGET_VSCREENINFO, &var)){printf("can't get var\\n");return -1;}//第二步,设置的参数x_label、y_label、字体大小以及倾斜角度if (argc < 5){printf("Usage : %s <font_file> <lcd_x> <lcd_y> [font_size]\\n", argv[0]);return -1;}lcd_x = strtoul(argv[2], NULL, 0);lcd_y = strtoul(argv[3], NULL, 0);font_size = strtoul(argv[4], NULL, 0);if (argc == 6)angle  = ( 1.0* strtoul(argv[5], NULL, 0) / 360 ) * 3.14159 * 2;	   /* use 25 degrees	 *///第三步:映射framebufferline_width  = var.xres * var.bits_per_pixel / 8;pixel_width = var.bits_per_pixel / 8;screen_size = var.xres * var.yres * var.bits_per_pixel / 8;fbmem = (unsigned char *)mmap(NULL , screen_size, PROT_READ | PROT_WRITE, MAP_SHARED, fd_fb, 0);if (fbmem == (unsigned char *)-1){printf("can't mmap\\n");return -1;}//第四步:使用 wchar_t 获得字符串的 UNICODE 值wchar_t *wline1 = L"希希雾里";wchar_t *wline2 = L"对自己越坦然,自己就越轻松!";wchar_t *wline3 = L"加油呀,争取换个地方继续搬砖,嘿嘿";//第五步:屏幕、字体库初始化,构建字体文件对象/* 清屏: 全部设为黑色 */memset(fbmem, 0, screen_size);/* 显示矢量字体 */error = FT_Init_FreeType( &library );			   /* initialize library *//* error handling omitted */error = FT_New_Face( library, argv[1], 0, &face ); /* create face object */FT_Set_Pixel_Sizes(face, font_size, 0);//第六步,绘制多行字符串(计算外框以及调整原点)display_string(face, wline1, lcd_x, lcd_y, angle);lcd_y2 = lcd_y + 80;display_string(face, wline2, lcd_x, lcd_y2, angle);lcd_y3 = lcd_y2 + 80;display_string(face, wline3, lcd_x, lcd_y3, angle);return 0;
}
(3)实现效果
//显示多行文字,祝福自己
./freetype_show_font ./simsun.ttc 100 0 40 0

参考视频:
5_Framebuffer应用编程_哔哩哔哩_bilibili
6.1_字符的编码方式_哔哩哔哩_bilibili 6.2_ASCII字符的点阵显示_哔哩哔哩_bilibili
6.3_中文字符的点阵显示_哔哩哔哩_bilibili 6-4.交叉编译程序_以freetype为例_哔哩哔哩_bilibili
6.5_使用freetype显示单个文字_哔哩哔哩_bilibili 6.6_使用freetype显示一行文字_哔哩哔哩_bilibili