用机器学习sklearn+opencv-python过简单的4位数字验证码

目录
用opencv-python处理图片
制作训练数据集
训练模型
识别验证码
总结与提高
源码下载
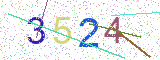
在本节我们将使用sklearn和opencv-python这两个库过掉简单的4位数字验证码,验证码风格如下所示。
生成验证码图片
要识别验证码,我们就需要大量验证码图片用于机器学习,以下是生成验证码图片的完整代码。
# captcha.py
from PIL import Image, ImageDraw, ImageFont
import concurrent.futures
from pathlib import Path
import randomIMG_WIDTH = 160             # 图片宽度
IMG_HEIGHT = 60             # 图片高度
FONT_SIZE = 40              # 字体大小def get_random_point():"""获取随机点坐标"""x = random.randint(0, IMG_WIDTH)y = random.randint(0, IMG_HEIGHT)return x, ydef get_random_color(min_val=0, max_val=255):"""获取随机颜色"""r = random.randint(min_val, max_val)g = random.randint(min_val, max_val)b = random.randint(min_val, max_val)return r, g, bdef draw_bg_noise(img, pen):"""制造背景噪点"""noise_num = IMG_WIDTH * IMG_HEIGHT // 8 # 要绘制的噪点数量for i in range(noise_num):x, y = get_random_point()color = get_random_color(min_val=150, max_val=255)pen.point((x, y), color)return imgdef draw_lines(img, pen):"""绘制线条"""for i in range(5):x1, y1 = get_random_point()x2, y2 = get_random_point()color = get_random_color()line_width = random.randint(1, 2)pen.line(((x1, y1), (x2, y2)), fill=color, width=line_width)return imgdef draw_texts(img, pen):"""绘制文本"""total = 4                   # 要绘制的字符总数char_list = []              # 字符列表seed = "0123456789"         # 字符池x_gap = IMG_WIDTH // (total + 2)y_gap = (IMG_HEIGHT - FONT_SIZE) // 2for i in range(total):char = random.choice(seed)char_list.append(char)x = x_gap * (i + 1)y = y_gapcolor = get_random_color()font = ImageFont.truetype("Arial", size=random.randint(FONT_SIZE - 5, FONT_SIZE + 5))pen.text((x, y), char, color, font)return img, "".join(char_list)def generate_captcha(num, output_dir, thread_name=0):"""生成一定数量的验证码图片:param num: 生成数量:param output_dir: 存放验证码图片的文件夹路径:param thread_name: 线程名称:return: None"""Path(output_dir).mkdir(exist_ok=True)   # 创建目录for i in range(num):img = Image.new("RGB", size=(IMG_WIDTH, IMG_HEIGHT), color="white")pen = ImageDraw.Draw(img, mode="RGB")img, text = draw_texts(img, pen)img = draw_bg_noise(img, pen)img = draw_lines(img, pen)save_path = f"{output_dir}/{i+1}-{text}.png"img.save(save_path, format="png")print(f"Thread {thread_name}: 已生成{i+1}张验证码")print(f"Thread {thread_name}: 验证码图片生成完毕")def main():with concurrent.futures.ThreadPoolExecutor(max_workers=10) as executor:for i in range(3):executor.submit(generate_captcha, 10000, f"./captcha{i}", i)if __name__ == "__main__":main()
该程序使用Pillow库生成随机4位数字类型的验证码图片,像素为160px*60px,图片上还设置了噪点和线条,可以加大识别难度。在main()函数中,我们开启了3个子线程,每一个子线程负责生成10000张验证码并保存在各自的文件夹中。
用opencv-python处理图片
将验证码图片交给模型识别前的一个重要操作就是图像处理。为了提高识别精读,我们应该将验证码上的图片噪点尽可能去除。下方的adjust_img会返回一个二值化后的验证码图片。
# process.py
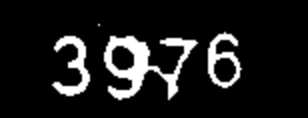
def adjust_img(img):"""调整图像"""# 图片灰度化img_gray = cv.cvtColor(img, cv.COLOR_BGR2GRAY)# 高斯模糊img_gaussian = cv.GaussianBlur(img_gray, (9, 9), 0)# 二值化ret, img_threshold = cv.threshold(img_gaussian, 0, 255,cv.THRESH_BINARY_INV + cv.THRESH_OTSU)# 腐蚀处理kernel = np.ones((3, 3), np.float32)img_erode = cv.erode(img_threshold, kernel)return img_erode高斯模糊可以有效去除图像中的噪点,腐蚀处理可以去除较细的线条,处理后的效果显示如下。
我们要用sklearn识别单个数字(这样识别难度会小一些),而验证码上是4个数字,所以我们应该将验证码图片进行切割,切割后的每张图片只包含一个数字。下方的split_img()函数实现了这个功能。
# process.py
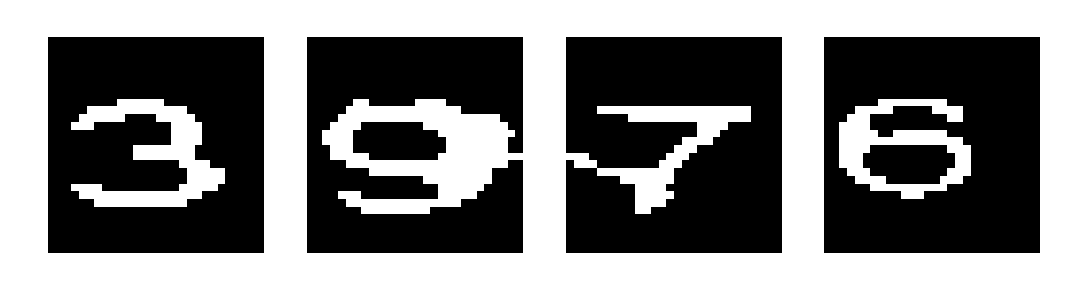
def split_img(img):"""分割图像"""height, width = img.shapex_gap = width // (4 + 2)roi_list = []for i in range(1, 5):roi = img[0:height, i*x_gap:(i+1)*x_gap]roi = cv.resize(roi, (28, 28))roi[roi < 125] = 0roi[roi >= 125] = 1if roi.sum() > 0:roi_list.append(roi)if len(roi_list) == 4:return True, roi_listelse:return False, None通过adjust_img()函数我们得到的是二值化图像,也就是说图像各像素的值只会是0或255,但是在split_img()函数中,我们调用了cv.resize()方法将单个数字图像调整成了28*28像素大小,该操作会让图像各像素的值改变,值是[0-255]区间中的任意一个值,所以笔者这里通过以下两行代码再次将图像二值化。那为什么不是0和255而是0和1呢,因为后者更有利于机器学习。
roi[roi < 125] = 0
roi[roi >= 125] = 1
分割结果如下所示:
由于有些数字颜色比较浅,所以在adjust_img()函数中二值化时就有可能变成全黑了,像素值为0。那在split_img()函数中,我们要先判断分割出来的单个数字图像是不是全黑的(图像值总和为0),如果是的话就不会被添加到roi_list中。如果roi_list的长度为4,说明成功分割到了4个数字的单独图像(图像质量好坏不一定)。
我们要知道的一点是,在图像处理这一步骤中,有少部分验证码图片肯定会不合格,不能拿来放进机器学习数据集中,也无法被正常识别。图像处理的好坏跟识别准确度高低有很大关系。图像处理的完整代码如下所示。
# process.py
import cv2 as cv
import numpy as np
import matplotlib.pyplot as pltdef adjust_img(img):"""调整图像"""# 图片灰度化img_gray = cv.cvtColor(img, cv.COLOR_BGR2GRAY)# 高斯模糊img_gaussian = cv.GaussianBlur(img_gray, (9, 9), 0)# 二值化ret, img_threshold = cv.threshold(img_gaussian, 0, 255,cv.THRESH_BINARY_INV + cv.THRESH_OTSU)# 腐蚀处理kernel = np.ones((3, 3), np.float32)img_erode = cv.erode(img_threshold, kernel)return img_erodedef split_img(img):"""分割图像"""height, width = img.shapex_gap = width // (4 + 2)roi_list = []for i in range(1, 5):roi = img[0:height, i*x_gap:(i+1)*x_gap]roi = cv.resize(roi, (28, 28))roi[roi < 125] = 0roi[roi >= 125] = 1if roi.sum() > 0:roi_list.append(roi)if len(roi_list) == 4:return True, roi_listelse:return False, Nonedef main():img = cv.imread("./captcha0/8-3976.png")img = adjust_img(img)is_ok, roi_list = split_img(img)if not is_ok:returnfor i, roi in enumerate(roi_list):plt.subplot(1, 4, i+1)plt.axis("off")plt.imshow(roi, cmap="gray")plt.show()if __name__ == "__main__":main()
制作训练数据集
验证码图片有了,图像处理也好了,接下来就是把所有单个数字图像保存为训练数据集,完整代码如下所示。
# data.py
import os
import cv2 as cv
import numpy as np
import concurrent.futures
from process import adjust_img, split_imgdef make_data(captcha_dir, thread_name):"""制作训练数据集"""data = []           # 特征数据target = []         # 数据标签for i, filename in enumerate(os.listdir(captcha_dir)):print(f"Thread {thread_name}: 正在处理第{i+1}张图片")file_path = f"{captcha_dir}/{filename}"img = cv.imread(file_path)img = adjust_img(img)is_ok, roi_list = split_img(img)if not is_ok:continue# 从图片名称中获取真实验证码captcha = filename.split("-")[-1].replace(".png", "")for i, roi in enumerate(roi_list):data.append(roi.ravel())target.append(int(captcha[i]))data = np.array(data)target = np.array(target)np.save(f"data{thread_name}.npy", data)np.save(f"target{thread_name}.npy", target)print(f"Thread {thread_name}: 已保存数据和标签")def main():with concurrent.futures.ThreadPoolExecutor(max_workers=10) as executor:for i in range(3):executor.submit(make_data, f"./captcha{i}", i)if __name__ == "__main__":main()
该程序开启了3个子线程,每个线程负责一个验证码文件夹中的所有图片。最终结果是将所有单个图片数据以及对应的标签保存在npy格式的文件中。
训练模型
有了数据之后就可以开始训练了。首先,我们应该把各个npy数据加载进来,并正进行整合,请看以下代码。
# train.py
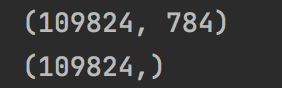
def load_data():"""加载各个npy数据,返回整合后的数据"""data0 = np.load("data0.npy")target0 = np.load("target0.npy")data1 = np.load("data1.npy")target1 = np.load("target1.npy")data2 = np.load("data2.npy")target2 = np.load("target2.npy")X = np.vstack([data0, data1, data2])y = np.hstack([target0, target1, target2])print(X.shape)print(y.shape)return X, y如果在图像处理部分完全没问题的话,那结果总数应该是4*30000 = 120000条数据。从打印结果看,数据数量还是可以的。
接下来,选择最合适的模型,不断调参(这里其实会花费很多时间)。出于演示目的,笔者这里就选择KNN了,请看以下代码。
# train.py
def get_best_estimator(X, y):"""调整参数,获取最佳的KNN模型"""X_train, X_test, y_train, y_test = train_test_split(X, y, test_size=0.2, random_state=0)param_grid = {"n_neighbors": [i for i in range(5, 13, 2)]}grid_search = GridSearchCV(KNeighborsClassifier(), param_grid, cv=5)grid_search.fit(X_train, y_train)print(grid_search.score(X_test, y_test))pred = grid_search.predict(X_test)print(classification_report(y_test, pred))return grid_search.best_estimator_
在get_best_estimator()函数中,我们用GridSearchCV进行参数选择与模型评估,评分和报告如下所示。
0.9287502845435921precision    recall  f1-score   support0       0.92      0.91      0.92      21461       0.91      0.95      0.93      21762       0.90      0.94      0.92      21783       0.91      0.92      0.91      22184       0.95      0.94      0.95      23195       0.94      0.92      0.93      21686       0.92      0.93      0.93      22077       0.93      0.94      0.94      22358       0.95      0.91      0.93      22179       0.95      0.92      0.93      2101accuracy                       0.93     21965macro avg   0.93      0.93      0.93     21965
weighted avg   0.93      0.93      0.93     21965
准确度有93%左右,还是不错的,但是真正的泛化能力不可能这么高,我们待会实战看下。
模型训练好了之后,我们就可以将它进行保存,请看以下代码。
# train.py
def save_model(best_estimator):"""保存模型"""with open("./model.pkl", "wb") as f:pickle.dump(best_estimator, f)
训练部分的完整代码所示如下:
# train.py
from sklearn.model_selection import train_test_split, GridSearchCV
from sklearn.neighbors import KNeighborsClassifier
from sklearn.metrics import classification_report
import numpy as np
import pickledef load_data():"""加载各个npy数据,返回整合后的数据"""data0 = np.load("data0.npy")target0 = np.load("target0.npy")data1 = np.load("data1.npy")target1 = np.load("target1.npy")data2 = np.load("data2.npy")target2 = np.load("target2.npy")X = np.vstack([data0, data1, data2])y = np.hstack([target0, target1, target2])print(X.shape)print(y.shape)return X, ydef get_best_estimator(X, y):"""调整参数,获取最佳的KNN模型"""X_train, X_test, y_train, y_test = train_test_split(X, y, test_size=0.2, random_state=0)param_grid = {"n_neighbors": [i for i in range(5, 13, 2)]}grid_search = GridSearchCV(KNeighborsClassifier(), param_grid, cv=5)grid_search.fit(X_train, y_train)print(grid_search.score(X_test, y_test))pred = grid_search.predict(X_test)print(classification_report(y_test, pred))return grid_search.best_estimator_def save_model(best_estimator):"""保存模型"""with open("./model.pkl", "wb") as f:pickle.dump(best_estimator, f)def main():X, y = load_data()best_estimator = get_best_estimator(X, y)save_model(best_estimator)if __name__ == "__main__":main()
识别验证码
最后一步就是实战验证,看看这个KNN模型的泛化能力如何。首先应该调用captcha.py中的generate_captcha()函数生成一定数量的验证码。
# predict.py
from captcha import generate_captchagenerate_captcha(1000, "./captcha3")    # 生成1000张验证码保存在captcha3文件夹中
接着加载模型。
# predict.py
def load_model(mode_path):"""加载模型"""with open(mode_path, "rb") as f:model = pickle.load(f)return model
然后是编写预测代码。
# predict.py
def predict(model, img_path):img = cv.imread(img_path)img = adjust_img(img)# 预测结果和真实结果predict_result = ""real_result = img_path.split("-")[-1].replace(".png", "")# 如果图像处理成功,则返回单个数字图像的预测结果和真实结果# 如果没成功,则返回0000和真实结果is_ok, roi_list = split_img(img)if is_ok:for i, roi in enumerate(roi_list):predict_result += str(model.predict(roi.reshape(1, -1))[0])print(f"{img_path}的识别结果为{predict_result}")return predict_result, real_resultelse:print(f"{img_path}图片处理失败")return "0000", real_result
在predict()函数中,我们首先读取了图片并对图像进行处理和分割,然后调用model.predict()方法进行预测。
预测结果要和真实结果比对后就可以得到准确度了,请看以下代码。
# predict.py
def get_accuracy(model):"""获取验证准确度"""all_predict_result = []all_real_result = []for filename in sorted(os.listdir("./captcha3")):predict_result, real_result = predict(model, f"./captcha3/{filename}")all_predict_result.append(predict_result)all_real_result.append(real_result)accuracy = (np.array(all_predict_result) == np.array(all_real_result)).sum() / len(all_predict_result)return accuracy
经笔者测试,accuracy的值在0.7左右,也就是说1000张图片中,大概有700张识别对了,剩下的300张要么是识别错误,要么是图像处理不过关直接返回0000了。这个泛化能力稍微偏弱,不过还算是可以用的。
完整代码如下所示:
# predict.py
import os
import pickle
import cv2 as cv
import numpy as np
from captcha import generate_captcha
from process import adjust_img, split_imgdef load_model(mode_path):"""加载模型"""with open(mode_path, "rb") as f:model = pickle.load(f)return modeldef predict(model, img_path):img = cv.imread(img_path)img = adjust_img(img)# 预测结果和真实结果predict_result = ""real_result = img_path.split("-")[-1].replace(".png", "")# 如果图像处理成功,则返回单个数字图像的预测结果和真实结果# 如果没成功,则返回0000和真实结果is_ok, roi_list = split_img(img)if is_ok:for i, roi in enumerate(roi_list):predict_result += str(model.predict(roi.reshape(1, -1))[0])print(f"{img_path}的识别结果为{predict_result}")return predict_result, real_resultelse:print(f"{img_path}图片处理失败")return "0000", real_resultdef get_accuracy(model):"""获取验证准确度"""all_predict_result = []all_real_result = []for filename in sorted(os.listdir("./captcha3")):predict_result, real_result = predict(model, f"./captcha3/{filename}")all_predict_result.append(predict_result)all_real_result.append(real_result)accuracy = (np.array(all_predict_result) == np.array(all_real_result)).sum() / len(all_predict_result)return accuracydef main():generate_captcha(1000, "./captcha3")model = load_model("./model.pkl")accuracy = get_accuracy(model)print(accuracy)if __name__ == "__main__":main()
总结与提高
通过以上内容我们得知,卡住识别精读的难点主要有两个:图像处理和模型训练。
如果要提高识别精读,可以在图像处理这一环节多下点功夫,尽量能够获取到好的分割图像。这样的话数据集质量会提高,训练精读就会上去,而且在真实识别过程中,被抛弃掉的(图像处理不过关的)验证码数量也会变少。
在本次训练过程中,笔者只选用了KNN模型,而且并没有对数据进行过多的预处理。读者完全可以通过尝试其他更强大的模型去获得更高的识别精读。
当然,训练数据如果能多一些的话那对精读提高也是有帮助的。
源码下载
链接:https://pan.baidu.com/s/1CCdyIAQs97N_gJyQJw9WzQ
密码:zy5b