nginx--官方模块

目录
1.概述
2.Nginx的客户端状态
1.使用
2.目录中选择一个随机主页
3.http内容替换
编辑
4.nginx请求限制
5.nginx访问控制
1.基于Ip的访问控制
1.1使用
1.2access_mod.conf
1.3只允许自己ip访问
1.4http_x_forwarded_for
1.5http_access_module局限性
2.基于用户的信任登录
2.1auth_mod.conf
2.2局限性
1.概述
nginx官方模块:默认下载,默认支持的模块
nginx第三方模块:自己开发的模块或者第三方开发的模块
--with-compat
--with-file-aio
--with-threads
--with-http_addition_module
--with-http_auth_request_module
--with-http_dav_module
--with-http_flv_module
--with-http_gunzip_module
--with-http_gzip_static_module
--with-http_mp4_module
--with-http_random_index_module
--with-http_realip_module
--with-http_secure_link_module
--with-http_slice_module
--with-http_ssl_module
--with-http_stub_status_module
--with-http_sub_module
--with-http_v2_module
--with-mail
--with-mail_ssl_module
--with-stream
--with-stream_realip_module
--with-stream_ssl_module
--with-stream_ssl_preread_module 2.Nginx的客户端状态
--with-http_stub_status_module
# 官方文档
https://nginx.org/en/docs/http/ngx_http_stub_status_module.html
配置语法
Syntax: stub_status; 配置语法
Default:-  默认没有配置
Context:server location 配置在server或者location下
1.使用
vi /etc/nginx/conf.d/server1.conf# 检查配置文件语法是否正确
[root@localhost ~]# nginx -tc /etc/nginx/nginx.conf
nginx: the configuration file /etc/nginx/nginx.conf syntax is ok
nginx: configuration file /etc/nginx/nginx.conf test is successful# 重启nginx
nginx -s reload -c /etc/nginx/nginx.conf1.nginx.cn/mystatus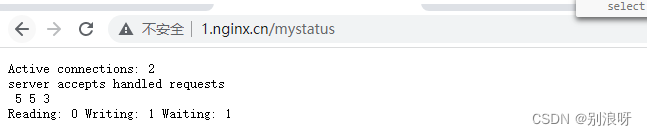
server{# 默认访问路径配置location /mystatus {stub_status;}}server {listen 80;server_name 1.nginx.cn;location /mystatus {stub_status;}location / {root /opt/app/server1;index server1.html;}error_page 500 502 503 504 /50x.html;error_page 404 /404x.html;location = /50x.html {root /usr/share/nginx/html;}location = /404x.html {root /usr/share/nginx/html;}}2.目录中选择一个随机主页
--with-http_random_index_module
# 官方文档
https://nginx.org/en/docs/http/ngx_http_random_index_module.htmlSyntax: random_index on | off; 配置语法
Default:random_index off;  默认关闭
Context: location 配置在location下
# 复制文件
cp /opt/app/server2/server2.html /opt/app/server1/server2.html
# 修改配置文件
vi /etc/nginx/conf.d/server1.conf
# 检查配置文件语法是否正确
[root@localhost ~]# nginx -tc /etc/nginx/nginx.conf
nginx: the configuration file /etc/nginx/nginx.conf syntax is ok
nginx: configuration file /etc/nginx/nginx.conf test is successful# 重启nginx
nginx -s reload -c /etc/nginx/nginx.conf# 测试 重复刷新即可
1.nginx.cn# /opt/app/server1 目录下有两个html文件随机展示一个
server{listen     80;server_name 1.nginx.cn;# 默认访问路径配置location / {root  /opt/app/server1;random_index on;}}
3.http内容替换
--with-http_sub_module
# 官方文档
https://nginx.org/en/docs/http/ngx_http_sub_module.htmlSyntax: sub_filter string replacement; 配置语法
Default:-
Context:http server location 配置在http、server或者location下Syntax: sub_filter_last_modified on | off; 配置语法
Default: sub_filter_last_modified off;
Context:http server location 配置在http、server或者location下Syntax: sub_filter_once on | off; 配置语法
Default: sub_filter_once off;
Context:http server location 配置在http、server或者location下# 修改配置文件
vi /etc/nginx/conf.d/server1.conf
# 检查配置文件语法是否正确
[root@localhost ~]# nginx -tc /etc/nginx/nginx.conf
nginx: the configuration file /etc/nginx/nginx.conf syntax is ok
nginx: configuration file /etc/nginx/nginx.conf test is successful# 重启nginx
nginx -s reload -c /etc/nginx/nginx.conf# 测试
1.nginx.cn/server1.html# /opt/app/server1
server{listen     80;server_name 1.nginx.cn;# 默认访问路径配置location / {root  /opt/app/server1;# 如果有多个内容一样的,默认只替换第一个,需要替换所有的使用sub_filter_oncesub_filter 'service1' 'service1131231';sub_filter_once off;}}
4.nginx请求限制
连接频率限制 - limit_conn_module
# 官方文档
https://nginx.org/en/docs/http/ngx_http_limit_conn_module.html
# key nginx内置变量 , name 申请的空间名称 ,size申请空间的大小
Syntax: limit_conn_zone key zone=name:size;
Default:一
Context:http 定义在http下面# zone 对应上面定义的空间名称name
Syntax: limit_conn zone number;
Default:-
Context:http, server, location请求频率限制 - limit_req_module
#   key nginx内置变量 , name 申请的空间名称 ,size申请空间的大小 , rate 限制大小
Syntax: limit_req_zone key zone=namesize rate=rate;
Default:-
Context:http 定义在http下面# name 对应上面定义的空间名称name,burst,nodelay默认不需要配置
Syntax: limit_reg zone=name [burst=number] [nodelay];
Default:-
Context:http, server, location1.使用测试# 修改配置文件
vi /etc/nginx/conf.d/server1.conf
# 检查配置文件语法是否正确
nginx -tc /etc/nginx/nginx.conf
# 重启nginx
nginx -s reload -c /etc/nginx/nginx.conf
# 测试 -n 发起的请求数 -c 并发的数量 ,可以看到请求错误49个 Non-2xx responses:      49
ab -n 50 -c 20 http://192.168.1.124/server1.html
# 查看日志
tail -f  /var/log/nginx/error.log2023/04/12 16:34:05 [error] 1938#1938: *5255 limiting requests, excess: 0.911 by zone "req_zone", client: 192.168.1.124, server: localhost, request: "GET /server1.html HTTP/1.0", host: "192.168.1.124"2.server1.conf# 1m 1兆
limit_conn_zone $binary_remote_addr zone=conn_zone:1m;
limit_req_zone $binary_remote_addr zone=req_zone:2m rate=1r/s;
server {listen      80;server_name  1.nginx.cn;#access_log  /var/log/nginx/host.access.log  main;location /mystatus {stub_status;}# 默认访问路径配置location / {root  /opt/app/server1;# 同一时段只允许1个ip连接过来,一个连接可以发送多个请求#limit_conn conn_zone 1;# burst 超过指定数速率后遗留的三个到下一秒执行#  50此请求可以成功4个 Non-2xx responses:      46limit_req zone=req_zone burst=3 nodelay;#limit_req zone=req_zone burst=3;# 50此请求可以成功1个 Non-2xx responses:      49#limit_req zone=req_zone;index server1.html;}error_page   500 502 503 504 /50x.html;error_page   404 /404x.html;location = /50x.html {root   /usr/share/nginx/html;}location = /404x.html {root  /usr/share/nginx/html;}
}3.错误日志# limit_req zone=req_zone burst=3 nodelay;
GET - /server1.html 192.168.1.124 - - [12/Apr/2023:16:41:17 +0800] "GET /server1.html HTTP/1.0" 200 251 "-" "ApacheBench/2.3" "-"
GET - /server1.html 192.168.1.124 - - [12/Apr/2023:16:41:17 +0800] "GET /server1.html HTTP/1.0" 200 251 "-" "ApacheBench/2.3" "-"
GET - /server1.html 192.168.1.124 - - [12/Apr/2023:16:41:17 +0800] "GET /server1.html HTTP/1.0" 200 251 "-" "ApacheBench/2.3" "-"
GET - /server1.html 192.168.1.124 - - [12/Apr/2023:16:41:17 +0800] "GET /server1.html HTTP/1.0" 200 251 "-" "ApacheBench/2.3" "-"
GET - /server1.html 192.168.1.124 - - [12/Apr/2023:16:41:17 +0800] "GET /server1.html HTTP/1.0" 503 497 "-" "ApacheBench/2.3" "-"
GET - /server1.html 192.168.1.124 - - [12/Apr/2023:16:41:17 +0800] "GET /server1.html HTTP/1.0" 503 497 "-" "ApacheBench/2.3" "-"
GET - /server1.html 192.168.1.124 - - [12/Apr/2023:16:41:17 +0800] "GET /server1.html HTTP/1.0" 503 497 "-" "ApacheBench/2.3" "-"
GET - /server1.html 192.168.1.124 - - [12/Apr/2023:16:41:17 +0800] "GET /server1.html HTTP/1.0" 503 497 "-" "ApacheBench/2.3" "-"
GET - /server1.html 192.168.1.124 - - [12/Apr/2023:16:41:17 +0800] "GET /server1.html HTTP/1.0"
5.nginx访问控制
1.基于Ip的访问控制
http_access_module
#官方文档
https://nginx.org/en/docs/http/ngx_http_access_module.html
# 允许哪些条件访问
# address ip地址,CIDR网段,unix: socket方式访问; all:允许所有
Syntax: allow address | CIDR | unix: | all;
Default:一
Context:http, server, location, limit_except# 不允许哪些条件访问
# address ip地址,CIDR网段,unix: socket方式访问; all:允许所有
Syntax: deny address | CIDR | unix: | all;
Default:一
Context:http, server, location, limit_except
1.1使用
# 删除之前配置
rm -rf /etc/nginx/conf.d/server1.conf /etc/nginx/conf.d/server2.conf
# 还原default配置文件
cp /opt/backup/default.conf /etc/nginx/conf.d/default.conf
# 修改文件名称
mv /etc/nginx/conf.d/default.conf /etc/nginx/conf.d/access_mod.conf
# 修改文件
vi /etc/nginx/conf.d/access_mod.conf
# 检查配置文件语法是否正确
nginx -tc /etc/nginx/nginx.conf
# 重启nginx
nginx -s reload -c /etc/nginx/nginx.conf
# 测试访问
http://192.168.1.124/
# 刷新页面查看错误日志tail -f /var/log/nginx/error.log
2023/04/12 17:21:16 [error] 2067#2067: *70856 access forbidden by rule, client: 192.168.1.118, server: localhost, request: "GET / HTTP/1.1", host: "192.168.1.124"
1.2access_mod.conf
server {listen 80;server_name localhost;#access_log /var/log/nginx/host.access.log main;location / {root /opt/app/server1;# 自己pc的ipdeny 192.168.1.118;allow all;index server1.html server1.htm;}error_page 500 502 503 504 /50x.html;error_page 404 /404x.html;location = /50x.html {root /usr/share/nginx/html;}location = /404x.html {root /usr/share/nginx/html;}}1.3只允许自己ip访问
location / {root /opt/app/server1;# 自己pc的ipallow 192.168.1.118;index server1.html server1.htm;}
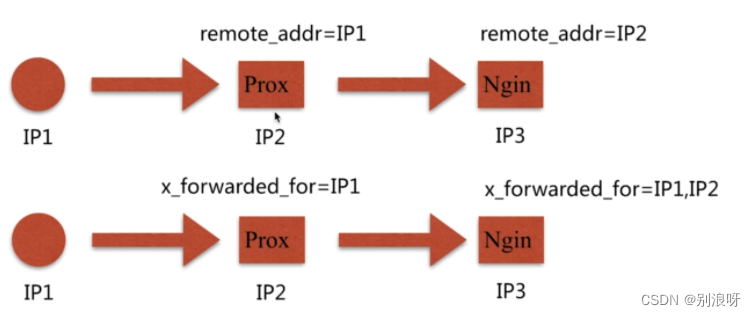
1.4http_x_forwarded_for
1.5http_access_module局限性
方法一、采用别的HTTP头信息控制访问,如:HTTPX FORWARD FOR
方法二、结合geo模块作
方法三、通过HTTP自定义变量传递
2.基于用户的信任登录
http_auth_basic_module
#官方文档
https://nginx.org/en/docs/http/ngx_http_auth_basic_module.html
Syntax: auth_pasic string | off;
Default: auth basic off;
Context:http, server, location, limit_except
Syntax: auth_basic_user_file file;
Default:-
Context:http, server, location, limit_except
# 修改文件
mv access_mod.conf auth_mod.conf
# htpasswd工具使用, 输入密码即可,用户名为test
htpasswd -c ./auth_conf test
[root@localhost conf.d]# htpasswd -c ./auth_conf test
New password:
Re-type new password:
Adding password for user test
# 编辑auth_mod.conf
vi auth_mod.conf
# 检查配置文件语法是否正确
nginx -tc /etc/nginx/nginx.conf
# 重启nginx
nginx -s reload -c /etc/nginx/nginx.conf
# 测试访问 输入密码即可
http://192.168.1.124/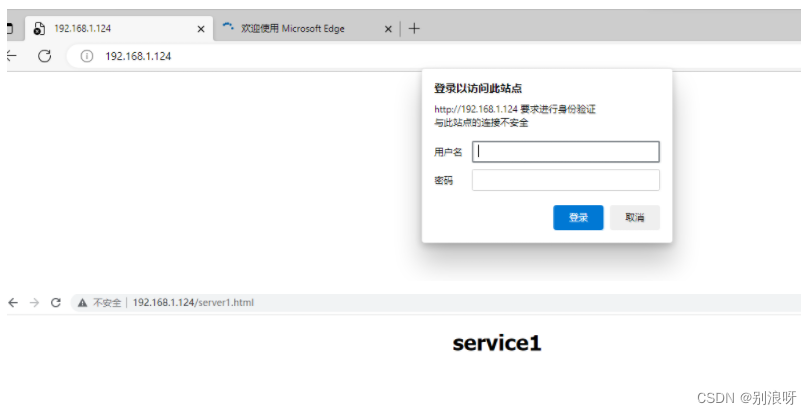
2.1auth_mod.conf
server {listen 80;server_name localhost;
#access_log /var/log/nginx/host.access.log main;
location / {root /opt/app/server1;auth_basic "auth access test! input you password";auth_basic_user_file /etc/nginx/conf.d/auth_conf;index server1.html server1.htm;}error_page 500 502 503 504 /50x.html;error_page 404 /404x.html;location = /50x.html {root /usr/share/nginx/html;}location = /404x.html {root /usr/share/nginx/html;}}2.2局限性
1.用户信息依赖文件方式
2.操作管理机械,效率底下
3.nginx结合lua实现高效验证
4.nginx和LDAP打通,利用nginx-auth-ldap模块