【论文解读】ConvNeXt V2: Co-designing and Scaling ConvNets with Masked Autoencoder

1. 本文贡献
提出了一个全卷积掩码的自动编码器框架和一个新的全局响应归一化(GRN)层
1.1 想法
本文的想法是希望能在 ConvNeXt 中使用MAE,但是MAE的设计架构是基于vision transformer的,与使用密集滑动窗口的标准ConvNets不兼容,因此作者的建议是在同一框架下共同设计网络架构和掩蔽自动编码器
1.1.1 操作梗要
将屏蔽输入视为一组稀疏补丁,并使用稀疏卷积仅处理可见部分。在实践中,我们可以用稀疏卷积实现ConvNeXt,在微调时,权重被转换回标准的密集层,而不需要特殊处理。
当直接在掩蔽输入上训练ConvNeXt时,我们发现了MLP层的特征崩溃的潜在问题。为了解决这个问题,我们建议添加一个全局响应规范化层来增强信道间的特征竞争
2. FCMA( Fully Convolutional Masked Autoencoder)

2.1 掩码
2.1.1 MAE的掩码
在正式进入ConvNeXt V2的掩码设计之前,我觉得有必要先看一下MAE的掩码是怎么实现的。
(1)掩码
def random_masking(self, x, mask_ratio):"""Perform per-sample random masking by per-sample shuffling.Per-sample shuffling is done by argsort random noise.x: [N, L, D], sequence"""N, L, D = x.shape # batch, length, dimlen_keep = int(L * (1 - mask_ratio))#保留量#拉一条同样长度的噪声,在大噪声处上掩码noise = torch.rand(N, L, device=x.device) # sort noise for each sampleids_shuffle = torch.argsort(noise, dim=1) #升序排列ids_restore = torch.argsort(ids_shuffle, dim=1)ids_keep = ids_shuffle[:, :len_keep]x_masked = torch.gather(x, dim=1, index=ids_keep.unsqueeze(-1).repeat(1, 1, D))#从原tensor中获取指定dim和指定index的数据# generate the binary mask: 0 is keep, 1 is removemask = torch.ones([N, L], device=x.device)mask[:, :len_keep] = 0# unshuffle to get the binary maskmask = torch.gather(mask, dim=1, index=ids_restore)return x_masked, mask, ids_restore#x_masked:图像上掩码的仍然保留的数据#mask:在原始图像中的掩码,0:保留,1:掩码#ids_restore:noise从打乱ids_shuffle到恢复的序号
参考下面这段代码就比较直观的看出两个argsort在实际上是在获得噪音和原始坐标从小到大的序号
import torch
len_keep=2#保留两个
x=torch.rand((1,4,1))#对应 N,L,D
print("x",x)
noise = torch.rand(1, 4)
print("noise",noise)
ids_shuffle = torch.argsort(noise, dim=1)#noise从小到大的序号
print("ids_shuffle",ids_shuffle)
ids_restore = torch.argsort(ids_shuffle, dim=1)#noise从打乱ids_shuffle到恢复的序号
print("ids_restore",ids_restore)
N, L, D = x.shape# keep the first subset
ids_keep = ids_shuffle[:, :len_keep]
print("ids_keep",ids_keep)
x_masked = torch.gather(x, dim=1, index=ids_keep.unsqueeze(-1).repeat(1, 1, D))
print("x_masked",x_masked)
# generate the binary mask: 0 is keep, 1 is remove
mask = torch.ones([N, L], device=x.device)
mask[:, :len_keep] = 0
print("mask",mask)
# unshuffle to get the binary mask
mask = torch.gather(mask, dim=1, index=ids_restore)
print("mask",mask)#在原始图像中的掩码位置
(2)掩码的使用
在encoder中patch_embed之后
2.1.2 ConvNeXt V2的掩码
由于卷积模型具有分层设计,其中在不同阶段对特征进行下采样,因此在最后阶段生成掩码,并递归地上采样,直到达到最佳分辨率。
(1)掩码
def gen_random_mask(self, x, mask_ratio):N = x.shape[0]L = (x.shape[2] // self.patch_size) 2len_keep = int(L * (1 - mask_ratio))noise = torch.randn(N, L, device=x.device)# sort noise for each sampleids_shuffle = torch.argsort(noise, dim=1)ids_restore = torch.argsort(ids_shuffle, dim=1)# generate the binary mask: 0 is keep 1 is removemask = torch.ones([N, L], device=x.device)mask[:, :len_keep] = 0# unshuffle to get the binary maskmask = torch.gather(mask, dim=1, index=ids_restore)return mask基本上也是大差不差
(2)掩码的使用:编码器encoder设计
两个挑战:
- 防止模型学习允许其从掩蔽区域复制和粘贴信息的shortcut。
- 保留2D图像结构
在MAE中图片被拉成长条(N, L, D),因此使用Mask其实是非常得心应手的,但是在 ConvNeXt V2 中始终是一个四维(N,C,H,W)的,即保留了2d的图像结构
解决办法:
将稀疏卷积纳入框架中,以促进掩蔽自动编码器的预训练
具体的代码直接参考SparseConvNeXtV2
class Block(nn.Module):""" Sparse ConvNeXtV2 Block. Args:dim (int): Number of input channels.drop_path (float): Stochastic depth rate. Default: 0.0layer_scale_init_value (float): Init value for Layer Scale. Default: 1e-6."""def __init__(self, dim, drop_path=0., D=3):super().__init__()self.dwconv = MinkowskiDepthwiseConvolution(dim, kernel_size=7, bias=True, dimension=D)self.norm = MinkowskiLayerNorm(dim, 1e-6)self.pwconv1 = MinkowskiLinear(dim, 4 * dim) self.act = MinkowskiGELU()self.pwconv2 = MinkowskiLinear(4 * dim, dim)self.grn = MinkowskiGRN(4 * dim)self.drop_path = MinkowskiDropPath(drop_path)def forward(self, x):input = xx = self.dwconv(x)x = self.norm(x)x = self.pwconv1(x)x = self.act(x)x = self.grn(x)x = self.pwconv2(x)x = input + self.drop_path(x)return x2.2 解码器 和 损失函数
解码器:使用一个轻量级的、普通的ConvNeXt块作为解码器
损失函数 :MSE重建损失
3.全局响应归一化
3.1 引入全局响应归一化的原因:“特征崩溃”现象
“特征崩溃”现象:有许多停滞或饱和的特征图,并且激活在通道之间变得多余。
3.2 全局响应归一化
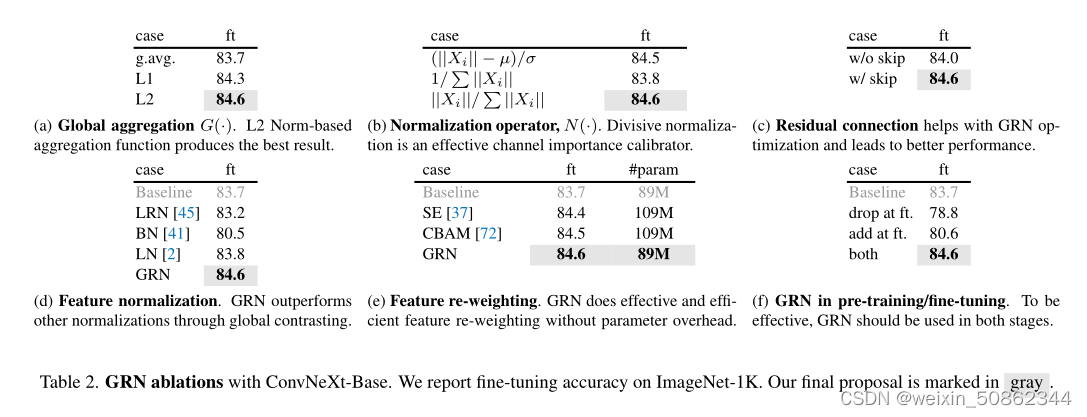
在这项工作中,我们引入了一种新的响应归一化层,称为全局响应归一化(GRN),旨在提高通道的对比度和选择性。所提出的GRN单元由三个步骤组成:
1)全局特征聚合
全局函数G(·)将空间特征地图 聚合为向量gx,实验结果是使用L2范数效果最好
2)特征归一化

3)特征校准
使用计算的特征归一化分数来校准原始输入响应

3.3 实现
没有使用稀疏卷积的实现:
class GRN(nn.Module):""" GRN (Global Response Normalization) layer"""def __init__(self, dim):super().__init__()self.gamma = nn.Parameter(torch.zeros(1, 1, 1, dim))self.beta = nn.Parameter(torch.zeros(1, 1, 1, dim))def forward(self, x):Gx = torch.norm(x, p=2, dim=(1,2), keepdim=True)Nx = Gx / (Gx.mean(dim=-1, keepdim=True) + 1e-6)return self.gamma * (x * Nx) + self.beta + x