Hudi集成Flink

安装Maven
1)上传apache-maven-3.6.3-bin.tar.gz到/opt/software目录,并解压更名
tar -zxvf apache-maven-3.6.3-bin.tar.gz -C /opt/module/
mv apache-maven-3.6.3 maven
2)添加环境变量到/etc/profile中
sudo vim /etc/profile
#MAVEN_HOME
export MAVEN_HOME=/opt/module/maven
export PATH=$PATH:$MAVEN_HOME/bin
3)测试安装结果
source /etc/profile
mvn -v
- 修改setting.xml,指定为阿里仓库地址
vim /opt/module/maven/conf/settings.xml
<!-- 添加阿里云镜像-->
<mirror>
<id>nexus-aliyun</id>
<mirrorOf>central</mirrorOf>
<name>Nexus aliyun</name>
<url>http://maven.aliyun.com/nexus/content/groups/public</url>
</mirror>
编译Hudi源码
源码下载地址:https://github.com/apache/hudi/releases/tag/release-0.12.0
- 解压hudi源码包到/opt/software文件夹下
cd /opt/software
tar -zxvf hudi-release-0.12.0.tar.gz
- 修改pom文件
vim /opt/software/hudi-0.12.0/pom.xml
新增repository加速依赖下载
<repository>
<id>nexus-aliyun</id>
<name>nexus-aliyun</name>
<url>http://maven.aliyun.com/nexus/content/groups/public/</url>
<releases>
<enabled>true</enabled>
</releases>
<snapshots>
<enabled>false</enabled>
</snapshots>
</repository>
3)修改依赖的组件版本
<hadoop.version>3.1.3</hadoop.version>
<hive.version>3.1.2</hive.version>
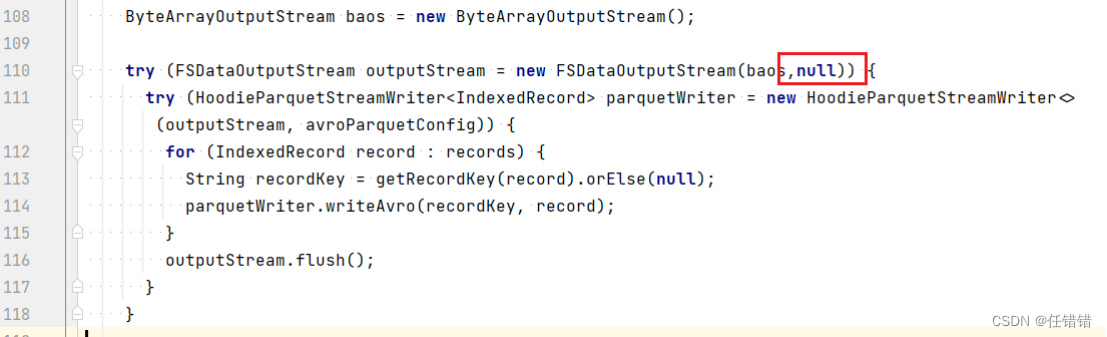
修改源码使其兼容Hadoop3
Hudi默认依赖的hadoop2,要兼容hadoop3,除了修改版本,还需要修改如下代码:
vim /opt/software/hudi-0.12.0/hudi-common/src/main/java/org/apache/hudi/common/table/log/block/HoodieParquetDataBlock.java
修改第110行,原先只有一个参数,添加第二个参数null:
4)手动安装Kafka依赖
有几个kafka的依赖需要手动安装,否则编译报错如下:
[ERROR] Failed to execute goal on project hudi-utilities_2.12: Could not resolve dependencies for project org.apache.hudi:hudi-utilities_2.12:jar:0.12.0: The following artifacts could not be resolved: io.confluent:kafka-avro-serializer:jar:5.3.4, io.confluent:common-config:jar:5.3.4, io.confluent:common-utils:jar:5.3.4, io.confluent:kafka-schema-registry-client:jar:5.3.4: Failure to find io.confluent:kafka-avro-serializer:jar:5.3.4 in https://maven.aliyun.com/repository/public was cached in the local repository, resolution will not be reattempted until the update interval of aliyunmaven has elapsed or updates are forced -> [Help 1]
下载jar包
通过网址下载:http://packages.confluent.io/archive/5.3/confluent-5.3.4-2.12.zip
解压后找到以下jar包,上传服务器hadoop102任意位置
jar包放在了本课程的资料包中。
- common-config-5.3.4.jar
- common-utils-5.3.4.jar
- kafka-avro-serializer-5.3.4.jar
- kafka-schema-registry-client-5.3.4.jar
install到maven本地仓库
mvn install:install-file -DgroupId=io.confluent -DartifactId=common-config -Dversion=5.3.4 -Dpackaging=jar -Dfile=./common-config-5.3.4.jar
mvn install:install-file -DgroupId=io.confluent -DartifactId=common-utils -Dversion=5.3.4 -Dpackaging=jar -Dfile=./common-utils-5.3.4.jar
mvn install:install-file -DgroupId=io.confluent -DartifactId=kafka-avro-serializer -Dversion=5.3.4 -Dpackaging=jar -Dfile=./kafka-avro-serializer-5.3.4.jar
mvn install:install-file -DgroupId=io.confluent -DartifactId=kafka-schema-registry-client -Dversion=5.3.4 -Dpackaging=jar -Dfile=./kafka-schema-registry-client-5.3.4.jar
5) Hudi集成Flink
我们将编译好的hudi-flink1.14-bundle_2.12-0.11.0.jar放到Flink的lib目录下
cp /opt/software/hudi-0.12.0/packaging/hudi-flink-bundle/target/ hudi-flink1.14-bundle-0.12.0.jar /opt/module/flink/lib/
解决guava依赖冲突
cp /opt/module/hadoop/share/hadoop/common/lib/guava-27.0-jre.jar /opt/module/flink/lib/
将项目用到的connector的jar包放入flink的lib中
#需要下载的jar放入flink的lib
https://repo.maven.apache.org/maven2/org/apache/flink/flink-sql-connector-kafka_2.12/1.13.6/flink-sql-connector-kafka_2.12-1.13.6.jar
https://repo1.maven.org/maven2/com/ververica/flink-sql-connector-mysql-cdc/2.2.1/flink-sql-connector-mysql-cdc-2.2.1.jar
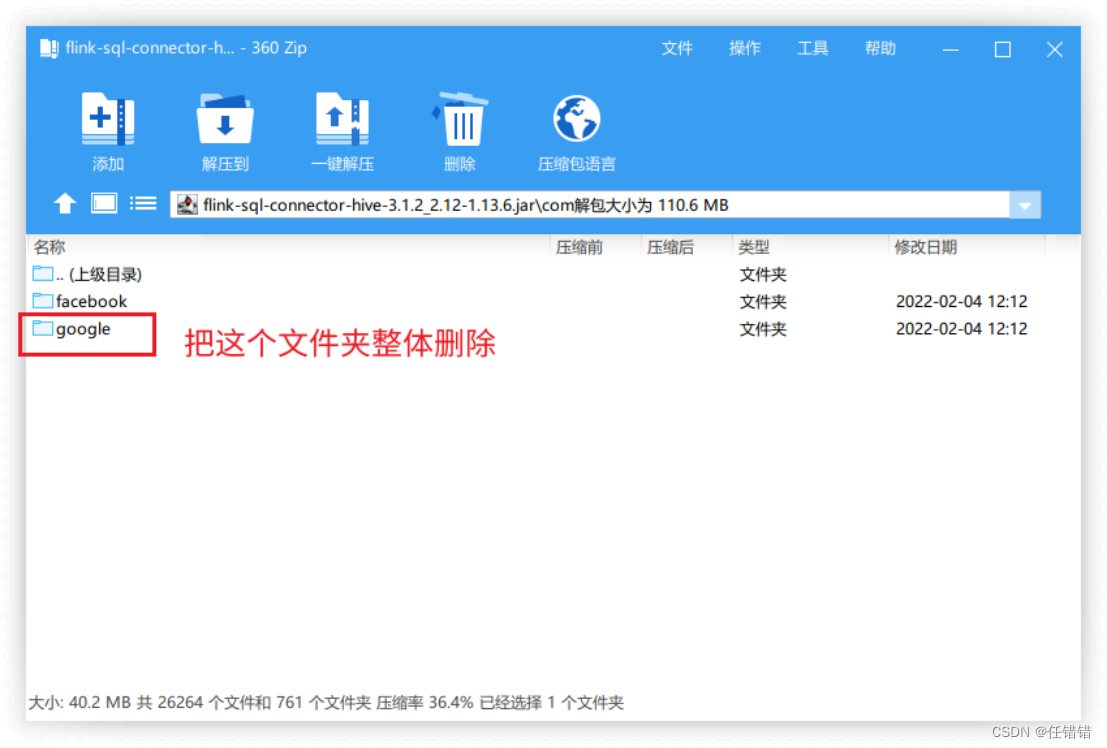
https://repo.maven.apache.org/maven2/org/apache/flink/flink-sql-connector-hive-3.1.2_2.12/1.13.6/flink-sql-connector-hive-3.1.2_2.12-1.13.6.jar
需要注意:
(1) hive-connector必须解决guava冲突。使用压缩软件打开jar,删除 com目录下的google文件夹
(2) 解决找不到hadoop的依赖问题
cp /opt/module/hadoop-3.1.3/share/hadoop/mapreduce/hadoop-mapreduce-client-core-3.1.3.jar flink/lib
Hudi集成Hive
解压Hive
把apache-hive-3.1.2-bin.tar.gz上传到Linux的/opt/software目录下
解压apache-hive-3.1.2-bin.tar.gz到/opt/module/目录下面
tar -zxvf /opt/software/apache-hive-3.1.3-bin.tar.gz -C /opt/module/
修改apache-hive-3.1.2-bin.tar.gz的名称为hive
mv /opt/module/apache-hive-3.1.2-bin/ /opt/module/hive
将Hudi集成至Hive
将 hudi-hadoop-mr-bundle-0.12.0.jar和hudi-hive-sync-bundle-0.12.0.jar放到hive节点的lib目录下;
cp /opt/software/hudi-0.12.0/packaging/hudi-hadoop-mr-bundle/target/hudi-hadoop-mr-bundle-0.12.0.jar /opt/module/hive/lib/
cp /opt/software/hudi-0.12.0/packaging/hudi-hive-sync-bundle/target/hudi-hive-sync-bundle-0.12.0.jar /opt/module/hive/lib/
配置Hive与环境变量
修改/etc/profile.d/my_env.sh,添加环境变量
sudo vim /etc/profile.d/my_env.sh
添加内容
#HIVE_HOME
export HIVE_HOME=/opt/module/hive
export PATH=$PATH:$HIVE_HOME/bin
source操作
source /etc/profile.d/my_env.sh
将MySQL的JDBC驱动拷贝到Hive的lib目录下
cp /opt/software/mysql-connector-java-5.1.37.jar $HIVE_HOME/lib
在$HIVE_HOME/conf目录下新建hive-site.xml文件
[atguigu@hadoop102 software]$ vim $HIVE_HOME/conf/hive-site.xml
添加如下内容:
<?xml version="1.0"?>
<?xml-stylesheet type="text/xsl" href="configuration.xsl"?>
<configuration>
<!-- jdbc连接的URL -->
<property>
<name>javax.jdo.option.ConnectionURL</name>
<value>jdbc:mysql://hadoop102:3306/metastore?useSSL=false&useUnicode=true&characterEncoding=UTF-8</value>
</property>
<!-- jdbc连接的Driver-->
<property>
<name>javax.jdo.option.ConnectionDriverName</name>
<value>com.mysql.jdbc.Driver</value>
</property>
<!-- jdbc连接的username-->
<property>
<name>javax.jdo.option.ConnectionUserName</name>
<value>root</value>
</property>
<!-- jdbc连接的password -->
<property>
<name>javax.jdo.option.ConnectionPassword</name>
<value>123456</value>
</property>
<!-- Hive默认在HDFS的工作目录 -->
<property>
<name>hive.metastore.warehouse.dir</name>
<value>/user/hive/warehouse</value>
</property>
<!-- Hive元数据存储的验证 -->
<property>
<name>hive.metastore.schema.verification</name>
<value>false</value>
</property>
<!-- 元数据存储授权 -->
<property>
<name>hive.metastore.event.db.notification.api.auth</name>
<value>false</value>
</property>
<!-- 指定hiveserver2连接的host -->
<property>
<name>hive.server2.thrift.bind.host</name>
<value>hadoop102</value>
</property>
<!-- 指定hiveserver2连接的端口号 -->
<property>
<name>hive.server2.thrift.port</name>
<value>10000</value>
</property>
<!-- hiveserver2高可用参数,开启此参数可以提高hiveserver2启动速度 -->
<property>
<name>hive.server2.active.passive.ha.enable</name>
<value>true</value>
</property>
<!-- 指定metastore服务的地址 -->
<property>
<name>hive.metastore.uris</name>
<value>thrift://hadoop102:9083</value>
</property>
<!-- 打印表名 -->
<property>
<name>hive.cli.print.header</name>
<value>true</value>
</property>
<!-- 打印库名 -->
<property>
<name>hive.cli.print.current.db</name>
<value>true</value>
</property></configuration>
初始化Hive元数据库
登录MySQL
mysql -uroot -p123456
新建Hive元数据库
mysql> create database metastore;
mysql> quit;
初始化Hive元数据库(修改为采用MySQL存储元数据)
bin/schematool -dbType mysql -initSchema -verbose
启动Hive Metastore和Hiveserver2服务(附脚本)
启动hiveserver2和metastore服务的命令如下:
bin/hive --service hiveserver2
bin/hive --service metastore
Flink 同步Hive
1)使用方式
Flink hive sync 现在支持两种 hive sync mode, 分别是 hms 和 jdbc 模式。 其中 hms 只需要配置 metastore uris;而 jdbc 模式需要同时配置 jdbc 属性 和 metastore uris,具体配置模版如下:
## hms mode 配置
CREATE TABLE t1(
uuid VARCHAR(20),
name VARCHAR(10),
age INT,
ts TIMESTAMP(3),
`partition` VARCHAR(20)
)
PARTITIONED BY (`partition`)
with(
'connector'='hudi',
'path' = 'hdfs://xxx.xxx.xxx.xxx:9000/t1',
'table.type'='COPY_ON_WRITE', -- MERGE_ON_READ方式在没生成 parquet 文件前,hive不会有输出
'hive_sync.enable'='true', -- required,开启hive同步功能
'hive_sync.table'='${hive_table}', -- required, hive 新建的表名
'hive_sync.db'='${hive_db}', -- required, hive 新建的数据库名
'hive_sync.mode' = 'hms', -- required, 将hive sync mode设置为hms, 默认jdbc
'hive_sync.metastore.uris' = 'thrift://ip:9083' -- required, metastore的端口
);
2)案例实操
CREATE TABLE t11(
id int,
num int,
ts int,
primary key (id) not enforced
)
PARTITIONED BY (num)
with(
'connector'='hudi',
'path' = 'hdfs://ns1:8020/hudi/hudi_dwd/t11',
'table.type'='COPY_ON_WRITE',
'hive_sync.enable'='true',
'hive_sync.table'='h10',
'hive_sync.db'='smart_village',
'hive_sync.mode' = 'hms',
'hive_sync.metastore.uris' = 'thrift://szxc-13:9083'
);
insert into t10 values(1,1,1);