WangEdtior富文本编辑器

WangEdtior官网,提供了vue2、vue3的安装方式>>
原生js使用

<!DOCTYPE html>
<html lang="en"><head><meta charset="UTF-8"><meta http-equiv="X-UA-Compatible" content="IE=edge"><meta name="viewport" content="width=device-width, initial-scale=1.0"><title>Document</title><link href="https://unpkg.com/@wangeditor/editor@latest/dist/css/style.css" rel="stylesheet"><script src="https://unpkg.com/@wangeditor/editor@latest/dist/index.js"></script><style>#editor—wrapper {border: 1px solid #ccc;z-index: 100;/* 按需定义 */width: 800px;margin: 10px auto;}#toolbar-container {border-bottom: 1px solid #ccc;}#editor-container {height: 150px;}p {/* 将p的margin改为0, 不然会出现改了#editor-container的高度,编辑器已经足够放下内容了,但是仍然会有滚动条出现的问题 */margin: 0 !important;line-height: 1.3em;}.w-e-scroll>div:first-child {padding-top: 15px; /* 将输入起始位置与“请输入内容对齐” */}</style>
</head><body><div id="editor—wrapper"><!-- 工具栏 --><div id="toolbar-container"></div><!-- 编辑器 --><div id="editor-container"></div></div></body>
<script>const { createEditor, createToolbar } = window.wangEditor/* 编辑器配置 */const editorConfig = {placeholder: '请输入内容...',onChange(editor) {const html = editor.getHtml()console.log('editor content', html)}}/* 编辑器 */const editor = createEditor({selector: '#editor-container',html: '<p><br></p>',config: editorConfig,mode: 'default', // or 'simple'})/* 工具栏配置 */const toolbarConfig = {}/* 工具栏 */const toolbar = createToolbar({editor,selector: '#toolbar-container',config: toolbarConfig,mode: 'default', // or 'simple'})
</script></html>
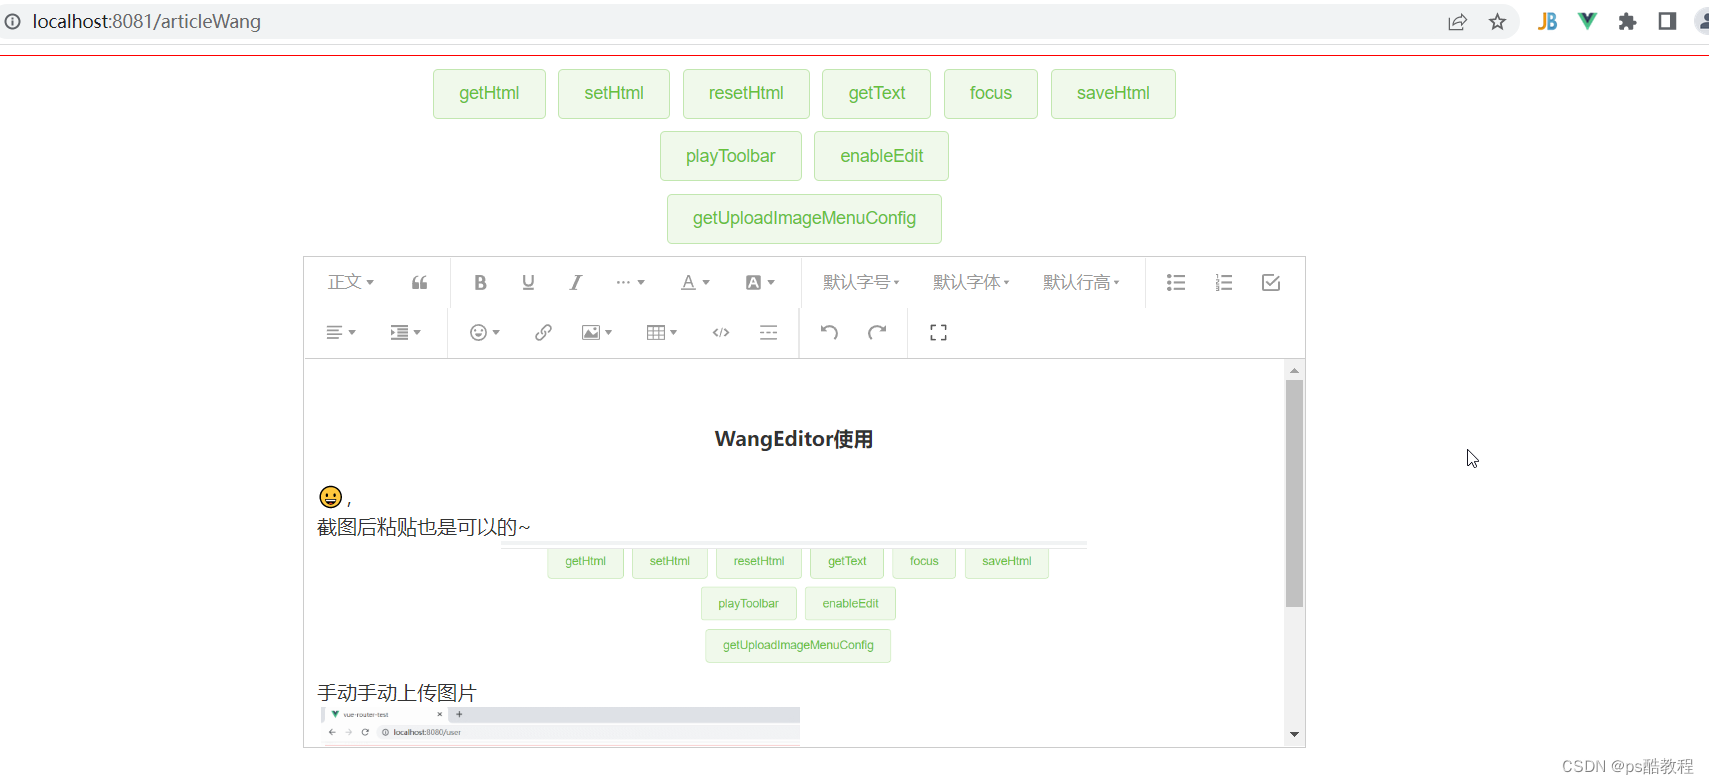
vue2
安装wangEditor
npm install @wangeditor/editor --save
npm install @wangeditor/editor-for-vue --save
ArticleWang.vue
<style>
p {/* 将p的margin改为0, 不然会出现改了#editor-container的高度,编辑器已经足够放下内容了,但是仍然会有滚动条出现的问题 */margin: 0 !important;line-height: 1.3em;
}.w-e-scroll>div:first-child {padding-top: 15px;/* 将输入起始位置与“请输入内容对齐” */
}
</style>
<template><div style="border: 1px solid red;padding: 10px;"><!-- 按钮组 --><div style="text-align: center;"><el-button type="success" plain @click="getHtml">getHtml</el-button><el-button type="success" plain @click="setHtml">setHtml</el-button><el-button type="success" plain @click="resetHtml">resetHtml</el-button><el-button type="success" plain @click="getText">getText</el-button><el-button type="success" plain @click="focus">focus</el-button><el-button type="success" plain @click="saveHtml">saveHtml</el-button></div><div style="text-align: center;margin-top: 10px;"><el-button type="success" plain @click="playToolbar">playToolbar</el-button><el-button type="success" plain @click="enableEdit">enableEdit</el-button></div><div style="text-align: center;margin-top: 10px;"><el-button type="success" plain @click="getUploadImageMenuConfig">getUploadImageMenuConfig</el-button></div><!-- 编辑器 --><div style="border: 1px solid #ccc; width: 800px;margin: 10px auto 0;"><!-- 工具栏 --><Toolbar style="border-bottom: 1px solid #ccc" :editor="editor" :defaultConfig="toolbarConfig" :mode="mode" /><!-- 编辑器 --><Editor style="height: 310px;" v-model="htmlContent" :defaultConfig="editorConfig" :mode="mode"@onCreated="onCreated" @onChange="onChange"/></div><div style="width: 800px;margin: 10px auto;" v-html="htmlContent"></div></div>
</template><script>import { Editor, Toolbar } from '@wangeditor/editor-for-vue'/* 可以用来获取toolbar */
import { DomEditor } from '@wangeditor/editor'/* 引入wangEditor的样式 */
import '@wangeditor/editor/dist/css/style.css'import axiosInstance from '@/utils/request'export default {name: 'ArticleWang',components: {Editor, Toolbar},data() {return {editor: null,                 /* 编辑器实例,在编辑器创建完成时,赋值 */htmlContent: '<p>hello</p>',  /* 编辑器内容 */toolbarConfig: {              /* 工具栏配置 */excludeKeys: ['group-video'  // 排除视频这个菜单]},editorConfig: {               /* 编辑器配置 */placeholder: '请输入内容...',// maxLength: 50, // 限制长度50MENU_CONF: {emotion: { // 表情菜单emotions: '😀 😃 😄 😁 😆 😅 😂 🤣 😊 😇 🙂 🙃 😉'.split(' ') // 数组},uploadImage: { // 图片上传server: 'http://localhost:8083/article/uploadImg', /* 上传接口 */fieldName: 'mfile', /* 文件参数名 */"allowedFileTypes": [ /* 允许的文件类型 */"image/*"],maxFileSize: 10 * 1024 * 1024, /* 单个文件的最大体积限制,默认为 2M */maxNumberOfFiles: 10, /* 最多可上传几个文件,默认为 100 */// 自定义上传参数,例如传递验证的 token 等。参数会被添加到 formData 中,一起上传到服务端。meta: {token: 'xxx',otherKey: 'yyy'},// 将 meta 拼接到 url 参数中,默认 falsemetaWithUrl: false,// 自定义增加 http  headerheaders: {Accept: 'application/json;charset=utf-8',otherKey: 'xxx'},// 跨域是否传递 cookie ,默认为 falsewithCredentials: true,// 超时时间,默认为 10 秒timeout: 5 * 1000, // 5 秒// 自定义插入图片/* 上传成功的返回格式:{"errno": 0, // 注意:值是数字,不能是字符串"data": {"url": "xxx", // 图片 src ,必须"alt": "yyy", // 图片描述文字,非必须"href": "zzz" // 图片的链接,非必须}}上传失败的返回格式:{"errno": 1, // 只要不等于 0 就行"message": "失败信息"}如果你的服务端 response body 无法按照上文规定的格式,则无法插入图片,提示失败。但你可以使用 customInsert 来自定义插入图片) *//* customInsert(res, insertFn) {// 从 res 中找到 url alt href ,然后插入图片// insertFn(url, alt, href)insertFn(`http://localhost:8083/img/${res.data}`)}, *//* 自己实现文件上传 */customUpload(file, insertFn) {// file 即选中的文件// 自己实现上传,并得到图片 url alt href// 最后插入图片// 拿到 files 之后上传到文件服务器,然后向编辑框中插入对应的内容let formData = new FormData()formData.append('mfile', file)axiosInstance({url: "http://127.0.0.1:8083/article/uploadImg",method: 'POST',data: formData,headers: { 'Content-Type': 'multipart/form-data' }}).then(res => {insertFn('http://127.0.0.1:8083/img/' + res, res)console.log('插入成功');})},},insertImage: {/* 插入过的图片都会回调这个方法,最后保存富文本时,比较插入的记录和最终获取的image(editor.getElemsByType('image')),就能知道该删除哪些图片 */onInsertedImage(imageNode) {console.log('onInsertedImage->imageNode',imageNode);}}}},mode: 'default',editorEnabled: true,}},methods: {onCreated(editor) {/* 编辑器创建完毕时的回调函数。 */this.editor = Object.seal(editor) // 一定要用 Object.seal() ,否则会报错},onChange(editor) {/* 编辑器内容、选区变化时的回调函数 */console.log('有人在动编辑器');},  getHtml() {console.log(this.editor.getHtml());},setHtml() {/* 这里设置的内容只能是从wangEditor中获取的内容哦 */this.editor.setHtml('<p>模拟 Ajax 异步设置内容 SETHTML</p>')},resetHtml() {this.editor.setHtml('')},getText() {console.log(this.editor.getText());},focus() {this.editor.focus() // 获取焦点,光标的位置默认会回到之前的位置闪烁},saveHtml() {axiosInstance({url: "http://127.0.0.1:8083/article/save",method: 'POST',data: { htmlContent: this.htmlContent },}).then(res => {console.log('成功');})},playToolbar() {const toolbar = DomEditor.getToolbar(this.editor)const curToolbarConfig = toolbar.getConfig()/* 当前菜单排序和分组, 目的是可以知道默认的工具栏配置 */console.log(curToolbarConfig.toolbarKeys)/* 可获取编辑器所有菜单 */console.log(this.editor.getAllMenuKeys());console.log(curToolbarConfig === this.toolbarConfig)  // false, 不是同一个},enableEdit() {/* 开启或禁用 编辑 */if (this.editorEnabled) {this.editor.disable()} else {this.editor.enable()}this.editorEnabled = !this.editorEnabled},getUploadImageMenuConfig() { /* 获取图片上传菜单的默认配置 */console.log(this.editor.getMenuConfig('uploadImage'));console.log(JSON.stringify(this.editor.getMenuConfig('uploadImage'))); // 获取 uploadImage菜单 的当前配置/*{         "server":"","fieldName":"wangeditor-uploaded-image","maxFileSize":2097152,"maxNumberOfFiles":100,"allowedFileTypes":["image/*"],"meta":{},"metaWithUrl":false,"withCredentials":false,"timeout":10000,"base64LimitSize":0}*/}},mounted() {// 模拟 ajax 请求,异步渲染编辑器setTimeout(() => {this.htmlContent = '<p>模拟 Ajax 异步设置内容 HTML</p>'}, 1500)},beforeDestroy() {const editor = this.editorif (editor == null) returneditor.destroy() // 组件销毁时,及时销毁编辑器}
}
</script>
request.js
import axios from 'axios'
import router from '@/router'const instance = axios.create({baseURL: 'http://localhost:8083',timeout: 60000,withCredentials: true /* 需要设置这个选项,axios发送请求时,才会携带cookie, 否则不会携带 */
})// Add a request interceptor
instance.interceptors.request.use(function (config) {// Do something before request is sentreturn config;}, function (error) {// Do something with request errorreturn Promise.reject(error);});// Add a response interceptor
instance.interceptors.response.use(function (response) {// Any status code that lie within the range of 2xx cause this function to trigger// Do something with response dataconsole.log('收到响应',response);if(response.data.code == 401) {router.push('/login')}return response.data.data;}, function (error) {// Any status codes that falls outside the range of 2xx cause this function to trigger// Do something with response errorreturn Promise.reject(error);});export default instance
WebConfig
@Configuration
public class WebConfig implements WebMvcConfigurer {@Overridepublic void addCorsMappings(CorsRegistry registry) {registry.addMapping("/").maxAge(3600).allowCredentials(true).allowedOrigins("*").allowedMethods("*").allowedHeaders("*").exposedHeaders("token","Authorization");}@Overridepublic void addResourceHandlers(ResourceHandlerRegistry registry) {registry.addResourceHandler("/img/").addResourceLocations("file:/D:\\\\Projects\\\\vue-springboot\\\\src\\\\main\\\\resources\\\\static\\\\img\\\\");}
}
ArticleController
@RestController
@RequestMapping("article")
public class ArticleController {@PostMapping("uploadImg")public Result uploadImg(@RequestParam("mfile") MultipartFile mfile) throws IOException {String filename = mfile.getOriginalFilename();mfile.transferTo(new File("D:\\\\Projects\\\\vue-springboot\\\\src\\\\main\\\\resources\\\\static\\\\img\\\\"+filename));return Result.ok(filename);}
}
yml配置
server:port: 8083spring:datasource:type: com.zaxxer.hikari.HikariDataSourceurl: jdbc:mysql://localhost:3306/vue-springboot?serverTimezone=UTC&useSSL=falseusername: rootpassword: rootdriver-class-name: com.mysql.jdbc.Driverservlet:multipart:max-file-size: 50MBmax-request-size: 50MBmybatis-plus:mapper-locations: classpath:/mapper/.xml