C++使用Python3的API

目录
配置环境
第一步 导入Python3路径
第二步 测试环境
运行例程
1. 直接运行Python代码段
2. 运行Python脚本
4. 调用Python类
参考资料
配置环境
环境:Windows10、Visual Studio 2019、Python3.x
打开VS,建立空项目。
第一步 导入Python3路径
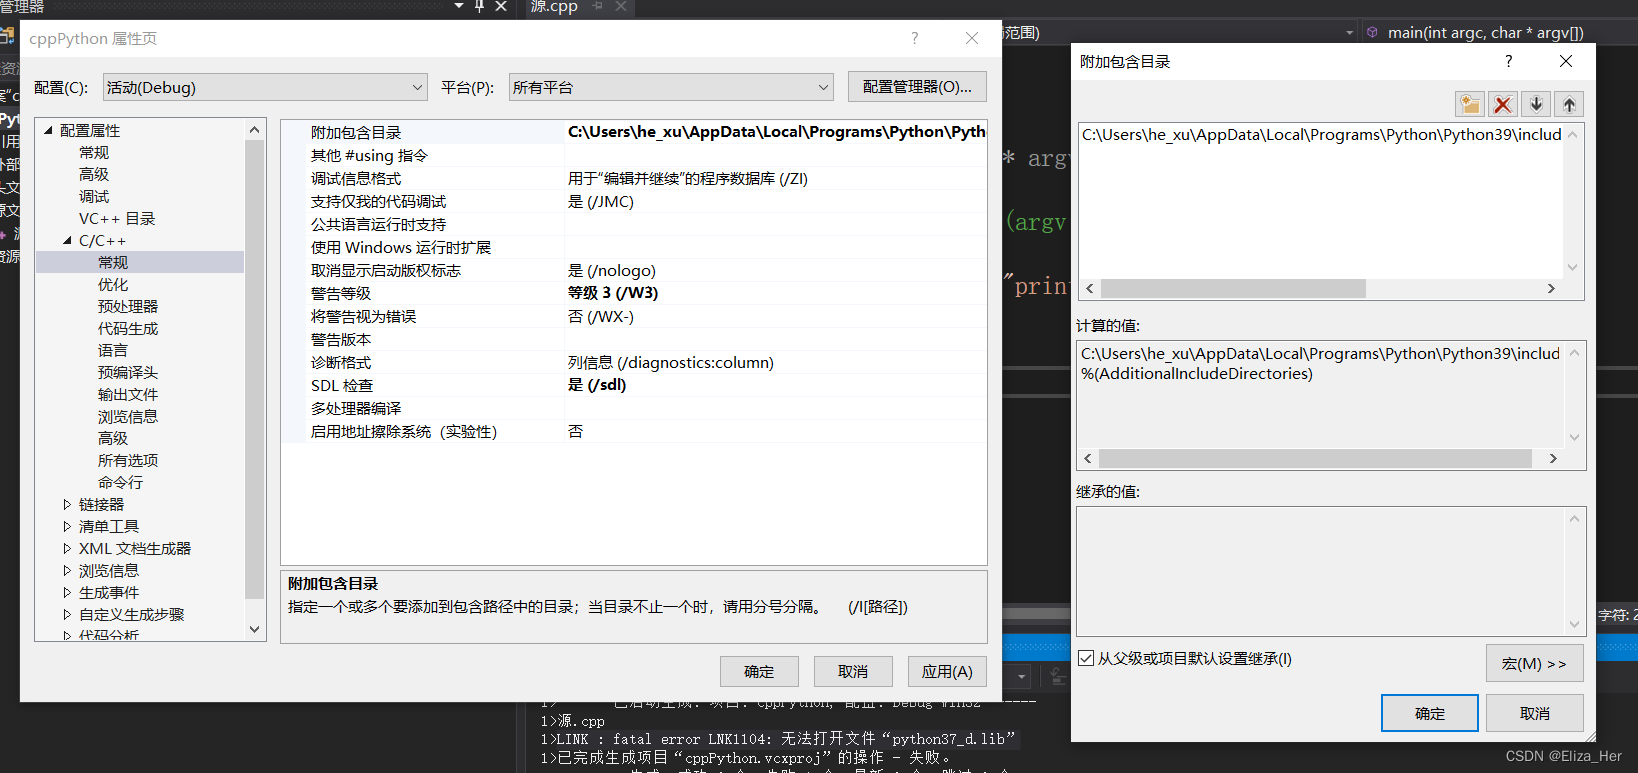
1. 项目→属性→C/C++→常规→附加包含目录,添加Python3安装路径\\include。
该文件夹下有Python.h,这就是C++调用Python的API前一定要include的库。
2. 项目→属性→VC++目录→库目录,添加Python3安装路径\\libs。
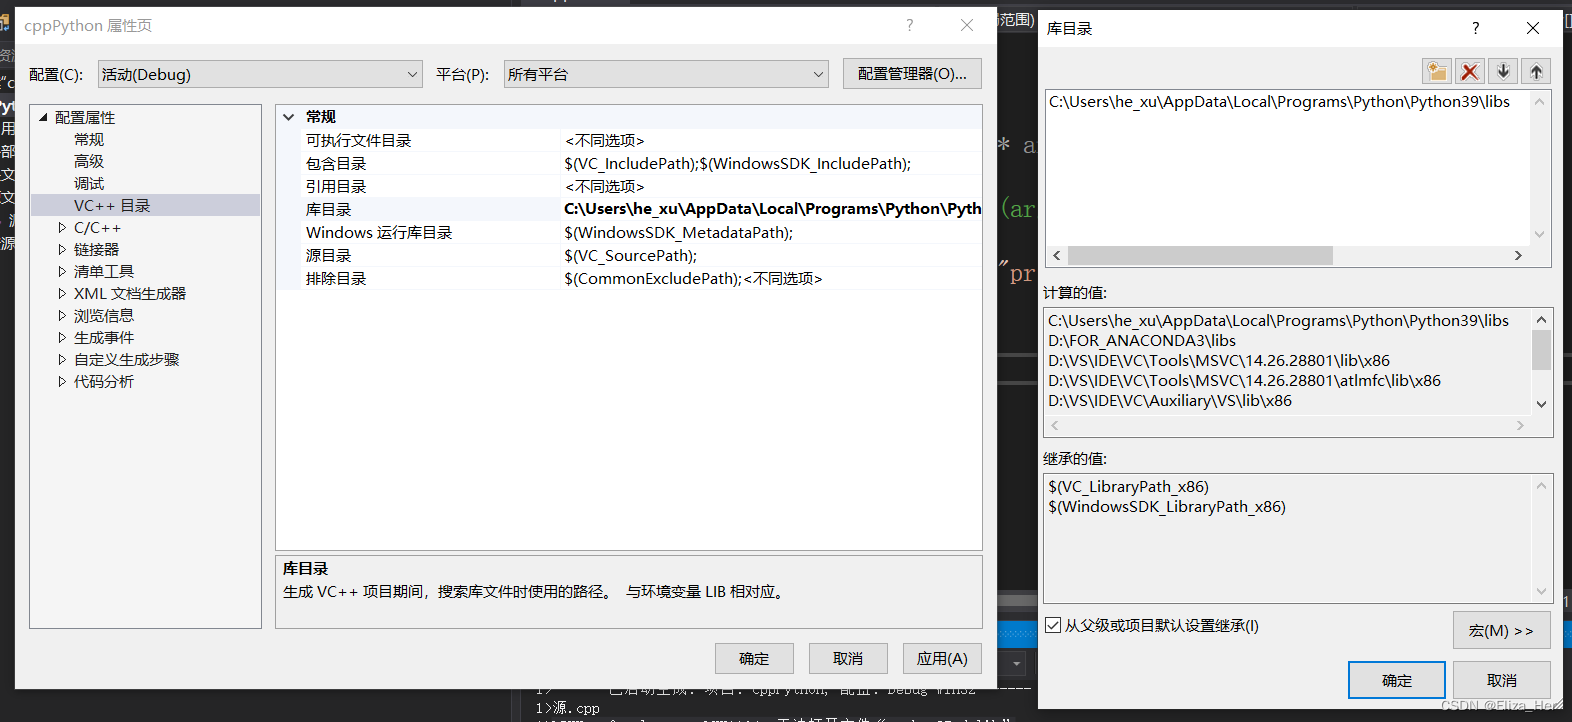
3. 项目→属性→VC++目录→库目录,添加Python3安装路径\\libs\\python39.lib。(如果Python版本是3.7则可以写python37.lib,以此类推)

4. 检查版本: 检查一下自己下载的Python是x86还是x64版本的,如果与VS版本不一致,可以在VS窗口上方调整项目版本。

第二步 测试环境
这是一个简单的helloworld程序。如果能够成功运行,则可以直接进入下一节。
#include <Python.h>int main(int argc, char* argv[])
{Py_Initialize();PyRun_SimpleString("print('Hello, world!')");Py_Finalize();return 0;
}
运行结果:

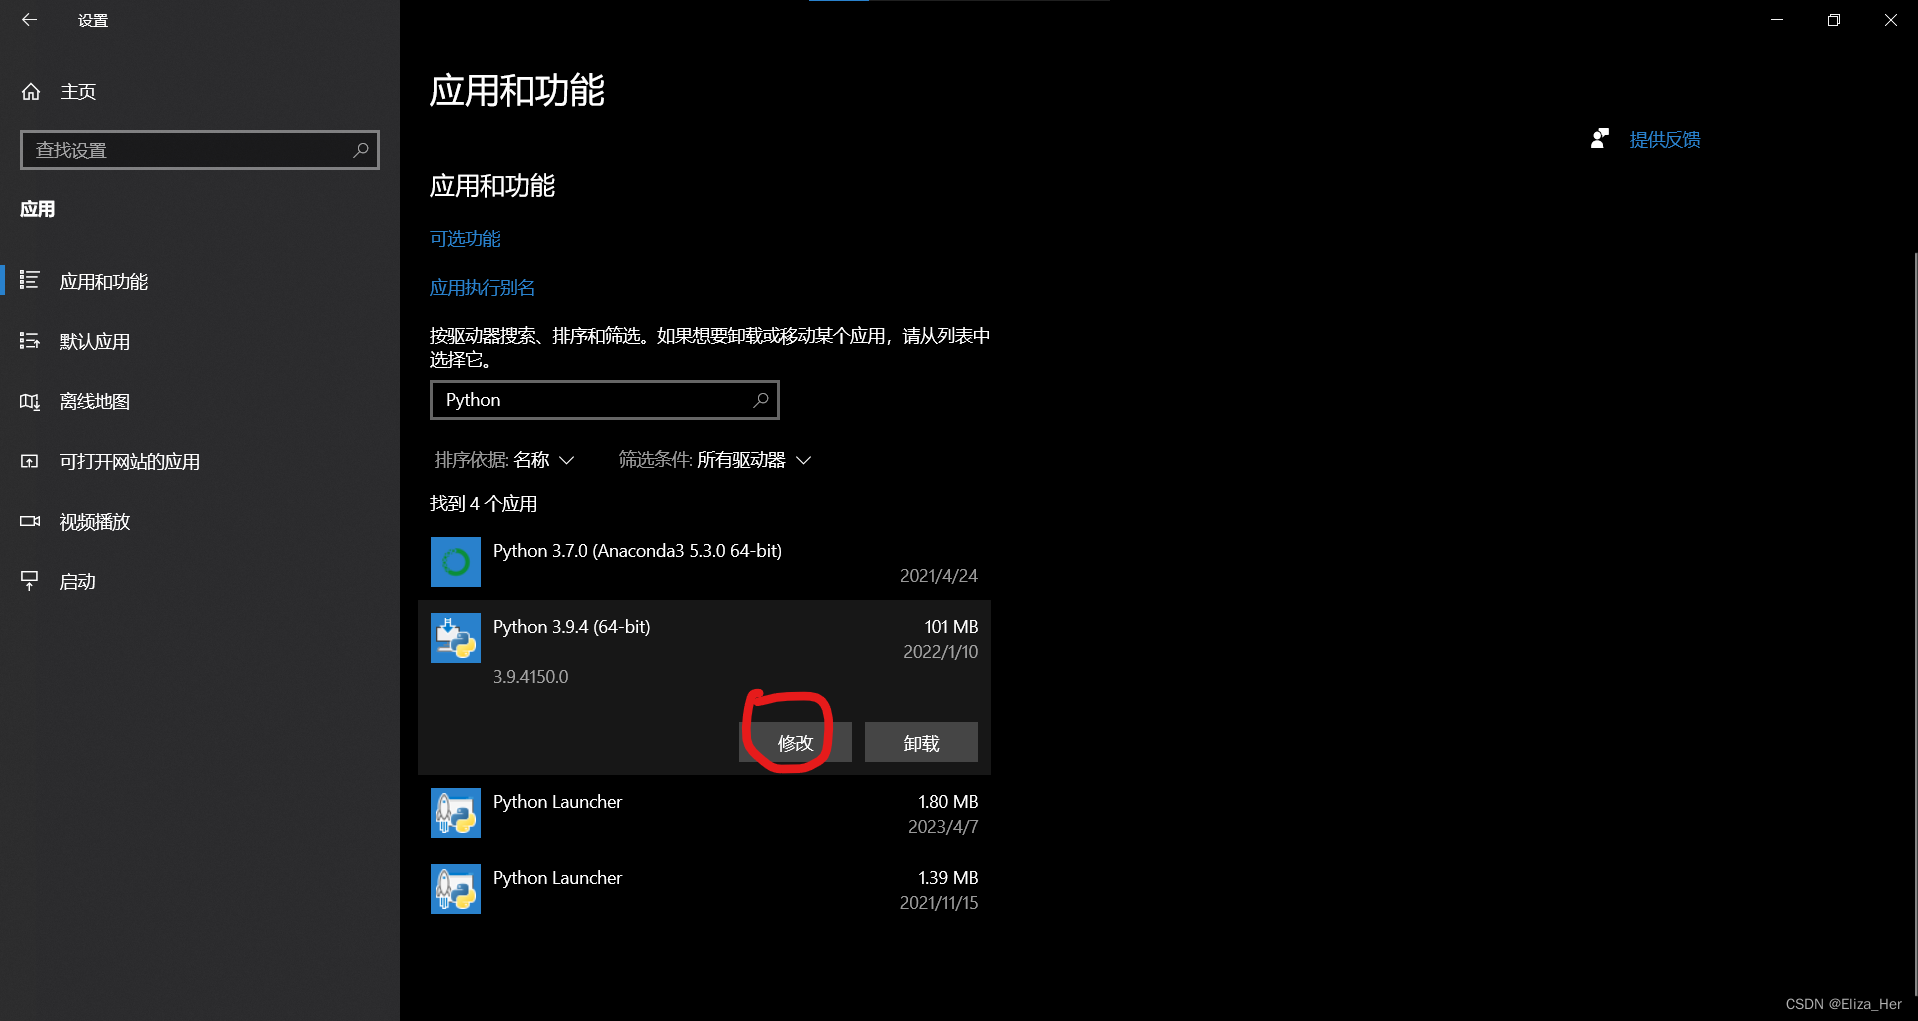
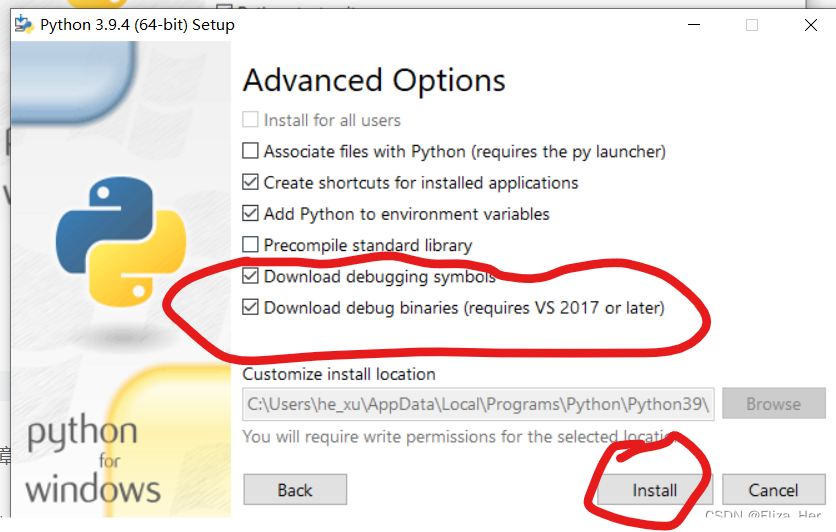
如果出现错误:LINK : fatal error LNK1104: 无法打开文件“python39_d.lib”,则说明没有安装Python的Debug功能,需要为Python增加Debug功能。增加方法如下图:
(注:针对该错误,除了本文中提到的方法,网上还有其它办法可供选择:扩展Python模块系列(一)----开发环境配置 - 建木 - 博客园 (cnblogs.com)。)


运行例程
C++调用Python的结构都如下:
#include <Python.h>int main(int argc, char* argv[])
{Py_Initialize(); //初始化//... ...Py_Finalize(); //结束,释放资源return 0;
}
注:下文仅包含C++运行或调用Python代码段、脚本、函数、类的基本方法,不包含进阶用法。
考虑到便利性,也由于其在 Python 解释器中被广泛使用, "Python.h" 还包含了一些标准头文件: <stdio.h> , <string.h> , <errno.h> 和 <stdlib.h> 。 如果后面的头文件在你的系统上不存在,它还会直接声明函数 malloc () , free () 和 realloc () 。
——Python官方文档
1. 直接运行Python代码段
#include <Python.h>int main(int argc, char* argv[])
{Py_Initialize(); PyRun_SimpleString("print('Hello from Python string')");Py_Finalize(); return 0;
}
2. 运行Python脚本
源目录下helloScript.py:
print("Hello from Python script")C++:
//my_python.c
#include <Python.h>int main(int argc, char* argv[])
{Py_Initialize(); PyObject* obj = Py_BuildValue("s", "helloScript.py");FILE* file = _Py_fopen_obj(obj, "r+");if (file != NULL){PyRun_SimpleFile(file, "helloScript.py");}Py_Finalize(); return 0;
}
3. 导入Python模块,调用Python函数
源目录下hello.py:
def Hello():print("Hello from Python module")def Add(a, b):print ("Add function: ", end="")print (str(a) + " + " + str(b) + " = " + str(a+b))return a + bC++:
#include <Python.h>int main(int argc, char* argv[])
{Py_Initialize(); //必须修改Python路径,否则会找不到Python模块PyRun_SimpleString("import sys");PyRun_SimpleString("sys.path.append('./')");PyObject* pModule = NULL;PyObject* pFunc = NULL;//import模块pModule = PyImport_ImportModule("hello");//模块文件名//找不到模块则报错if (pModule == nullptr) {PyErr_Print();Py_Finalize();return 0;}//1. 调用不带参数的函数 Hello()pFunc = PyObject_GetAttrString(pModule, "Hello");//函数名PyObject_CallFunction(pFunc, NULL);//调用函数//2. 调用带参数的函数 Add(a, b)PyObject* pAdd = NULL;PyObject* args = NULL;pAdd = PyObject_GetAttrString(pModule, "Add");args = Py_BuildValue("(ii)", 123, 456); //设置传入Add的参数PyObject* pRet = PyObject_CallObject(pAdd, args); //pRet = Add(123, 456)//输出返回值int ans = 0;PyArg_Parse(pRet, "i", &ans);//返回类型转换printf("Return C++: ans = %d\\n", ans);Py_Finalize(); return 0;
}
4. 调用Python类
源目录下helloClass.py:
class myClass:welcome = "Hello from Python class attribute"def hello(self):print("Hello from Python class method")def minus(self, a, b):print(str(a) + " - " + str(b) + " = " + str(a-b))return a-bC++:
#include <Python.h>int main(int argc, char* argv[])
{Py_Initialize(); //必须修改Python路径,否则会找不到Python模块PyRun_SimpleString("import sys");PyRun_SimpleString("sys.path.append('./')");PyObject* pModule2 = NULL;PyObject* pFunc2 = NULL;PyObject* pClass = NULL;PyObject* pInstance = NULL;PyObject* args2 = NULL;pModule2 = PyImport_ImportModule("helloClass");//这里是要调用的文件名helloClass.pyif (pModule2 == NULL){PyErr_Print();Py_Finalize();return 0;}// 模块的字典列表PyObject* pDict = PyModule_GetDict(pModule2);if (!pDict) {PyErr_Print();Py_Finalize();return 0;}//从字典中获取myClass类PyObject* pClassCalc = PyDict_GetItemString(pDict, "myClass");if (!pClassCalc) {PyErr_Print();Py_Finalize();return 0;}//构造实例PyObject* pInstanceCalc = PyInstanceMethod_New(pClassCalc);if (!pInstanceCalc) {PyErr_Print();Py_Finalize();return 0;}//获取pInstanceCalc实例的属性,转换成字符串并输出PyObject* obj2 = PyObject_GetAttrString(pInstanceCalc, "welcome");PyObject* str = PyUnicode_AsEncodedString(obj2, "utf-8", "strict");char* result = PyBytes_AsString(str);printf("%s\\n", result);//如果属性是int型,可用下面这句转换属性://int qwq;//PyArg_Parse(obj2, "i", &qwq);//调用无参数Python方法,s和pInstanceCalc对应Python中的selfPyObject_CallMethod(pClassCalc, "hello", "s", pInstanceCalc);//调用多参数Python方法,(s,i,i)和pInstanceCalc、12、22 分别对应Python方法中的 self、a、bpRet = PyObject_CallMethod(pClassCalc, "minus","(s,i,i)",pInstanceCalc, 12, 22);if (!pRet){PyErr_Print();Py_Finalize();return 0;}int res = 0;PyArg_Parse(pRet, "i", &res);//转换返回类型printf("Return C++: ans = %d\\n", res);Py_Finalize(); return 0;
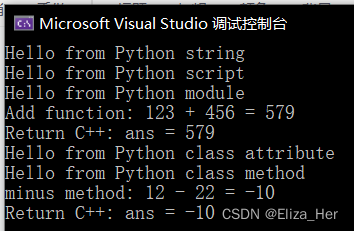
}把上面的四段代码整合到一起运行,控制台输出为:
参考资料
文档:
- 官方API文档:The Very High Level Layer — Python 3.10.11 documentation
- API文档中文版本:C++调用Python浅析_pyeval_callobject_magictong的博客-CSDN博客
- 官方使用教程:1. 在其它应用程序嵌入 Python — Python 3.7.13 文档
- 官方API手册:Python 中文文档 - Python/C API 参考手册 | Docs4dev
博客:
- 精炼:[Python]C用API与Python交互_cpython api_西北丰的博客-CSDN博客
- 初学:
- C++调用python脚本 - 知乎 (zhihu.com)
- [C++/Python] 如何在C++中使用一个Python类? (Use Python-defined class in C++) - Lancelod_Liu - 博客园 (cnblogs.com)
- c++调用python的代码、函数、类 - 简书 (jianshu.com)
- 细致:C语言扩展Python模块 - 随笔分类 - 建木 - 博客园 (cnblogs.com)
- 踩坑经验:这里要隆重的写一下C++调用python遇到的各种坑,搞了好久,终于成功了!_c++调用python initfsencoding: unable to load the fil_Darling100的博客-CSDN博客