vue+Nodejs+Koa搭建前后端系统(一)--简易版

前言
- vue3+ts+vite搭建前端框架
- node+koa搭建后端框架
- 包管理器使用npm(v8.5.5)
- HTTP请求使用axios
- 编辑器使用Visual Studio Code(以下简称VS Code)
- 本地项目目录:F:\\test\\vue_node\\hello-node\\
- 前端服务器地址http://127.0.0.1:5172/
- 后端服务器地址http://127.0.0.1:5173/
开始前请确保已全局安装Node
前端搭建
使用vite构建vue项目
在VS Code终端相应目录下输入以下命令:
npm create vite@latest hello-node -- --template vue-ts
不同包管理器,命令不同(我使用的是npm 8.5.5版本)。具体参见Vite中文官网
效果如下:

按指引分别键入命令
cd hello-node
npm install
npm run dev
效果如下:

此时已完成vue框架搭建,并启动了前端项目服务器(地址为http://127.0.0.1:5173/)
项目文件结构图:

安装并编写http请求
使用axios用于http请求。
安装axios,在终端输入:
npm install axios
在\\src\\App.vue文件中编写请求:
<script setup lang="ts">
import axios from "axios";
//post请求
function http(url: string, params = {}) {axios.request({url: `/nodeApi/${url}`,timeout: 8000,headers: { "X-Custom-Header": "foobar" },method: "post",data: params,}).then((res) => {console.log(`${url}响应:`, res);}).catch((err) => {console.error(`${url}错误信息:`, err);});
}
//不带参数的请求
function helloNode() {http("hello");
}
//带参数的请求
function goodbyeNode() {http("goodbye", { name: "xiaoyang" });
}
</script><template><button @click="helloNode">hello-node</button><button @click="goodbyeNode">goodbye-node</button>
</template><style scoped></style>
(注意,上面http函数中请求的url前缀/nodeApi/,用于代理识别,请看下一步)
配置HTTP代理
在项目根目录找到vite.config.ts文件,添加HTTP代理设置:
server: {proxy: {"/nodeApi": {target: "http://127.0.0.1:5152/",changeOrigin: true,rewrite: (path) => path.replace(/^\\/nodeApi/, ""),},},}
整体配置如下图:
 即当遇到HTTP请求为 nodeApi 前缀时,则向 http://127.0.0.1:5152/ 服务器地址发请求(target),允许跨域请求(changeOrigin),并将请求路径重写为去掉/nodeApi前缀(rewrite)。
比如上一步helloNode(),其原本请求路径为 http://127.0.0.1:5153/nodeApi/hello ,经过代理后,其请求实际为http://127.0.0.1:5152/hello。
后端搭建
搭建服务器
在项目根目录新建一个server文件夹(名字随意),用来放置node代码。
在VS Code终端打开这个文件夹:

在终端输入:
npm init -y
初始化后端项目。

package.json文件中的main字段表示的是后端程序的入口文件,这里是index.js。
在VS Code终端输入以下指令,安装koa框架:
npm install koa@2.0.0

在server文件夹下新建index.js文件。编写监听端口程序:
"use strict";
const Koa = require("koa");
const app = new Koa();
app.use(async (ctx, next) => {console.log(`Process ${ctx.request.method} ${ctx.request.url} ...`);await next();
});console.log("服务器已启动:本地地址:http://127.0.0.1:5152");
app.listen(5152);
在VS Code终端输入:
node index.js
启动服务器。
此时,在浏览器打开http://127.0.0.1:5152,就会在终端看到访问服务器的痕迹

(浏览器显示Not Found,是因为还没开始写路由,先稳住,不管它)

自定义服务器启动指令
可以像VUE一样使用npm run的方式,自定义启动指令。在package.json文件中script字段中写就可以了。
"server":"node index.js"
(server只是一个名字,随意)
然后,在终端键入 npm run server即可启动服务器。

注意!上面的启动指令只管启动,不会去监听项目文件变化而热重启服务器。这对于开发环境不太友好。可以用nodemon
安装nodemon:
(全局安装)
npm install -g nodemon
(本地安装)
npm install --save-dev nodemon
(二选一,我是本地安装)
在package.json文件中,把server的执行指令改为nodemon index.js
再次键入npm run server即可启动服务器并监听文件变化。

编写路由
在终端键入以下代码,安装路由
npm i koa-router --save
在index.js中编写路由
"use strict";const Koa = require("koa");
/引入koa-router */
const router = require("koa-router")();
const app = new Koa();app.use(async (ctx, next) => {console.log(`Process ${ctx.request.method} ${ctx.request.url} ...`);await next();
});/路由配置 Start */
router.get("/hello/:name", async (ctx, next) => {var name = ctx.params.name;ctx.response.body = `<h1>Hello Bad World! Mr/Miss ${name}</h1>`;
});
router.get("/", async (ctx, next) => {ctx.response.body = `Hello Node! I Get`;
});
router.post("/hello", async (ctx, next) => {ctx.response.body = `Hello Node! I Post`;
});
router.post("/goodbye", async (ctx, next) => {ctx.response.body = `Goodbye Node!`;
});
/路由配置 End *//路由加载 */
app.use(router.routes());console.log("服务器已启动:本地地址:http://127.0.0.1:5152");
app.listen(5152);
npm run server启动服务器,在浏览器可以看到:


将请求参数转化为json对象
http请求(request)和响应(response)的数据都是以文本形式传递。而大多数情况,我们需要将其变成json对象处理。
使用koa-bodyparser,可将请求参数处理成json对象。
安装koa-bodyparser,在终端输入:
npm i koa-bodyparser
修改index.js代码
"use strict";const Koa = require("koa");
const router = require("koa-router")();
/引入koa-bodyparser */
const bodyParser = require("koa-bodyparser");
const app = new Koa();app.use(async (ctx, next) => {console.log(`Process ${ctx.request.method} ${ctx.request.url} ...`);await next();
});
router.get("/hello/:name", async (ctx, next) => {var name = ctx.params.name;ctx.response.body = `<h1>Hello Bad World! Mr/Miss ${name}</h1>`;
});
router.get("/", async (ctx, next) => {ctx.response.body = `Hello Node! I Get`;
});
router.post("/hello", async (ctx, next) => {ctx.response.body = `Hello Node! I Post`;
});
router.post("/goodbye", async (ctx, next) => {/koa-bodyparser已将请求参数处理成json对象 */var name = ctx.request.body.name || "";ctx.response.body = `Goodbye ${name}!`;
});/koa-bodyparser加载 */
app.use(bodyParser());
app.use(router.routes());console.log("服务器已启动:本地地址:http://127.0.0.1:5152");
app.listen(5152);
测试请求与响应
启动前后台应用(如果没启动)
启动前台应用

启动后台应用

可以在这里查看和切换终端

气氛已然烘到这里,也是男有情女有意,只差我们指尖轻点,即可百年好合。
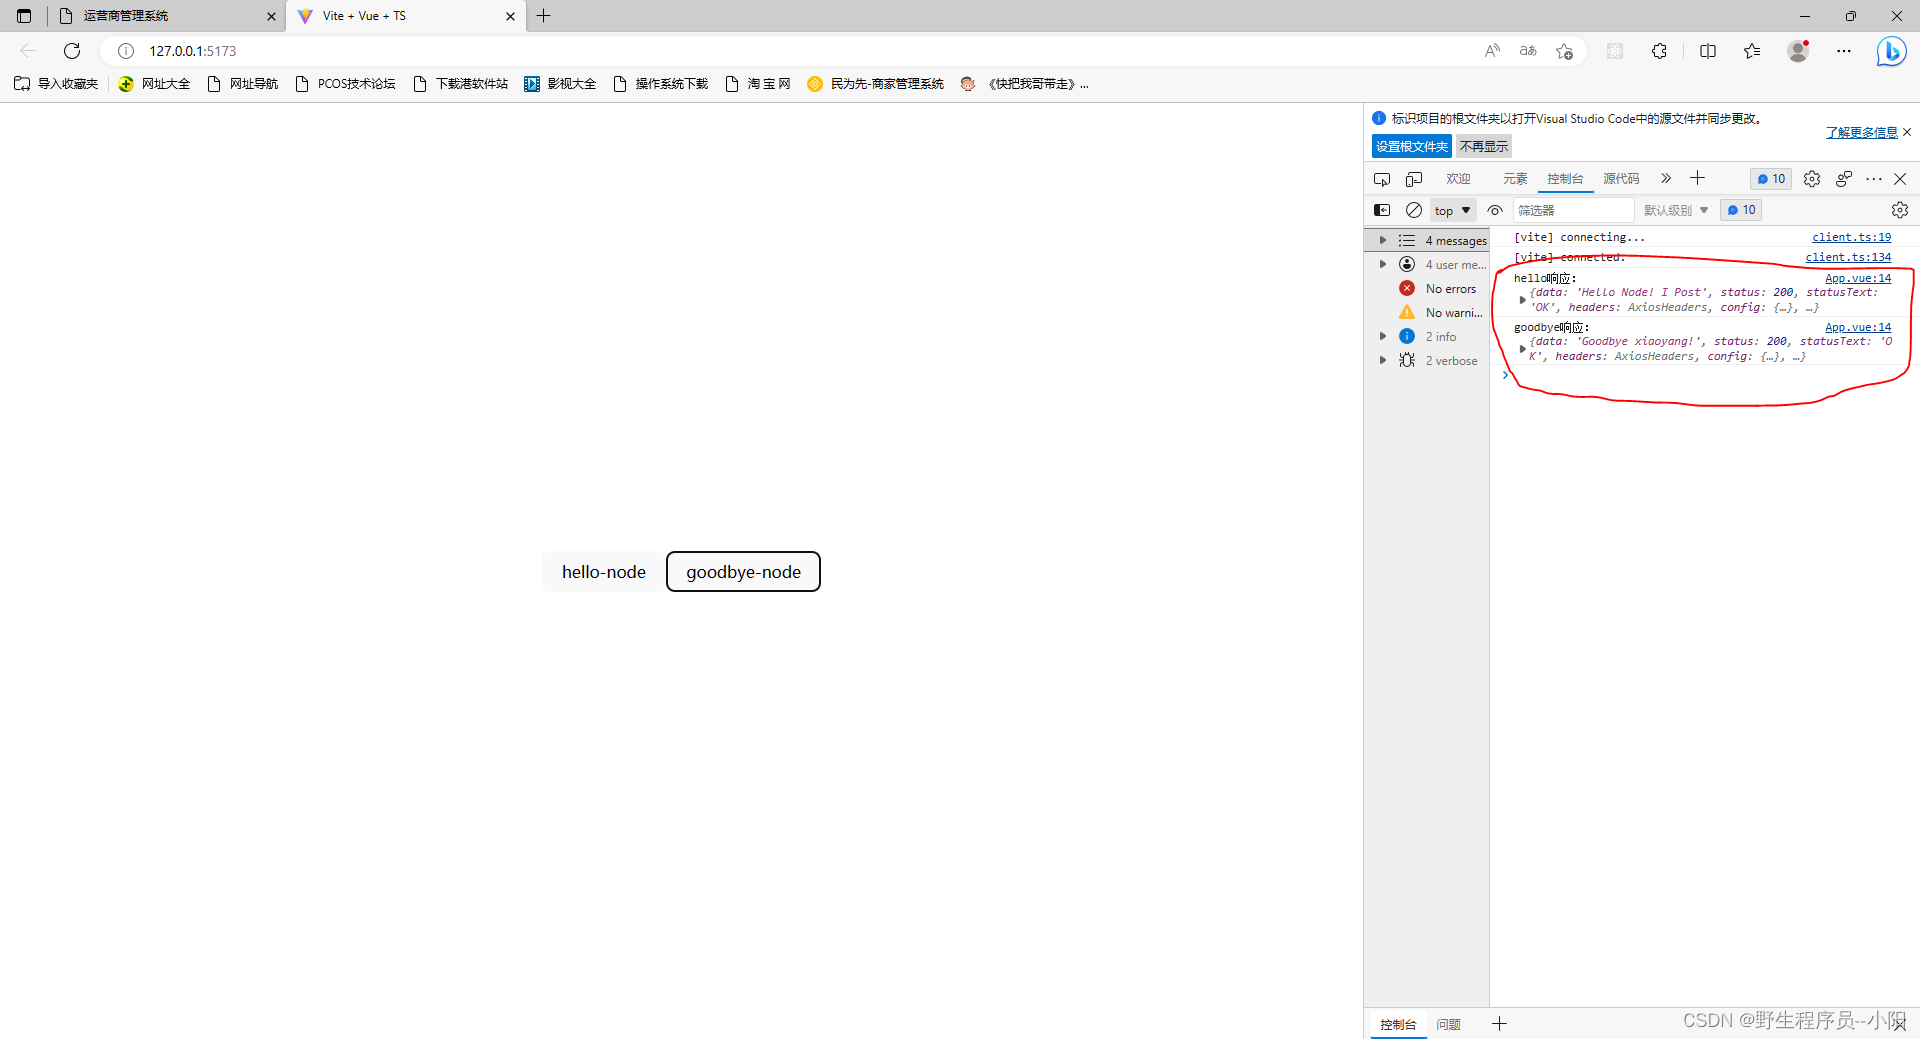
有情人终成眷属!