QT开发笔记(Serial Port )

Serial Port
Qt 提供了串口类,可以直接对串口访问。我们可以直接使用 Qt 的串口类编程即可,十分
方便。Qt 串口类不仅在 Windows 能用,还能在 Linux 下用,虽然串口编程不是什么新鲜事儿,
既然 Qt 提供了这方面的接口,我们就充分利用起来,这将会使我们的开发十分方便!其实 Qt
也提供了相关的 Qt 串口的例子,我们也可以直接参考来编程,笔者根据实际情况,化繁为易,
直接写了个简单的例子给大家参考。
资源简介
在正点原子的 I.MX6U 开发板的出厂系统里,默认已经配置了两路串口可用。一路是调试
串口UART1(对应系统里的节点/dev/ttymxc0),另一路是UART3(对应系统里的节点/dev/ttymxc2)。
由于 UART1 已经作为调试串口被使用。所以我们只能对 UART3 编程,(如需要使用多路串口,
请自行设计底板与系统)。
应用实例
项目简介:Qt 串口的使用示例,应用到正点原子 I.MX6U 开发板上。
例 03_serialport,Qt 串口编程(难度:一般)。项目路径为 Qt/3/03_serialport。
在 03_serialport.pro 里,我们需要使用串口,需要在 pro 项目文件中添加串口模块的支持,
如下。
1 # 添加串口模块支持 2 QT += core gui serialport 3 4 greaterThan(QT_MAJOR_VERSION, 4): QT += widgets 5 6 CONFIG += c++11 7 8 # The following define makes your compiler emit warnings if you use 9 # any Qt feature that has been marked deprecated (the exact warnings 10 # depend on your compiler). Please consult the documentation of the 11 # deprecated API in order to know how to port your code away from it. 12 DEFINES += QT_DEPRECATED_WARNINGS 13 14 # You can also make your code fail to compile if it uses deprecated APIs. 15 # In order to do so, uncomment the following line. 16 # You can also select to disable deprecated APIs only up to a certain
version of Qt. 17 #DEFINES += QT_DISABLE_DEPRECATED_BEFORE=0x060000 # disables all the
APIs deprecated before Qt 6.0.0 18 19 SOURCES += \\ 20 main.cpp \\ 21 mainwindow.cpp 22 23 HEADERS += \\ 24 mainwindow.h 25 26 # Default rules for deployment. 27 qnx: target.path = /tmp/$${TARGET}/bin 28 else: unix:!android: target.path = /opt/$${TARGET}/bin 29 !isEmpty(target.path): INSTALLS += target
第 2 行,添加的 serialport 就是串口模块的支持。
在头文件“mainwindow.h”的代码如下。
/ Copyright © Deng Zhimao Co., Ltd. 1990-2021. All rights reserved. * @projectName 03_serialport * @brief mainwindow.h * @author Deng Zhimao * @email 1252699831@qq.com * @net www.openedv.com * @date 2021-03-12 */ 1 #ifndef MAINWINDOW_H 2 #define MAINWINDOW_H 3 4 #include <QMainWindow> 5 #include <QSerialPort> 6 #include <QSerialPortInfo> 7 #include <QPushButton> 8 #include <QTextBrowser> 9 #include <QTextEdit> 10 #include <QVBoxLayout> 11 #include <QLabel> 12 #include <QComboBox> 13 #include <QGridLayout> 14 #include <QMessageBox> 15 #include <QDebug> 16 17 class MainWindow : public QMainWindow 18 { 19 Q_OBJECT 20 21 public: 22 MainWindow(QWidget *parent = nullptr); 23 ~MainWindow(); 24 25 private: 26 /* 串口对象 */ 27 QSerialPort *serialPort; 28 29 /* 用作接收数据 */ 30 QTextBrowser *textBrowser; 31 32 /* 用作发送数据 */ 33 QTextEdit *textEdit; 34 35 /* 按钮 */ 36 QPushButton *pushButton[2]; 37 38 /* 下拉选择盒子 */ 39 QComboBox *comboBox[5]; 40 41 /* 标签 */ 42 QLabel *label[5]; 43 44 /* 垂直布局 */ 45 QVBoxLayout *vboxLayout; 46 47 /* 网络布局 */ 48 QGridLayout *gridLayout; 49 50 /* 主布局 */ 51 QWidget *mainWidget; 52 53 /* 设置功能区域 */ 54 QWidget *funcWidget; 55 56 /* 布局初始化 */ 57 void layoutInit(); 58 59 /* 扫描系统可用串口 */ 60 void scanSerialPort(); 61 62 /* 波特率项初始化 */ 63 void baudRateItemInit(); 64 65 /* 数据位项初始化 */ 66 void dataBitsItemInit(); 67 68 /* 检验位项初始化 */ 69 void parityItemInit(); 70 71 /* 停止位项初始化 */ 72 void stopBitsItemInit(); 73 74 private slots: 75 void sendPushButtonClicked(); 76 void openSerialPortPushButtonClicked(); 77 void serialPortReadyRead(); 78 }; 79 #endif // MAINWINDOW_H
上面代码是在 mianwindow.h 里声明需要用到的变量,方法及槽函数。
mainwindow.cpp 的代码如下。
 / Copyright © Deng Zhimao Co., Ltd. 1990-2021. All rights reserved. * @projectName 03_serialport * @brief mainwindow.cpp * @author Deng Zhimao * @email 1252699831@qq.com * @net www.openedv.com * @date 2021-03-12 */ 1 #include "mainwindow.h" 2 #include <QDebug> 3 #include <QGuiApplication> 4 #include <QScreen> 5 #include <QRect> 6 7 MainWindow::MainWindow(QWidget *parent) 8 : QMainWindow(parent) 9 { 10 /* 布局初始化 */ 11 layoutInit(); 12 13 /* 扫描系统的串口 */ 14 scanSerialPort(); 15 16 /* 波特率项初始化 */ 17 baudRateItemInit(); 18 19 /* 数据位项初始化 */ 20 dataBitsItemInit(); 21 22 /* 检验位项初始化 */ 23 parityItemInit(); 24 25 /* 停止位项初始化 */ 26 stopBitsItemInit(); 27 } 28 29 void MainWindow::layoutInit() 30 { 31 /* 获取屏幕的分辨率,Qt 官方建议使用这
32 * 种方法获取屏幕分辨率,防上多屏设备导致对应不上
33 * 注意,这是获取整个桌面系统的分辨率
34 */ 35 QList <QScreen *> list_screen = QGuiApplication::screens(); 36 37 /* 如果是 ARM 平台,直接设置大小为屏幕的大小 */ 38 #if __arm__ 39 /* 重设大小 */ 40 this->resize(list_screen.at(0)->geometry().width(), 41 list_screen.at(0)->geometry().height()); 42 #else 43 /* 否则则设置主窗体大小为 800x480 */ 44 this->resize(800, 480); 45 #endif 46 /* 初始化 */ 47 serialPort = new QSerialPort(this); 48 textBrowser = new QTextBrowser(); 49 textEdit = new QTextEdit(); 50 vboxLayout = new QVBoxLayout(); 51 funcWidget = new QWidget(); 52 mainWidget = new QWidget(); 53 gridLayout = new QGridLayout(); 54 55 /* QList 链表,字符串类型 */ 56 QList <QString> list1; 57 list1<<"串口号:"<<"波特率:"<<"数据位:"<<"检验位:"<<"停止位:"; 58 59 for (int i = 0; i < 5; i++) { 60 label[i] = new QLabel(list1[i]); 61 /* 设置最小宽度与高度 */ 62 label[i]->setMinimumSize(80, 30); 63 /* 自动调整 label 的大小 */ 64 label[i]->setSizePolicy( 65 QSizePolicy::Expanding, 66 QSizePolicy::Expanding 67 ); 68 /* 将 label[i]添加至网格的坐标(0, i) */ 69 gridLayout->addWidget(label[i], 0, i); 70 } 71 72 for (int i = 0; i < 5; i++) { 73 comboBox[i] = new QComboBox(); 74 comboBox[i]->setMinimumSize(80, 30); 75 /* 自动调整 label 的大小 */ 76 comboBox[i]->setSizePolicy( 77 QSizePolicy::Expanding, 78 QSizePolicy::Expanding 79 ); 80 /* 将 comboBox[i]添加至网格的坐标(1, i) */ 81 gridLayout->addWidget(comboBox[i], 1, i); 82 } 83 84 /* QList 链表,字符串类型 */ 85 QList <QString> list2; 86 list2<<"发送"<<"打开串口"; 87 88 for (int i = 0; i < 2; i++) { 89 pushButton[i] = new QPushButton(list2[i]); 90 pushButton[i]->setMinimumSize(80, 30); 91 /* 自动调整 label 的大小 */ 92 pushButton[i]->setSizePolicy( 93 QSizePolicy::Expanding, 94 QSizePolicy::Expanding 95 ); 96 /* 将 pushButton[0]添加至网格的坐标(i, 5) */ 97 gridLayout->addWidget(pushButton[i], i, 5); 98 } 99 pushButton[0]->setEnabled(false); 100 101 /* 布局 */ 102 vboxLayout->addWidget(textBrowser); 103 vboxLayout->addWidget(textEdit); 104 funcWidget->setLayout(gridLayout); 105 vboxLayout->addWidget(funcWidget); 106 mainWidget->setLayout(vboxLayout); 107 this->setCentralWidget(mainWidget); 108 109 /* 占位文本 */ 110 textBrowser->setPlaceholderText("接收到的消息"); 111 textEdit->setText("www.openedv.com"); 112 113 /* 信号槽连接 */ 114 connect(pushButton[0], SIGNAL(clicked()), 115 this, SLOT(sendPushButtonClicked())); 116 connect(pushButton[1], SIGNAL(clicked()), 117 this, SLOT(openSerialPortPushButtonClicked())); 118 119 connect(serialPort, SIGNAL(readyRead()), 120 this, SLOT(serialPortReadyRead())); 121 } 122 123 void MainWindow::scanSerialPort() 124 { 125 /* 查找可用串口 */ 126 foreach (const QSerialPortInfo &info, 127 QSerialPortInfo::availablePorts()) { 128 comboBox[0]->addItem(info.portName()); 129 } 130 } 131 132 void MainWindow::baudRateItemInit() 133 { 134 /* QList 链表,字符串类型 */ 135 QList <QString> list; 136 list<<"1200"<<"2400"<<"4800"<<"9600" 137 <<"19200"<<"38400"<<"57600" 138 <<"115200"<<"230400"<<"460800" 139 <<"921600"; 140 for (int i = 0; i < 11; i++) { 141 comboBox[1]->addItem(list[i]); 142 } 143 comboBox[1]->setCurrentIndex(7); 144 } 145 146 void MainWindow::dataBitsItemInit() 147 { 148 /* QList 链表,字符串类型 */ 149 QList <QString> list; 150 list<<"5"<<"6"<<"7"<<"8"; 151 for (int i = 0; i < 4; i++) { 152 comboBox[2]->addItem(list[i]); 153 } 154 comboBox[2]->setCurrentIndex(3); 155 } 156 157 void MainWindow::parityItemInit() 158 { 159 /* QList 链表,字符串类型 */ 160 QList <QString> list; 161 list<<"None"<<"Even"<<"Odd"<<"Space"<<"Mark"; 162 for (int i = 0; i < 5; i++) { 163 comboBox[3]->addItem(list[i]); 164 } 165 comboBox[3]->setCurrentIndex(0); 166 } 167 168 void MainWindow::stopBitsItemInit() 169 { 170 /* QList 链表,字符串类型 */ 171 QList <QString> list; 172 list<<"1"<<"2"; 173 for (int i = 0; i < 2; i++) { 174 comboBox[4]->addItem(list[i]); 175 } 176 comboBox[4]->setCurrentIndex(0); 177 } 178 179 void MainWindow::sendPushButtonClicked() 180 { 181 /* 获取 textEdit 数据,转换成 utf8 格式的字节流 */ 182 QByteArray data = textEdit->toPlainText().toUtf8(); 183 serialPort->write(data); 184 } 185 186 void MainWindow::openSerialPortPushButtonClicked() 187 { 188 if (pushButton[1]->text() == "打开串口") { 189 /* 设置串口名 */ 190 serialPort->setPortName(comboBox[0]->currentText()); 191 /* 设置波特率 */ 192 serialPort->setBaudRate(comboBox[1]->currentText().toInt()); 193 /* 设置数据位数 */ 194 switch (comboBox[2]->currentText().toInt()) { 195 case 5: 196 serialPort->setDataBits(QSerialPort::Data5); 197 break; 198 case 6: 199 serialPort->setDataBits(QSerialPort::Data6); 200 break; 201 case 7: 202 serialPort->setDataBits(QSerialPort::Data7); 203 break; 204 case 8: 205 serialPort->setDataBits(QSerialPort::Data8); 206 break; 207 default: break; 208 } 209 /* 设置奇偶校验 */ 210 switch (comboBox[3]->currentIndex()) { 211 case 0: 212 serialPort->setParity(QSerialPort::NoParity); 213 break; 214 case 1: 215 serialPort->setParity(QSerialPort::EvenParity); 216 break; 217 case 2: 218 serialPort->setParity(QSerialPort::OddParity); 219 break; 220 case 3: 221 serialPort->setParity(QSerialPort::SpaceParity); 222 break; 223 case 4: 224 serialPort->setParity(QSerialPort::MarkParity); 225 break; 226 default: break; 227 } 228 /* 设置停止位 */ 229 switch (comboBox[4]->currentText().toInt()) { 230 case 1: 231 serialPort->setStopBits(QSerialPort::OneStop); 232 break; 233 case 2: 234 serialPort->setStopBits(QSerialPort::TwoStop); 235 break; 236 default: break; 237 } 238 /* 设置流控制 */ 239 serialPort->setFlowControl(QSerialPort::NoFlowControl); 240 if (!serialPort->open(QIODevice::ReadWrite)) 241 QMessageBox::about(NULL, "错误", 242 "串口无法打开!可能串口已经被占用!"); 243 else { 244 for (int i = 0; i < 5; i++) 245 comboBox[i]->setEnabled(false); 246 pushButton[1]->setText("关闭串口"); 247 pushButton[0]->setEnabled(true); 248 } 249 } else { 250 serialPort->close(); 251 for (int i = 0; i < 5; i++) 252 comboBox[i]->setEnabled(true); 253 pushButton[1]->setText("打开串口"); 254 pushButton[0]->setEnabled(false); 255 } 256 } 257 258 void MainWindow::serialPortReadyRead() 259 { 260 /* 接收缓冲区中读取数据 */ 261 QByteArray buf = serialPort->readAll(); 262 textBrowser->insertPlainText(QString(buf)); 263 } 264 265 MainWindow::~MainWindow() 266 { 267 }
第 29~121 行,界面布局初始化设置,在嵌入式里,根据实际的屏的大小,设置全屏显示。
其中我们用到垂直布局和网格布局,如果布局这方面内容理解不了,请回到第七章 7.5 小节学
习布局内容,学以致用理解的时候到了。
第 123~130 行,查找系统可用的串口,并添加串口名到 comboBox[0]中。
第 132~144 行,波特率初始化,预设常用的波特率,115200 作为默认选项。并添加波特率
到 comboBox[1]中。
第 146~155 行,数据位项初始化,设置默认数据位为 8。
第 157~166 行,校验位项初始化,默认无校验位。
第 168~177 行,停止位项初始化,默认停止位为 1。
第 179~184 行,发送数据,点击发送按钮时触发。
第 186~256 行,打开或者关闭串口。以我们设置的项使用 Qt 串口提供的设置串口的方法
如 setDataBits(QSerialPort::DataBits)等,按第 188~239 行步骤设置完串口需要配置的参数就可以
打开或者关闭串口了。
第 258~263 行,从缓冲区里读出数据,并显示到 textBrowser 里。
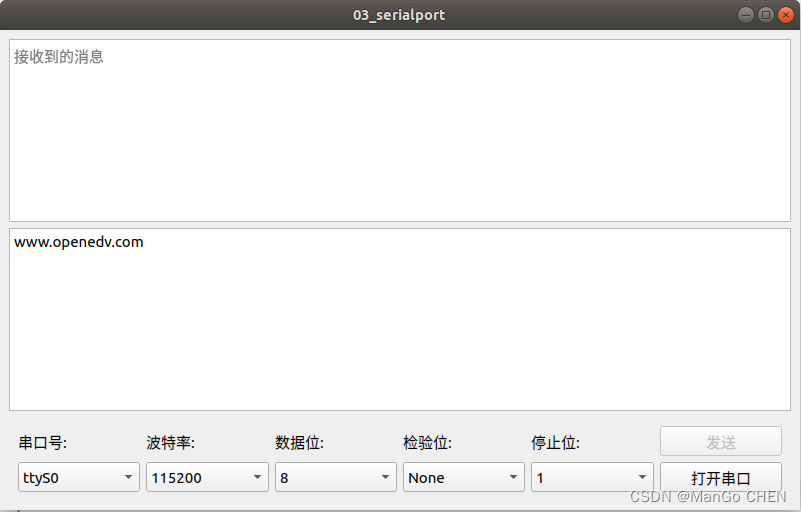
程序运行效果
下面为 Ubuntu 上仿真界面的效果,请将程序交叉编译后到开发板运行,用串口线连接开发
板的 UART3 到电脑串口,在电脑用正点原子的 XCOM 上位机软件(或者本程序亦可当上位机软
件),设置相同的串口参数,选择串口号为 ttymxc(2 注意 ttymxc0 已经作为调试串口被使用了!),
点击打开串口就可以进行消息收发了。默认参数为波特率为 115200,数据位为 8,校验为 None,
停止位为 1,流控为关闭。